![]()
![]()
A 3D object in GraphWorX64 enables an all-around visualization of an asset. This topic aims to guide you through adding and using 3D objects in GraphWorX64.
By default, a GraphWorX64 display is two dimensional only. When you want to add 3D objects, you must first create a 3D space that contains this object. The 3D viewport is such a space container.
Click on 3D View button  in the Shapes section of the Home tab of the ribbon.
The mouse cursor becomes a cross-hair.
Click anywhere in the GraphWorX64 display and drag to a desired size for the 3D space.
You can expand the size of the 3D space anytime by double-clicking outside the 3D space (so that 8 selection squares are around it) and dragging its corners.
For complete information about the 3D viewport, refer to the Activating and Creating a 3D Viewport and 3D Viewport Overview topics.
Primitive 3D objects are basic shapes you can use for creating images in a 3D display. To add one, follow these steps:
Double-click on the 3D space.
The ribbon should update to look like Figure 1.
Figure 1 - GraphWorX64 3D Ribbon

Click on any of the primitive 3D objects in the Primitive section of the ribbon as in Figure 2.
Figure 2 - Primitive 3D objects
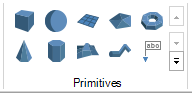
The selected primitive will be added to the middle of the 3D space.
For complete information, refer to the Primitives in 3D and Primitives for Creating Object from Scratch topics.
Select the 3D object that you wish to move.
Press the ‘W’ key or click on the Move button in the Manipulator section of the ribbon.
Arrows indicating the axes will appear on the object as in Figure 3.
Figure 3 - Movement Axis Indicators
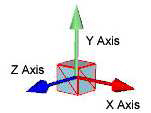
Left click, hold and drag on any of the axis arrows to move the object along that axis.
For a more precise movements, the following keys can be used :
Left/Right arrow keys to move along the X axis
Up/Down arrow keys to move along the Y axis
Pg-Up/Pg-Down to move along the Z axis (make sure Num lock is off)
For free movement, hold the middle mouse button and drag to move the object anywhere in the 3D space
For complete information about moving objects in the 3D viewport, refer to the Manipulator Section of the 3D Home Ribbon and More about Aligning 3D Objects topics. Also refer to the Transformations in 3D topic.
Click on the 3D object you wish to rotate
Press the ‘E’ key or click on the Rotate button in the Manipulator section of the ribbon.
Lines around the object indicating the axes will appear on as shown in Figure 4.
Figure 4 - Rotation Axis Indicators
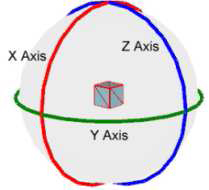
Left click, hold, and drag on any of the axis lines to rotate the object around that axis.
For more precise movements, the following keys can be used :
Up/Down arrow keys to rotate around the X axis
Pg-Up/Pg-Down to rotate around the Y axis (make sure Num Lock is off)
Left/Right arrow keys to rotate around the Z axis
For free movement, hold the middle mouse button and drag to rotate the object along any of the axes
For complete information about rotating objects in the 3D viewport, refer to the Manipulator Section of the 3D Home Ribbon topic.
Click on the 3D object that you wish to scale.
Press on the ‘R’ key or click on the Scale button in the Manipulator section of the ribbon.
Lines indicating the axis will appear on the object as in Figure 5.
Figure 5 - Scaling Axis Indicators
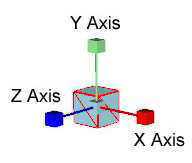
Left-click, hold, and drag on any of the axis to scale the object along that axis.
Left-click, hold, and drag the middle square to scale the object proportionally.
For more precise scaling, the following keys can be used:
Left/Right arrow keys to scale along the X axis
Up/Down arrow keys to scale along the Y axis
Pg-Up/Pg-Down to scale along the Z axis
For free scaling, hold the middle mouse button and drag to scale along any of the axis
For complete information about scaling objects in the 3D viewport, refer to the Manipulator Section of the 3D Home Ribbon topic.
Materials are the colors or images that are wrapped around a 3D object. You can apply a solid color as the material or a picture that resembles a brick wall to make your object look like it’s made of bricks. Applying a material allows you to create more realistic objects.
Click on the 3D object whose materials you wish.
Click on Materials on the ribbon. The ribbon should look like Figure 6.
Figure 6 - Materials Ribbon

Click on the Front Material button in the Material section of the ribbon to change the outer color or image of the object. Click OK.
Click on the Back Material button in the Material section of the ribbon to change the inner color or image of the object. Click OK.
Click on the 2D Material button to add ActiveX components and other 2D elements to faces of the object.
After clicking on Front Material and Back Material, you can click on any of the color boxes to change its property
Diffuse color changes the main color or image for the object.
Ambient color changes the color of the ambient light on the object.
Emissive color changes the color of the light emitted by the object.
Specular brush changes the color reflected on the object at certain angles.
For complete information about the materials tab of the 3D ribbon, refer to the Materials Ribbon for the 3D Viewport topic.
Images or textures are applied to a 3D object by way of mapping. Different mappings would result in different ways of putting the texture on the object.
You can apply an image as a material of a 3D object.
With the object selected, click on any of the mappings in the Texture section on the Materials tab as shown in Figure 7.
Figure 7 - Texture Mapping
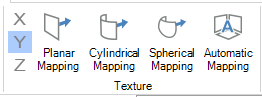
Here are the definition for each of the objects:
Planar Mapping: maps a texture on one plane
Cylindrical Mapping: maps a texture around a cylinder
Spherical Mapping: maps a texture around a sphere
Automatic Mapping: maps a texture automatically based on the object
X, Y, Z indicate along what axis you want to apply a particular mapping. If you choose Automatic Mapping, the axis selection will not make any difference.
For more information, refer to the Texture Section of the 3D Materials Ribbon topic.
Click on the 3D object you wish to add a size dynamic.
Click on Dynamics on the ribbon. The ribbon should look like Figure 8.
Figure 8 - Dynamics Ribbon

Click on the Size button in the Position section of the ribbon.
The properties of the size dynamic would show up in the dynamics list for the object which is by default, at the right.
Click on ‘Data Source’ and click on the ellipsis [...] button to launch the data browser.
Select a data source and click OK.
The low and high limits would dictate the range of values that this dynamic would be active.
Select the animation mode that you would like in the ‘AnimationMode’ field.
Analog – Size of object depends on the data source values.
Discrete – Size of object does not depend on the data source values. Data source merely starts or stops the animation.
Specify the start and end percentages of the actual size of the object.
Click on the SizeMode drop-down and click on any of the axis arrows to indicate the direction of the animation. You can select more than one arrow. When you are done, click away from the drop-down box.
For discrete animations, the following fields apply:
Duration – duration of animation from start percent to finish percent
ReverseAnimateWhenFalse – reverse the animation when dynamic becomes inactive
AutoReverse – reverse the animation automatically after its forward iteration is finished
RepeatCount – number of times to repeat this dynamic while its active
NOTE: If you do not see some of these objects, check that you are in the Advanced application mode.
For more information, refer to the Adding a 3D Dynamic and Add a 3D Size Dynamic and Set Properties topics.
Click on the 3D object you wish to add a location dynamic.
Click on the Location button in the Position section of the ribbon.
The properties of the location dynamic would show up in the dynamics list for the object which is by default, at the right.
Click on ‘Data Source’ and click on the button to launch the data browser.
Select a data source and click on OK.
The low and high limits would dictate the range of values that this dynamic would be active.
Click on ‘Path3D’ and click on the button to specify the 3D path for the object. The choices are "Edit Path On-Screen" and "Edit Path Vertex Values". Click on "Edit Path On-Screen".
In the 3D space, you should see something like Figure 9.
Figure 9 - 3D Path of Object
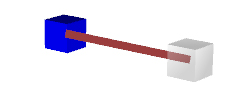
The transparent mirror of the selected object is the target location of the dynamic. Move it just as you would a primitive 3D object.
Click anywhere on the red line to add a location point. A sphere will appear with movement arrows.
Move the point to the desired location just as you would a primitive 3D object.
For more information, refer to the Adding a 3D Dynamic and Add a 3D Location Dynamic and Set Properties topics.
Click on the 3D object you wish to add a rotation dynamic.
Click on the Rotation button in the Position section of the ribbon.
The properties of the rotation dynamic would show up in the dynamics list for the object which is by default, at the right.
Click on ‘Data Source’ and click on the ellipsis [...] button to launch the data browser.
Select a data source and click OK.
The low and high limits would dictate the range of values that this dynamic would be active.
Specify the rotation direction in the ‘Clockwise’ field.
Specify the start and end angles, in degrees, of the rotation range.
Specify the axis to rotate on in the ‘Axis3D’ field.
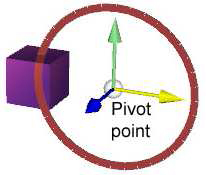
The pivot offset X, Y and Z fields dictate the pivot point of rotation for this object. The object would rotate around this pivot point.
The pivot point is shown initially as a sphere in the middle of the object, as in Figure 10. Move it just as you would any primitive 3D object..
Figure 10 - Pivot Point
For more information, refer to the Adding a 3D Dynamic and Add a 3D Rotation Dynamic and Set Properties topics.
Click on the 3D object that you wish to add a color dynamic.
Click on the Color button from the Visibility section of the ribbon.
Specify the data source.
Specify the values for the necessary color dynamic fields, like StartColor and EndColor.
A description for each item shows up at the bottom after you select it.
For more information, refer to the Adding a 3D Dynamic and Visibility Section of the 3D Dynamics Ribbon topics.
Click on the 3D object that you wish to add a disable dynamic.
Click on the Disable or Hide button from the Visibility section of the ribbon.
Specify the data source and when the object should be disabled or hidden based on the value of the data source.
For more information, refer to the Adding a 3D Dynamic and Visibility Section of the 3D Dynamics Ribbon topics.