![]()
![]()
One set of tools for moving, rotating, and scaling objects in GraphWorX64 3D are the buttons in the Manipulator section on the Home ribbon. In order to manipulate an object, you must first select the object or an aspect of the object, using the tools in the Selection Mode section.
|
|
Note: If an object is locked, you cannot select it. An object is locked if its Locked property is true or if in the Explorer the lock icon appears next to the object. You can unlock it by clicking the object’s lock icon. If the object is listed in the Explorer but you can not see it click the blank box next to the object. An eye icon will display, this is the hide, show icon. |
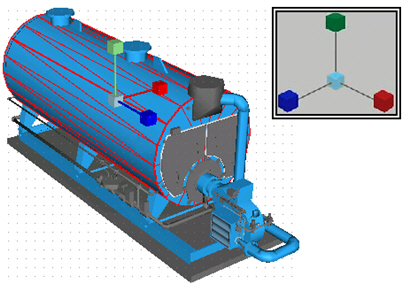
When one of these manipulators is active and one or more objects or sub-elements are selected, a manipulator is displayed in the pivot point of the selected object. If multiple objects or sub-elements are selected, the manipulator is displayed in the pivot point of the key object (that is, the last selected object).
Each manipulation is described in the remainder of this topic. Most of the manipulations can be done using the mouse or by using a hot key .
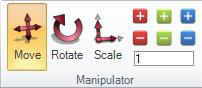
Move, rotate, or scale objects or sub-elements incrementally along an axis using the red, green, and blue plus (+) and minus (-) buttons.
How each of these manipulators works depends on the selection option you are using. (Selection options are described in Selection Mode Section of the 3D Home Ribbon.)
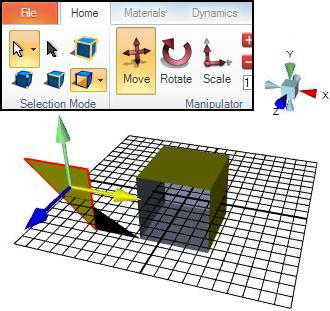
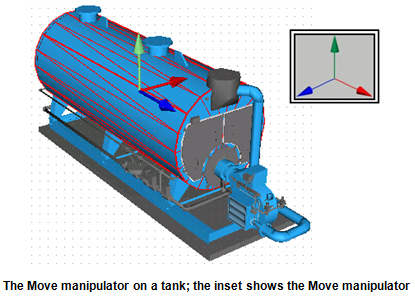
The Move manipulator is a three-directional tool that moves the selected object(s) in the 3D space. You can click and drag one of the pointers to drag the object(s) along the pointer’s axis. Depending on the selection mode you are using, the Move manipulator can move a sub-element of an object: a vertex, an edge, or face. In the following example, the triangular face of the cube has been moved to the left. (Selection options are described in Selection Mode Section of the 3D Home Ribbon.) To see an example of a cube face being moved, click here. To see and example of a sphere's face being moved, click here.
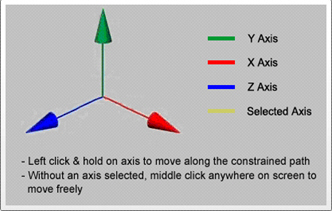
Before you can use the Move manipulator, you must first activate it. Click the Move button  to activate the move manipulator, or press the default hotkey of NM on the keyboard. When activated, the move manipulator icon appears on the selected object. The manipulator’s handles point in the directions of the three axes: X, Y, and Z. The object will move freely. If you want to control it so that it aligns to the grid, before moving the object set the Snap Options.
With your mouse, click a handle to choose the direction in which you want to move the selected object(s). Once a handle is activated it turns yellow. Click and drag the object to move it in the activated direction.
If no direction handle is selected then you can move the object freely along all three axes on the plane that is perpendicular to the perspective.
Click the center of the manipulator then drag the cursor to move the object(s) in any direction.
Alternatively, using the middle mouse button, point and click the object then move your mouse to move the object freely around the 3D view.
Using toolbar buttons: Alternatively, you can click the red, green, and blue + and - manipulator buttons to incrementally move the object or sub-element. See Move, Rotate, or Scale Objects Incrementally Along an Axis below for details.
Using the keyboard: Alternatively, you can use keyboard keys to move the selected object(s):
Pressing the Left and Right arrow keys moves the object along the Z axis.
Pressing the Up and Down arrow keys moves the object along the X axis.
Pressing the Page Up and Page Down keys moves the object along the Y axis.
|
|
Tip: For more precision in where the object moves, click the Transform button and, in the dialog box that opens, enter the precise movements you want to make. |
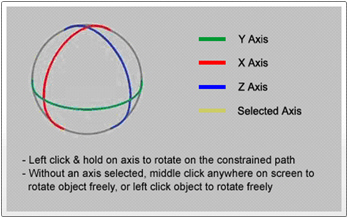
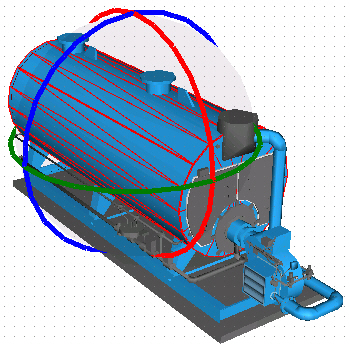
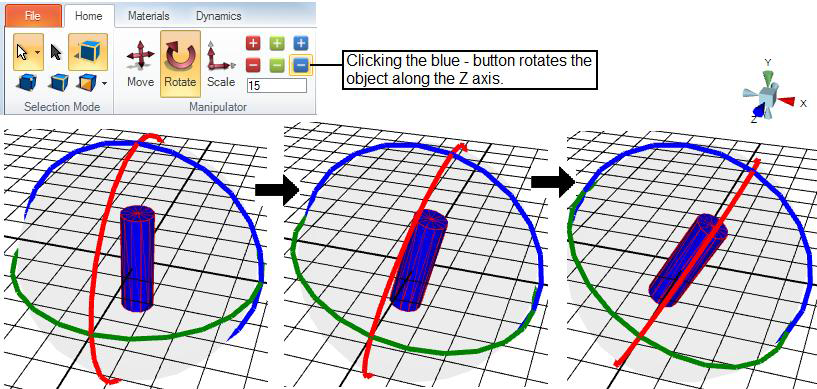
The Rotate manipulator rotates the selected object(s) or object sub-element in the 3D space. The Rotate manipulator rotates the object around the pivot point. Click the Rotate button to display the Rotate manipulator around the selected object(s). The Rotate manipulator, is a gyroscope-like tool for rotated objects. Click a ring then drag the cursor up or down, or left or right, to rotate the object(s) along that axis.
Before you can use the Rotate manipulator, you must first activate it.
Although clicking the Rotate button  activates the manipulator, it is best to press the default hotkey of NO to activate it.
When activated, the Rotate manipulator is represented by a gyroscope that surrounds the selected object(s). Each circle of the gyroscope represents one of the three axes (X, Y, and Z).
The object will rotate freely unless you restrict its rotation to specific angles using the Snap Option.
Using the mouse: Click and drag a circle to rotate along one of the three main axes. If you click inside the gyroscope without selecting a circle, you can rotate along all three axes at the same time (free rotation).
Alternatively, using the middle mouse button, point and click on the object then move your mouse to rotate the object freely in the 3D view.
Using toolbar buttons: Alternatively, you can click the red, green, and blue + and - manipulator buttons to incrementally rotate the object or sub-element. See Move, Rotate, or Scale Objects Incrementally Along an Axis below for details. For an example of how to rotate an object using these buttons, click here.
Using the keyboard: Alternatively, you can use keyboard keys to rotate the selected object(s):
Pressing the Left and Right arrow keys rotates the object along the Z axis.
Pressing the Up and Down arrow keys rotates the object along the X axis.
Pressing the Page Up and Page Down keys rotates the object along the Y axis.
|
|
Tip: For more precision in the angle to which the object rotates, click the Transform button and, in the dialog box that opens, enter the precise relation angle you want to make. |
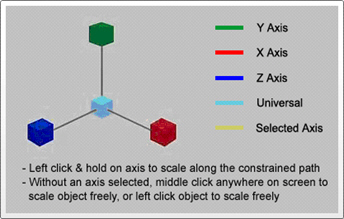
The Scale manipulator lets you resize the selected object(s) or object sub-element(s) to scale. The Scale manipulator scales the object out from or in toward the pivot point. The Scale button re-sizes an object. Click the Scale button to display the Scale manipulator for the selected object(s). The Scale manipulator, is a three-dimensional tool for re-sizing an object along one or all axes.
Before you can use the Scale manipulator, you must first activate it. Although clicking the Scale button  activates the manipulator, it is best to press the default hotkey of NC.
Once activated, the Scale manipulator appears over the selected object(s). A small cube appears on the intersection of the axes as well as at the end of each axis—there are four cubes in total.
The object will resize freely. If you want to control it so that changes in size align to the grid, before resizing the object set the Snap Options.
Using the mouse: By clicking any cube that lays on a move manipulator axis and then dragging the mouse, you can scale the object(s) along that axis (this is called constrained scale). Clicking on the cube in the intersection of the axes lets you scale along all axes at the same time (free scale).
Click a block then drag the cursor up or down, or left or right, to re-size the object(s) along that access.
Click the center of the manipulator then drag the cursor to re-size the object(s) in all directions uniformly.
Alternatively, using the middle mouse button, point and click on the object and move your mouse to resize the object proportionally.
Using toolbar buttons: Alternatively, you can click the red, green, and blue + and - manipulator buttons to incrementally resize the object or sub-element. See Move, Rotate, or Scale Objects Incrementally Along an Axis below for details. For an example of how these buttons help you scale an object, click here.
Using the keyboard: Alternatively, you can use keyboard keys to resize the selected object(s) to scale:
Pressing the Left and Right arrow keys scales the object along the Z axis.
Pressing the Up and Down arrow keys scales the object along the X axis.
Pressing the Page Up and Page Down keys scales the object along the Y axis.
|
|
Tip: For use more precise measurements to scale the object, click the Transform button and, in the dialog box that opens, enter the precise change you want to make. |
You can also move, rotate, or scale the selected object(s) or object sub-elements incrementally along the X, Y, or Z axis using the red, green, and blue plus (+) and minus (-) buttons. These buttons give you precise control over the manipulation of an object.


Move buttons and the 3D legend
The buttons' colors match the axis color in the 3D view's legend.
Red moves the object(s) along the X axis.
Green moves the object(s) along the Y axis.
Blue moves the object(s) along the Z axis.
The + and - indicates the direction in which the selected objects move.
Beneath the buttons, you can enter a number representing the amount of change to be applied with each button click to move, rotate, or scale the selected object(s). The default value varies, depending on the selected manipulator.
The Move and Scale manipulators move or resize the selection 1 grid line with each click by default. (You can change the density or cell size of the grid. For more information, refer to the Grid Options in 3D topic.)
The Rotate manipulator rotates the selection 15 degrees with each click by default.
If you want to increase the amount of change, enter a higher number; to apply smaller amounts of change, enter a lower number.
To use these buttons:
Click the object or objects you want to manipulate.
Click the manipulator button (Move, Rotate, or Scale) for the way you want to manipulate the object(s) or sub-element.
Click the red, green, or blue + or - button to manipulate the object(s) or sub-element.
See also: