![]()
![]()
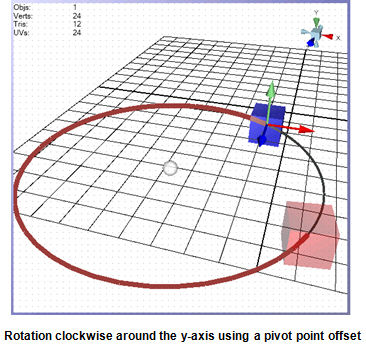
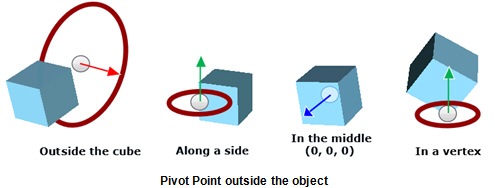
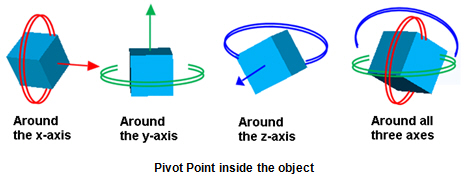
The 3D Rotation button ![]() is in the Position section on the Dynamics ribbon. Clicking it adds a Rotation dynamic to the object; the object’s appearance changes slightly and a pivot point appears at the center of the object. The pivot point is the center around which the object will rotate. If necessary, you can change the location of the pivot point for the Rotation dynamic, and choose the axis and the starting and ending angle if you want the object to rotate around. If you leave the pivot point inside the object, the object will spin around it. But if you offset the pivot point (that is, move the pivot point outside the object), the object will orbit the pivot point. You also set the axis around which the object will rotate.
is in the Position section on the Dynamics ribbon. Clicking it adds a Rotation dynamic to the object; the object’s appearance changes slightly and a pivot point appears at the center of the object. The pivot point is the center around which the object will rotate. If necessary, you can change the location of the pivot point for the Rotation dynamic, and choose the axis and the starting and ending angle if you want the object to rotate around. If you leave the pivot point inside the object, the object will spin around it. But if you offset the pivot point (that is, move the pivot point outside the object), the object will orbit the pivot point. You also set the axis around which the object will rotate.
To add a Rotation dynamic to an object in a 3D viewport in GraphWorX, follow these steps:
Before you begin, if the object that will rotate or spin is made up of several components, make sure the objects are grouped. You want to apply the dynamic to the group so that the objects move as one.
In the 3D viewport (you can do this in the display or in the Explorer), select the object (or group) that will rotate or spin.
Select the Dynamics ribbon, and click the Rotation button in the Position section. This inserts the Rotation dynamic into the selected object.
To move the pivot point, click the pivot point. A move manipulator displays. (Refer to The Move Manipulator for help.)
Use the Move manipulator to relocate the pivot point to the spot around which the object will rotate. (The object can rotate around an internal point or around an external object.) When you release the mouse, a rotation ring appears around the pivot point.
If the ring shows a rotation path along the wrong axis, go to the object's Rotation dynamic on the Dynamics tab. From the Axis3D property for the dynamic, select the axis (x, y, or z) around which the object is to rotate. (Refer to The X, Y, and Z Axis Legend in the 3D Viewport for more information.)
|
|
Tip: If you click off the pivot point, the pivot point will no longer be visible. To show it again, go to the object’s Properties tab and click on the ellipsis button |
Now define the range of the object’s rotation. You do this by specifying the beginning and ending points of the object’s rotation.
To establish the object’s beginning point in the rotation, left-click on the rotation ring at the object’s starting point. A red, opaque version of the object appears at that point in the rotation.
To establish the object’s ending point in the rotation, right-click on the rotation ring at the object’s ending point. A gray, opaque version of the object appears at that point in the rotation.
|
|
Tip: Alternatively, you can use data sources to determine beginning and ending points in the rotation. To do so, use the StartAngle and EndAngle properties. |
Set any of the Rotation dynamic’s properties that apply. These dynamics are described below.
Most of the 3D Rotation dynamic’s properties work the same way as the 3D Size and Location dynamics’ properties; these include: Name, Description, CustomData, DataSource, LowLimit, HighLimit, ActiveWhen, AnimationMode (Analog or Discrete) StartPercent, EndPercent, Detents, and ToolTips.
The Dynamic Behavior-Discrete section contains a number of options for controlling discrete behavior. For more about the properties refer to Animation Mode for 3D Dynamics. Properties are: StartDelay, Duration, SkipInitialDuration, AccelerationRatio, DecelerationRatio, AnimateWhenTrue, ReverseAnimateWhenFalse, AutoReverse, RepeatCount, FillBehavior, and FreezeWhenNotAnimating.
Other properties work uniquely for the 3D Rotation dynamic. These include the following:
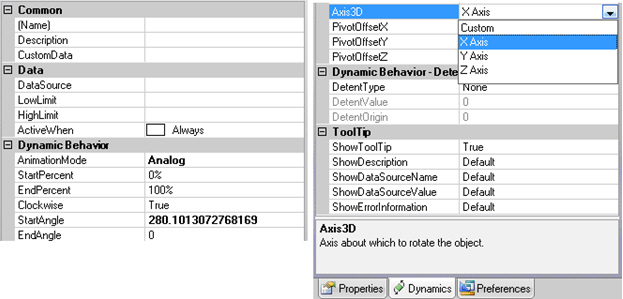
Clockwise—True rotates the object clockwise; False rotates it counter-clockwise.
StartAngle and EndAngle identify the starting and ending angles of the rotation; valid values range from 0 to 360. These angles are set when you use the Rotate manipulator described earlier for the Rotation dynamic but, instead, you can set these angles by using data sources—simply click the ellipsis button for either of these properties to open the Data Browser and choose a data source.
Axis3D identifies the axis around which the object will rotate.
PivotOffsetX, PivotOffsetY, PivotOffsetZ are set when you move the pivot point. Don’t use these properties to set the offset value; instead, use the Move manipulator described earlier in the steps for Adding a 3D Rotation Dynamic.