![]()
![]()
The 3D Location dynamic moves a 3D object at runtime based on the data source or animation feature; the object moves along a path that you create. To animate the object in this way, follow the steps below.
|
|
Tip: Alternatively, you can use a 3D pipe to create a pipe along which the object is to move. For instructions, refer to the 3D Pipe Primitive topic. |
In the 3D viewport, select the object you want to animate.
Click the Location button in the Position section on the Dynamics ribbon. This creates a Location dynamic.
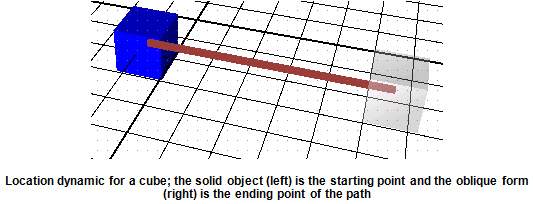
Initially, a path from the selected object to an oblique form of the object appears. The solid object represents the starting point of the path; the oblique form represents the ending point of the path.
To change the starting point of the path, click the solid object to display the Move manipulator, then move the object to where you want the path to start. To change the ending point of the path, click the oblique form and move it to the ending point. You can do this at any time.
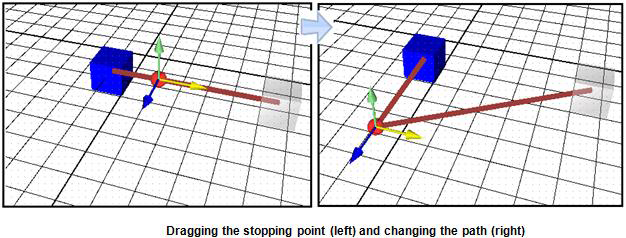
If you want the path to bend, click the brown line that forms the path; this displays the Move manipulator. Drag the Move manipulator with your mouse; you can drag it along the path or create a bend in the path. (For help using the manipulator, refer to The Move Manipulator.) Click here to see an illustration.
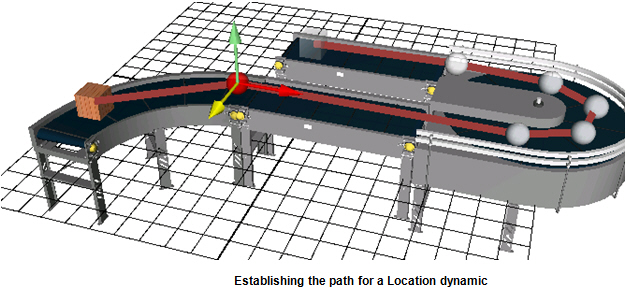
Establish the entire path, adding additional models or primitives as needed.
|
|
Note: The path gets automatically written to the Location dynamic’s 3DPath property. Don’t set the 3DPath property manually; instead, set it by following the steps provided above. |
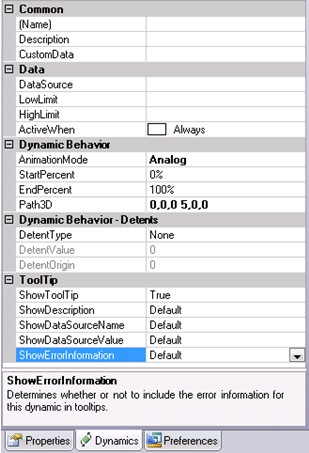
Using the Dynamics tab, set the Location dynamic’s properties. These properties are described below.
The 3D Location dynamic's properties are described below. For a description of the 2D Location dynamic, refer to Location Dynamic Properties for 2D.
Optional Name, Description, and CustomData
DataSource is the source of data for the Size action. Click the ellipsis button ![]() to open the Data Browser, where you can select a tag. You can also create Expressions in the Data Browser.
to open the Data Browser, where you can select a tag. You can also create Expressions in the Data Browser.
LowLimit is the lowest boundary (if any) for use with the ActiveWhen property.
HighLimit is the highest boundary (if any) for use with the ActiveWhen property.
ActiveWhen—Select the discrete range of values that will make animation occur during runtime. Choose one of the following expressions, then use the LowLimit and/or HighLimit properties to specify any low or high limits that are required.
AnimationMode—Choose one:
Analog animates the selected object’s change in size based on continuously changing values provided by an OPC tag.
Discrete animates selected object’s change in size based on time-based movie-like animation you specify for the object.
StartPercent, EndPercent—Use these fields to limit the amount of change in the object. By default the size can change as little as 0% and as much as 100%. StartPercent identifies the object’s starting magnitude; EndPercent identifies the object’s ending magnitude.
If you want the object to size incrementally, use the Detents section. (This section is available only if the AnimationMode is Analog.) In the DetentType property you can specify increments in one of two ways:
A total number of increments for the object to resize to. Set the DetentType to Number of Detents, then specify the total number of increments to be used in the DetentValue property.
A delta by which the object will resize. Set the DetentType to Delta Value, then specify the number by which the incremental value by which the object’s size will change. For example, if you want a thermometer to change every 5 degrees starting at 35 degrees, set a DetentValue to 5, and the DetentOrigin to 35.
Dynamic Behavior-Discrete section contains a number of options for controlling discrete behavior. For more about the properties in this section, refer to Discrete Mode. Properties are: StartDelay, Duration, SkipInitialDuration, AccelerationRatio, DecellerationRatio, AnimateWhenTrue, ReverseAnimateWhenFalse, AutoReverse, RepeatCount, FillBehavior, and FreezeWhenNotAnimating.
Tool Tips—To add information about the dynamic to the object’s runtime tool tips, see Tool Tips.
See also: