Scripting Basics
In GraphWorX64, you can write scripts to define custom behavior and interact with the product. For example:
-
You can read from and write to an OPC data source
-
You can write your own logic to manipulate and perform computation over your data
-
You can use scripts to connect to a remote database and pass that data to a GraphWorX64 component for visualization
-
You can alter GraphWorX64 objects’ properties
-
You can dynamically create and control the content of a 3D View control
-
You can call GENESIS64 API functions to take full control of the product
It is possible to edit your scripts directly from inside GraphWorX64 and to make the code run on specific events, like a button click or when the display has finished loading. You can create new elements in the display, Alter the appearance of the display, add objects to the 3D view, rotate a 3D views, create pick actions on the fly, interact with other controls (AlarmWorX Viewer, EarthWorX Viewer, GridWorX64 Viewer, and TrendWorX Viewer), and so on. All of this can be handled from inside the Script Editor that is available in GraphWorX64.
JScript.NET
GraphWorX64 uses JScript.NET which is a programming language in the .NET family. JScript.NET allows you to call .NET framework functions, as well as to interact with .NET code from any .NET DLL. This means you can write your own DLL and use it inside the product, interfacing to it through scripting.
Since JScript.NET is a .NET language, you should be familiar with .NET programming when creating scripts. Apart for some syntactical differences and a few limitations, JScript.NET is no different from other well-known .NET languages such as C# and VisualBasic.NET.
You can reuse existing scripts by saving them externally to GENESIS64 as .JS or .TXT files and importing them into or referencing them from the scripts you write in the Script Editor in GraphWorX64. The steps for importing and referencing scripts is described in the Script Modules topic.
Scripting Versus GraphWorX Features
Although scripting is powerful and useful, remember that GraphWorX64 is by itself a very powerful product. For this reason, you should avoid using scripting to perform tasks that can easily be carried out using built-in features of GraphWorX64. For example, you may be tempted to write a short script that writes a value to an OPC data source, but you can do this in no time by using the Write Value command property of a Pick Action dynamic in GraphWorX64 or simply by using the Data Entry Dynamic. On the other hand, you may want to write a script to read several different OPC data source values, apply some logic on the values, and execute a command only when a specific condition is met. In this case, you can use a script, but you may want to consider using an expression to evaluate your condition instead.
You will probably find that over time, you will need to create more powerful custom projects that require scripting in GraphWorX64. For example, when a display is loaded into runtime, you may want to prompt the user with an instructional message box, or a form, that might not be available through the GraphWorX64 configurator.
Basic Information about Scripting
A few basic rules you should keep in mind are:
-
Before you begin scripting, make sure the Application Mode is set to Standard or Advanced. You will not be able to access events if you are in Basic mode.
-
Changes done to a GraphWorX display through scripting while in Runtime mode will persist when you switch the display back to Configuration mode.
-
A DataReady event occurs when data tags have initially received good quality data values. (This alert occurs just once in the lifetime of an HMI display.)
Return to Top
More About Scripting
In this topic, the following basic scripting examples are provided:
For additional, more advanced information, refer to the following topics:
For more examples, refer to the following topics:
Creating Scripts; an Example
To let you create your own scripts, GraphWorX64 provides a Script Editor. (For more about this tool, refer to Script Editor.) This section describes how to create a script using Script Editor, and when to use the more common global variables.
You can run a script on a wide range of events, but the most common way is to run a script from a button. In this example, you will see the steps needed to create a script that runs when a user clicks a button in runtime mode.
-
Starting in configuration mode in GraphWorX64, add a button to your display. On the button's Dynamics tab, select the Pick dynamic, then for the Command property select the Run Script command. (For more information, refer to Buttons.)
-
In the middle of the Dynamics tab, click the Events button  . This displays the possible events related to this dynamic, which in this example is just the RunScript event.
-
Now, name the script. There are two ways of naming this script, and the approach that you use will affect the module and function names that are created.
-
The first is to double-click on the RunScript event, which creates a function by using the dynamics’ name and the dynamic performed.
-
The second way is to enter a name for the script yourself manually, then press Enter.
-
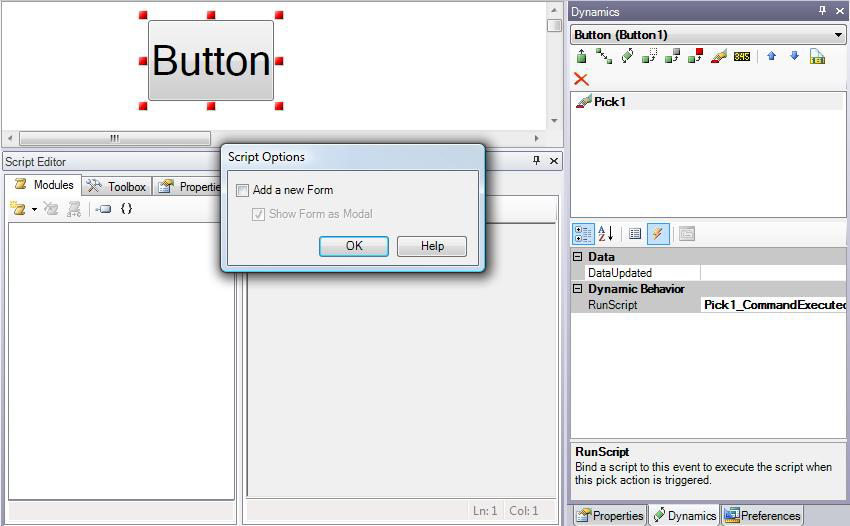
The Script Options dialog appears ( click here to see an example). If the script will open a form during runtime, select the Add a new Form check box, but leave this check box empty if the script doesn't open a form.
-
Click OK in the Script Options dialog. You will be brought to the Script Editor with the Modules tab showing on the left and the Code View tab showing on the right.
What Just Happened?
At this point, you should note the entries that appear in the Modules tab. The modules reflect how you created your script and the name you gave it:
-
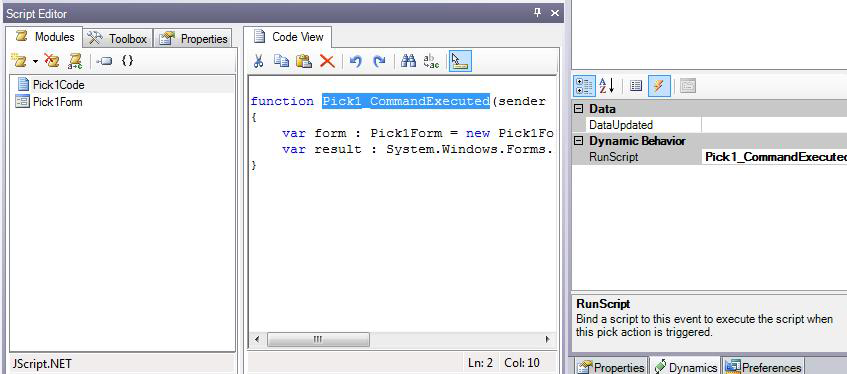
If you double-clicked the RunScript event, it created a function with the name of the dynamic and what the dynamic performs; your function name may be something like: Pick1_CommandExecuted. In the Modules list, there is a module called Pick1Code; and if you chose to create a form with it, there is a form called Pick1Form. For an example, click here.
-
If you typed the name of a script in the RunScript property (for example, Script1), you will have a function called just that, but there is no module created where the function resides. Instead, this function resides in the ThisDisplayCode module. If you had a form created with it, it would be called ThisDisplayForm (additional forms are numbered, for example ThisDisplayForm2, and so on).
If you would like to type in your own module name and the function name, then you must type in both when you create the script, separating it by an underscore (_). For example, if you want a module named myModule and the function to be myFunction, then when you type in the name of the script, you should type in myModule_myFunction. Anything in front of the underscore will be treated as the module name. Appended to this name is the word Code and therefore, the entire name of the module will end up being myModuleCode.
Also note the content in the Code View tab. A function has been created for you and appears in this tab. If you chose to create a form, the form is included in the function; if you chose not to create a form, the function is an empty function.
Modifying the Function to Open a Message Box
At this point you can write your own code to accomplish your own objectives. Let's look at a simple example of a button that displays a message box:
-
Create a new button, and follow the five steps described above, but double-click the RunScript event and don't create a form. The following empty function appears in the Code View tab.
function Pick1_CommandExecuted(sender : System.Object,
cmdArgs : Ico.Gwx.CommandExecutionEventArgs)
{
}
-
Modify the code to create a Message Box that displays “Click Here.” It should look like this:
function Pick1_CommandExecuted(sender : System.Object,
cmdArgs : Ico.Gwx.CommandExecutionEventArgs)
{
MessageBox.Show("Click Here.");
}
-
Save your changes.
-
At the top right of GraphWorX64, click the Runtime button. The runtime version of your button appears.
-
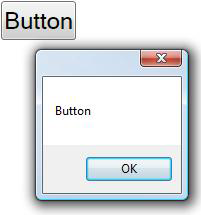
Click your button. The message box appears, as shown below. Click OK to close it.
-
Click the Configure button to return to configuration mode.
Click the Runtime Button to see the Message "Click Here."

See also:
Scripting - Quick Start
Scripting - Shape Manipulation
Return to Top
Using Global Variables in Scripts
GraphWorX64 exposes a few different global variables that you can use to access different elements of the application quickly. These variables, for example, allow you to interact with the currently loaded display, to retrieve objects, symbols, and dynamics to work with them. You can consider these variables as the “entry points” to the GraphWorX64 object hierarchy. Most of your scripts will use these variables, and for this reason, it is very important to understand them, and to know when to use which in your scripts. The global variables are:
-
ThisConfiguration – Related functions to manipulating objects such as process points, rectangles, etc. If you are familiar with scripting in GraphWorX32, then this would be most comparable to using ThisDisplay.
-
ThisDocument – Related to all the runtime functionality including the options found on the Properties tab in configuration mode.
-
ThisWindow – Related to the view area of the display, such as the dimensions of the viewing area, or converting point coordinates.
To understand how these variables should be used inside a script, consider the following example. Before you begin, make sure you are familiar with the “Click Here.” example in Scripting Basics; this example adds to that one.
In this example, you will allow runtime users to be able to interact with an object in the display to read some of its properties. In this case, the script will read the button’s caption (because the button is the only object in the display).
To do this, change the body of the function in the “Click Here.” example to this:
function Pick1_CommandExecuted(sender : System.Object,
cmdArgs : Ico.Gwx.CommandExecutionEventArgs)
{
var b : GwxButton =
ThisConfiguration.GetObjectByName("Button1");
MessageBox.Show(b.Text);
}
In this script, you can see how to declare a variable, how to specify its type, and that the type of a GraphWorX64 Button is GwxButton. You can also see how to use the ThisConfiguration variable to retrieve an object on the display by means of the GetObjectByName function. Note that the parameter of this function is the button’s name. If you changed the name of your button, you also need to change this string to match the button's name. For the message, the script will look at the button's Text property.
When you go into Runtime Mode and you click on your button, you should see something like the following.
The Message Box Reads the Button's Caption
Return to Top
Reading an OPC Tag
One of the most important features of GENESIS64 is its capability to interface with many different data sources. You can use this data to animate your graphics and to perform a number of other tasks.
There are several ways to read an OPC tag through scripting; in this section, you will learn one of them. In this example, you will trigger a script by clicking on a button (as in the previous example). The script will read a couple of data
source values and will present them in a message box dialog.
First you need to prepare your display.
-
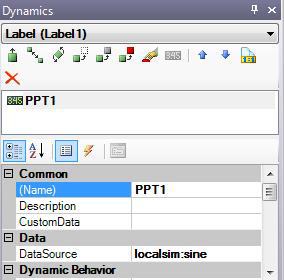
Place a Process Point and define localsim:sine as its data source. Then, give this dynamic a name, such as “PPT1”.
-
Add a Data Entry object (which is like an editable Process Point). Define a new simulated variable and name this object as “PPT2”. To see what your dynamic object configurations should look like, click here.
Now that you have created the objects you need to work with:
-
Create a button to run a script by following the steps in the previous example. Let the system generate a new script function for you.
-
Write the script function, which will read and show the data source values. Below is the necessary code:
function Pick1_CommandExecuted(sender : System.Object,
cmdArgs : Ico.Gwx.CommandExecutionEventArgs)
{
//declare variables
var ppt1 : GwxDynamic =
ThisConfiguration.GetDynamicObjectByName("PPT1");
var ppt2 : GwxDynamic =
ThisConfiguration.GetDynamicObjectByName("PPT2");
//read values and output into a message box
MessageBox.Show(String.Format("The first Process
Point value is: {0}\n" + "The second Process Point
value is: {1}",
ppt1.GetValueOfPrimaryDataSource(),
ppt2.GetValueOfPrimaryDataSource()));
}
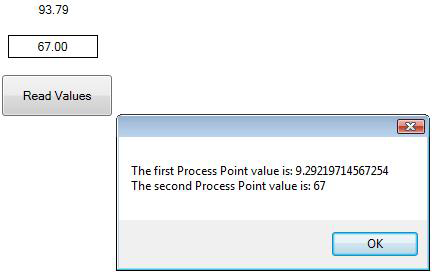
The first section is similar to what we used to get a reference to the button earlier. In this case, we use a different function because we want to get a dynamic object, instead of a regular object. Once we have retrieved the two process point objects, we can show a message with their values. The function that gets a process point value is called GetValueOfPrimaryDataSource. When you run the script, this is what you see:
Reading Values off Two Process Points
|

|
Note. The first process point value is actually different from what is shown in the message box. This is because the GraphWorX64 display is still animating behind the message box, thus the process point value is continuously changing.
|
Return to Top
Writing to an OPC Tag
This example shows how to write a value to an OPC tag. It reuses the previous example, and enhances it by adding a new button running a different script to write a value to a data source. In this example, you will write a value to the PPT2 process point from the previous example. The value you are going to write will be the value read from PPT1.
First, add a new button to the display. The new button should be set to “run a script”, and a new script function should be generated.
In the Code View tab, write the following function:
function Pick2_CommandExecuted(sender : System.Object,
cmdArgs : Ico.Gwx.CommandExecutionEventArgs)
{
//declare variables
var ppt1 : GwxDynamic =
ThisConfiguration.GetDynamicObjectByName("PPT1");
var ppt2 : GwxDynamic =
ThisConfiguration.GetDynamicObjectByName("PPT2");
//write value from ppt1 to ppt2
ppt2.WriteValueToPrimaryDataSource(ppt1.GetValueOfPri
maryDataSource());
}
The first part of the function is the same as the previous example. The WriteValueToPrimaryDataSource function uses as its parameter the value to write to its associated data source, which in this case is PPT1's value. When you run this example, clicking on the new button copies the PPT1's value to PPT2.
Return to Top
Opening the Security Login Dialog Box
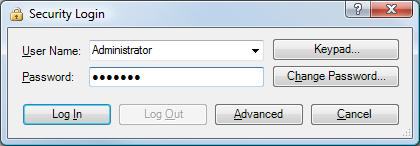
To open the Security Login dialog box using a script, add a button to your GraphWorX64 display, select the Run Script command, double-click the RunScript event and leave the Add a new form check box empty. Next, add the following code to the empty function body:
ThisWindow.ShowLoginDialog();
Go into Runtime Mode, and click the button to display the Security Login dialog.
Return to Top
See also:
Scripts that Manipulate Objects at Runtime
Scripts that Use a Form or Dialog Box
Script Editor