More and more often, an organization’s information is stored inside a database. It might be useful to be able to interface with such database to extract the data that you need to use inside your GENESIS64 application. You can visualize the information in your database in GraphWorX64. You can further use this data in generating your display content automatically, populating a 3D View control’s content, or animating some elements on the screen, just to name few. In this topic, we demonstrate how to access your data from a database.
For this example, we are going to use a default sample database, which has been created for SQL Server 2005, called AdventureWorks. This is the SQL Server 2005 equivalent of the well-known NorthWind database, which was created for previous versions of SQL Server.
Feel free to use your already existing database, or to create a new one if you prefer. The only difference in this example will be in the connection string and the query used to access the database.
If you want to use the same sample database we will use in this Application Note, then you can freely download it from CodePlex at http://www.codeplex.com/MSFTDBProdSamples under the SQL Server 2005 examples. We have used the lite version of this database, which is called AdventureWorksLT.
Once you have chosen the database you intend to use for this example, you are ready to start.
The first step, we will create a new GraphWorX64 display, where we will insert a button. Set the pick action for the button to be “Run Script”, and double-click the “RunScript” event to generate the script function associated to this button.
NOTE: If you need more information on how to create simple scripts in GraphWorX64, refer to the Scripting - Quick Start and Scripting Basics topics.
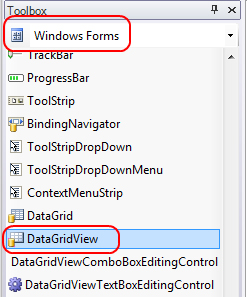
To show the database content we will use the .NET Framework “DataGridView” control. You can access this user control from the Toolbox, selecting the category “Windows Forms” as shown in Figure 1.
Figure 1 - The DataGridView Control in the Toolbox
NOTE: If you do not see the “DataGridView”, you can add it by clicking the “Add/Remove Components” button on the Windows Forms Toolbox. Browse for the System.Windows.Forms.dll usually located in C:\Windows\Microsoft.NET\Framework64\v2.0.50727.
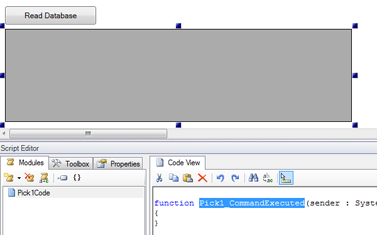
This will add a few more .NET controls into your Toolbox. Drag this control on the screen, and size it as desired. Your current display should look similar to Figure 2, where the selected gray rectangle is the DataGridView control in configuration mode.
Figure 2 - Display with a DataGridView Control and Button
The display is ready. We just need to write some script to have it connect to our database.
The script code we are going to write consists of the following:
Let us start by defining the connection string. Yours might be slightly different, depending on the location of your SQL Server, the database name, and eventually the security settings. In this example, we show the easiest possible configuration, with the server running locally and using the integrated security.
Our connection string is defined in the script module as shown below:
var connectionString : String = "Data
Source=(local);Initial
Catalog=AdventureWorksLT;Integrated Security=SSPI";
You can see that we have used “(local)” as our data source, because the server is local, and the database name is “AdventureWorksLT”.
Next, we write the utility function that will populate the grid. This function is made to accept two parameters: the name of the grid to populate, and the query to use to get the data.
function PopulateGrid(gridName, commandString)
{
// Declare variables
var wfCtl : Ico.Gwx.GwxWindowsFormsControl;
var grid : System.Windows.Forms.DataGridView;
var conn : System.Data.SqlClient.SqlConnection;
var command : System.Data.SqlClient.SqlCommand;
var dataAdaptor:
System.Data.SqlClient.SqlDataAdapter;
var dataTable: System.Data.DataTable;
// Initialize variables
conn = new
System.Data.SqlClient.SqlConnection(connectionStrin
g);
command = new
System.Data.SqlClient.SqlCommand(commandString,
conn);
dataAdapter = new
System.Data.SqlClient.SqlDataAdapter(command);
dataTable = new System.Data.DataTable();
dataAdapter.Fill(dataTable);
// Get the control and give it properties
wfCtl =
Ico.Gwx.GwxWindowsFormsControl(ThisConfiguration.Ge
tObjectByName(gridName));
grid =
System.Windows.Forms.DataGridView(wfCtl.Control);
grid.DataSource = dataTable;
}
In the function, you can identify three different blocks. In the first block, we have declared all the variables we are going to use here. In the second block, we initialize them. We start creating a SqlConnection using the connection string we built before. Using this connection, we prepare a SqlCommand object, passing it the query we got as a parameter. We also create and prepare a SqlDataAdapter and a DataTable object.
In the last block, we get a reference to the data grid, and then we fill its DataSource property with the DataTable object created earlier.
This is all we need to access the database and populate the data grid. The last thing we need to do to complete our example is to call our PopulateGrid function when the button is clicked. To do so we fill the button’s click as follows:
function Pick1_CommandExecuted(sender :
System.Object, cmdArgs :
Ico.Gwx.CommandExecutionEventArgs)
{
var commandString: String;
commandString = "SELECT * FROM SalesLT.Product";
PopulateGrid("DataGridView1", commandString);
}
The first two lines define the query to select all the records from the SalesLT.Product table. Last line calls the function we defined earlier to populate the data grid.
NOTE: The function body can easily be collapsed to a single line if you specify the query in the PopulateGrid call, instead of defining a variable for it. We preferred to do it this way for readability and ease of understanding.
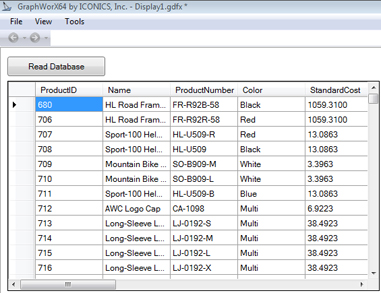
The example is now complete, you may want to save your display, and then go into Runtime mode to try it out. When clicking the button you should see your data populated in the grid.
Figure 3 – Database Data Populated in the DataGridView Control