Scripting allows you full access to the GENESIS64 API. In this document, we are going to see how to use the GraphWorX64 API to alter a shape’s appearance on the display while in Runtime mode.
To become familiar with shape manipulation you are going to create an example based on a display containing a rectangle, which is the shape you will be manipulating, as well as a few buttons to run some scripts.
The buttons you will create will let you do the following:
Now create a display containing a rectangle, and nine buttons - four of which will be used to move the rectangle up, down, left, and right. Two of the buttons will be used to rotate the rectangle clockwise and counter-clockwise. The three remaining buttons will be used to set the color to red, green, and blue.
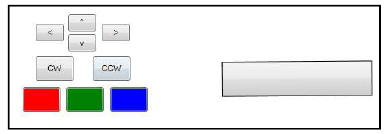
Feel free to arrange these elements as you wish. Figure 1 shows how to arrange the objects for this example.
Figure 1 - The Display with a Rectangle and Nine Buttons
Now you can create the script code needed to perform the nine different tasks.
The nine script functions you are going to create are very similar to each other. In all of them you get a reference to the rectangle object on the screen (which is why it is important that the rectangle has been given a name, “Rect1” in this case). Then you call an API function with some parameters that let you perform the desired action.
The first function you will analyze is called MoveUp, which will move the rectangle up by 10 pixels:
function MoveUp(sender : System.Object, cmdArgs :
Ico.Gwx.CommandExecutionEventArgs)
{
var rect : GwxElement =
GwxElement(ThisConfiguration.GetObjectByName("Rect1
"));
rect.MoveBy(new Vector(0,-10), null);
}
The function signature is the same as for a button’s click event handler, so that you can directly assign it to one of the buttons, as shown in Figure 2.
Figure 2 - Assigning the Script Function to a Pick Action

The function body contains two lines of code, the first one will be replicated among all the other functions as well and simply get a reference to the rectangle and place it in a variable called “rect”.
In the second line you will use one of the API functions to relocate the rectangle up by 10 pixels, specifying a Vector object with (x,y) coordinates relative to the current rectangle position. Since you have selected (0, -10) the x coordinate will not change, while the rectangle will move up 10 pixels along the coordinate.
The coordinate system has the point (0, 0) in the top left corner of the display. The x coordinate grows going right, the y coordinate grows going down.
For a second example, let's look at the function for rotating the rectangle clockwise.
function RotateClockWise(sender : System.Object,
cmdArgs : Ico.Gwx.CommandExecutionEventArgs)
{
var rect : GwxElement =
GwxElement(ThisConfiguration.GetObjectByName("Rect1
"));
rect.RotateBy(-15, null);
}
This function is very similar to the previous one, but the API function used here is called RotateBy. The first parameter is the angle in degrees, the second parameter is a Transform type object, which you can ignore for now -- just specify a null for it.
Then assign this function to the pick action of the button you want to use for clockwise rotation.
The last function is the one to make the rectangle change to red.
function SetRedColor(sender : System.Object,
cmdArgs : Ico.Gwx.CommandExecutionEventArgs)
{
var rect : GwxRectangle =
GwxRectangle(ThisConfiguration.GetObjectByName("Rec
t1"));
rect.Fill = Brushes.Red;
}
In this case, the function is even simpler, as you just need to alter the Fill property, assigning it one of the predefined brushes in the system. Again, assign this function to the pick action for the red button in the display.
After completing the creation of all the script functions, go to Runtime mode and test the example. Here are some figures that show the running display:
Figure 3 - The Display in Runtime
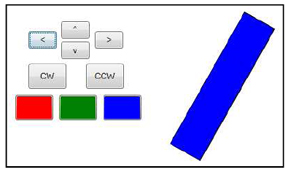
Figure 4 - The Rectangle Moved Behind the Command Buttons
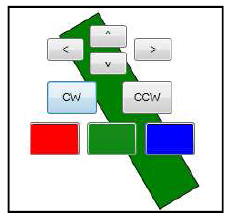
Figure 5 - The Rectangle Rotated, Moved, and Changed Color

Below is the full source code for this example. You can put all the functions inside the same module; just make sure the nine buttons are correctly set up to use these functions.
function RotateClockWise(sender : System.Object,
cmdArgs : Ico.Gwx.CommandExecutionEventArgs)
{
var rect : GwxElement =
GwxElement(ThisConfiguration.GetObjectByName("Rect1
"));
rect.RotateBy(-15, null);
}
function RotateCounterClockWise(sender :
System.Object, cmdArgs :
Ico.Gwx.CommandExecutionEventArgs)
{
var rect : GwxElement =
GwxElement(ThisConfiguration.GetObjectByName("Rect1
"));
rect.RotateBy(15, null);
}
function MoveRight(sender : System.Object, cmdArgs :
Ico.Gwx.CommandExecutionEventArgs)
{
var rect : GwxElement =
GwxElement(ThisConfiguration.GetObjectByName("Rect1
"));
rect.MoveBy(new Vector(10,0), null);
}
function MoveLeft(sender : System.Object, cmdArgs :
Ico.Gwx.CommandExecutionEventArgs)
{
var rect : GwxElement =
GwxElement(ThisConfiguration.GetObjectByName("Rect1
"));
rect.MoveBy(new Vector(-10,0), null);
}
function MoveUp(sender : System.Object, cmdArgs :
Ico.Gwx.CommandExecutionEventArgs)
{
var rect : GwxElement =
GwxElement(ThisConfiguration.GetObjectByName("Rect1
"));
rect.MoveBy(new Vector(0,-10), null);
}
function MoveDown(sender : System.Object, cmdArgs :
Ico.Gwx.CommandExecutionEventArgs)
{
var rect : GwxElement =
GwxElement(ThisConfiguration.GetObjectByName("Rect1
"));
rect.MoveBy(new Vector(0,10), null);
}
function SetRedColor(sender : System.Object,
cmdArgs : Ico.Gwx.CommandExecutionEventArgs)
{
var rect : GwxRectangle =
GwxRectangle(ThisConfiguration.GetObjectByName("Rec
t1"));
rect.Fill = Brushes.Red;
}
function SetGreenColor(sender : System.Object,
cmdArgs : Ico.Gwx.CommandExecutionEventArgs)
{
var rect : GwxRectangle =
GwxRectangle(ThisConfiguration.GetObjectByName("Rec
t1"));
rect.Fill = Brushes.Green;
}
function SetBlueColor(sender : System.Object,
cmdArgs : Ico.Gwx.CommandExecutionEventArgs)
{
var rect : GwxRectangle =
GwxRectangle(ThisConfiguration.GetObjectByName("Rec
t1"));
rect.Fill = Brushes.Blue;
}
This was just a simple example, using a single shape. You can easily create complex examples with multiple shapes in a display. You can also make these functions capable of receiving parameters so that you don’t have to create a new function for each individual shape; this strategy lets you collapse the functions above to just three of them. This can be done by using the CustomData property of the pick actions. Consider for example a revised version of the Rotate function, defined in this way:
function Rotate(sender : System.Object, cmdArgs :
Ico.Gwx.CommandExecutionEventArgs)
{
var rect : GwxElement =
GwxElement(ThisConfiguration.GetObjectByName("Rect1
"));
rect.RotateBy(sender.CustomData, null);
}
As you can see, there are only two differences from the previous version: the name of the function and the first parameter of the RotateBy function. In this case, you are telling the function to use the CustomData property of the sender. The sender is the pick action that generated the event; in Figure 6, you can see where you edit the CustomData property for a pick action.
Figure 6 - The CustomData Property
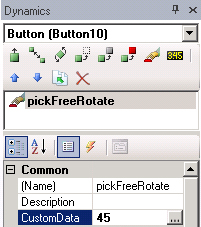
In this case, when executing this pick action, you are passing the value “45” to the RotateBy function, and the rectangle will be rotated counter-clockwise by 45 degrees. To rotate clockwise, you can simply specify a negative number here.
Using these concepts, you can call many different API functions to have full control of all of your objects currently on the display. It is also possible to create new objects and place them on the screen dynamically.
You can find more information about all the available functions by reading the API documentation, which is accessible from the Windows Start menu > ICONICS > GENESIS64 > GENESIS64 API Reference Help. You can also open the GENESIS64 API Reference by clicking the Help ![]() button that's on the Code View tab's toolbar in the Script Editor.
button that's on the Code View tab's toolbar in the Script Editor.
See also: