|
|
The features on this page require a GENESIS64 Advanced license and are not available with GENESIS64 Basic SCADA . |
|
|
The features on this page require a GENESIS64 Advanced license and are not available with GENESIS64 Basic SCADA . |
To Add a Publisher Connection:
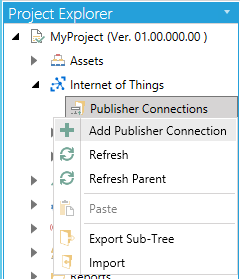
In the Workbench, expand a project and the expand the Internet of Things node. Right-click on the Publisher Connections node, as shown below, and then click on Add Publisher Connection.
Add Publisher Connection from Project Explorer in the Workbench

-OR-
Select Publisher Connections then click on the Add Publisher Connection button (shown below) in the Edit section of the Home ribbon in the Workbench.
Add Publisher Connection Button

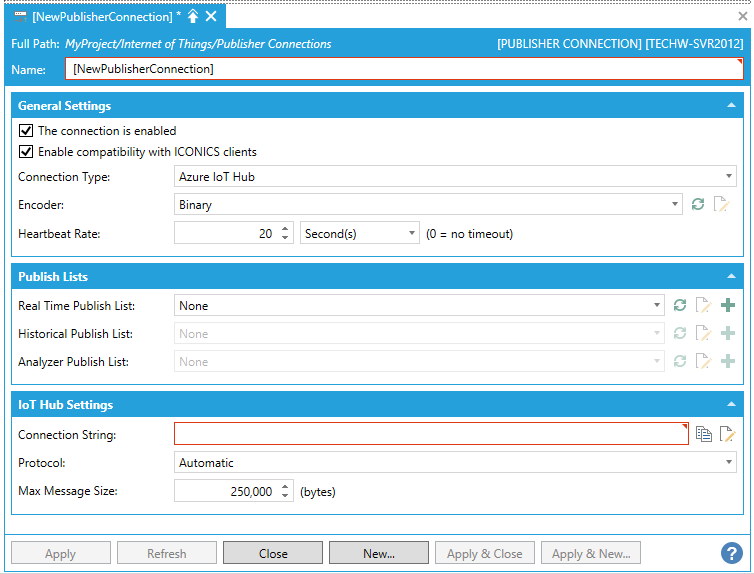
This opens the Publisher Connection properties window, as shown below, in the Workbench. Enter a Name for the Publisher Connection in the top text entry field.
Publisher Connection Properties in the Workbench

The connection is enable - Click this checkbox to enable the selected publisher connection.
Enable compatibility with ICONICS clients - Click this checkbox to ensure compatibility with ICONICS software tools.
Connection Type - Use the pulldown menu to select from Azure Event Hub, Azure IoT Hub, Azure Edge Hub, Platform Services, MQTT or REST. The bottom section of the Publisher Connections properties will change according to your selection. See [Selected Connection Type] Settings below.
Encoder - Use the pulldown menu to select from either Binary, Binary Gzip, JSON, or JSON Gzip.
Heartbeat Rate - Enter a heartbeat rate in the text entry field (or use the up/down arrows), then set the units of time [Second(s), Minute(s), Hour(s), or Day(s)] in the nearby pulldown menu. 0 = no timeout.
Publish List - Use the pulldown menu to select a Publish List. Once selected, you can use the following buttons  to refresh the list, edit the publish list, or add a publish list, respectively.
This section changes according to the Connection Type selected in the General Settings section above.
Azure Event Hub Settings

(Click to configure the headers) - Click this link to open the 'Specify the Headers for the connection' window, where you can add a new item and set its Key and Value.
Connection String - Enter the connection string for the selected Event Hub. Click on the  button to copy the Connection String to the clipboard. Click on the
  button to open the Event Hub Connection Configurator window.
Device ID - Enter the device identity that is used for device authentication and access control in the text entry field.
Max Message Size - Enter the maximum size of messages (in bytes) in the text entry field or use the up/down buttons.
Azure IoT Hub Settings

(Click to configure the headers) - Click this link to open the 'Specify the Headers for the connection' window, where you can add a new item and set its Key and Value.
Connection String - Enter the connection string for the selected IoT Hub. Click on the  button to copy the Connection String to the clipboard. Click on the
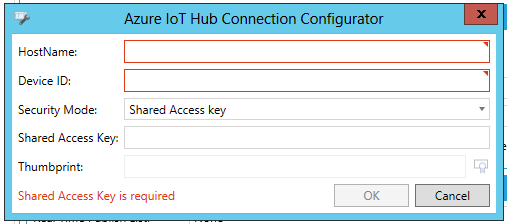
  button in order to open the Azure IoT Hub Connection Configurator, shown below.
Azure IoT Hub Connection Configurator Window

HostName - Enter the Host Name in the text entry field.
Device ID - Enter the Device ID in the text entry field.
Security Mode - Use the pulldown menu to select from Shared Access key or Certificate Thumbprint.
Shared Access Key - This setting will activate upon selection of Shared Access key from the Security Mode setting above. Enter the Shared Access Key in the text entry field.
Thumbprint - This setting will activate upon selection of Certificate Thumbprint from the Security Mode setting above. Enter the certificate thumbprint in the text entry field or click on the  button to open the Certificate Browser window to navigate to your selected certificate thumbprint.
Protocol - Use the pulldown menu to select from Automatic, AMQP, or Web Sockets.
Max Message Size - Enter the maximum size of messages (in bytes) in the text entry field or use the up/down buttons.
Azure Edge Hub Settings

IoT Edge Hub connection takes advantage of the default Hub defined in IoT Edge for publishing the data and receiving the commands. The Edge Hub works only on IoT Edge devices. It's possible to define only one IoT Edge Hub for each device.
Protocol - Use the pulldown menu to select from Automatic, AMQP or Web Sockets.
Max Message Size - Enter a maximum message size, in bytes, in the text entry field, or use the up/down arrow buttons.
Warning: The publisher is using an IoT Edge connection. However, the device associated with the publisher is NOT an IoT Edge device. Please check that the configuration is correct to avoid communication issues.
Platform Services Settings

Publish Machine Name - Enter the name of the remote machine (in the text entry field) where the collected data will be published.
Max Concurrency Level - Set the maximum concurrency level in the text entry field (or using the up/down buttons).
Use security credentials - Click this checkbox if you wish to use security credentials.
Username - If the checkbox above is checked, enter a user name in the text entry field.
Password - If the checkbox above is checked, enter a password in the text entry field.
MQTT Settings

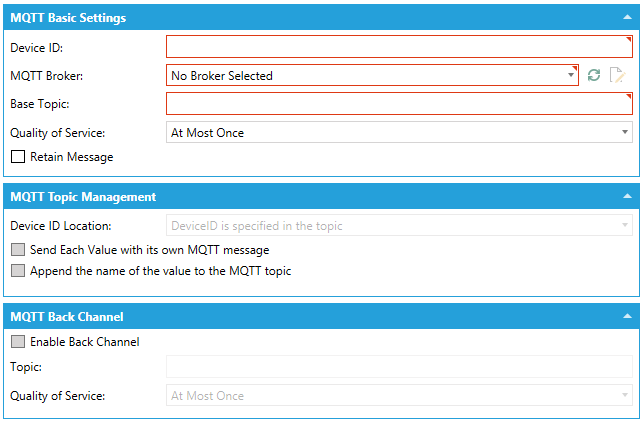
MQTT Basic Settings
Client ID - Enter a Client ID in the text entry field. Make sure that the Client ID is unique for all MQTT publishers in order to avoid conflicts when publishing the data.
Device ID - Enter a Device ID in the text entry field.
MQTT Broker - Use the pulldown to select a MQTT broker. Click on the  button to refresh the list of MQTT Brokers. Click on the
  button to edit the selected MQTT Broker's settings.
Base Topic - Enter a Base Topic in the text entry field. It's possible to subscribe to subtopics using the wildcard "#" at the end of the connection string. The wildcard is mandatory when the compatibility mode is enabled or when the Device ID and value names are appended at the end of the topic. Also the wildcards "+" and "/" are allowed.
Quality of Service - Use the pulldown menu to select from At Most Once, At Least Once, or Exactly Once.
Retain Message - Click this checkbox in order to retain the MQTT message.
MQTT Security Settings
Override Client Certificate -Click this checkbox to override the client certificate.
Client Certificate -If the Override Client Certificate checkbox is checked, you can enter the alternative one in the now active text entry field.
Override security credentials -Click this checkbox to override security credentials.
Username -If the Override security credentials checkbox is checked, you can enter the alternative Username in the now active text entry field.
Password -If the Override security credentials checkbox is checked, you can enter the alternative Password in the now active text entry field.
MQTT Topic Management (not available when compatibility is enabled)
Device ID Location - Use the pulldown menu to select the location of the Device ID.
Send Each Value with its own MQTT message - Click this checkbox to send each value with its own MQTT message.
Append the name of the value to the MQTT topic - If the above selection is checked, you can opt to click this checkbox in order to append the name of the value to the MQTT topic.
MQTT Back Channel (not available when compatibility is enabled)
Enable Back Channel - Click this checkbox if you wish to enable the MQTT Back Channel.
Topic - Once enabled, enter the Topic in the text entry field.
Quality of Service - Use the pulldown menu to select from At Most Once, At Least Once, or Exactly Once.
REST Settings

Connection String - Enter the connection string for the selected REST connection. Click on the  button to copy the Connection String to the clipboard.
Method - Use the pulldown menu to select from either PUT or POST.
Send each value with its own REST message - Click this checkbox to send each value with its own REST message.
Append the name of the value to the REST URL - If the above selection is checked, you can opt to click this checkbox in order to append the name of the value to the REST URL.
Use security credentials - Click this checkbox if you wish to use security credentials.
Username - If the checkbox above is checked, enter a user name in the text entry field.
Password - If the checkbox above is checked, enter a password in the text entry field.
When you have completed your settings, click on the Apply button. Click on Close to return to the Workbench. Your new Publisher Connection will now appear in the Project Explorer.
See Also:
IoTWorX Configuration in Workbench