|
|
The features on this page require a GENESIS64 Advanced license and are not available with GENESIS64 Basic SCADA . |
|
|
The features on this page require a GENESIS64 Advanced license and are not available with GENESIS64 Basic SCADA . |
To Add a Logger:
Open the Workbench and expand your project and then the Internet of Things node.
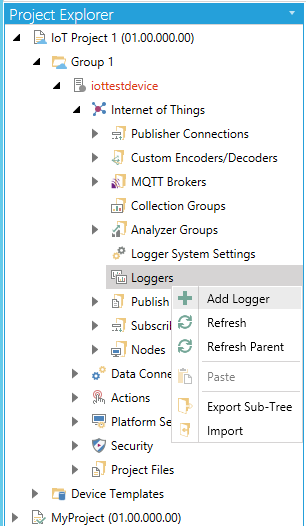
Right-click on the Loggers node, then click on Add Logger in the pulldown menu, as shown below.
Editing the Logger System Settings in the Project Explorer

-OR-
Select the Logger node, then click on the Add Logger button, shown below, in the Edit section of the Home ribbon in the Workbench.
Add Logger Button

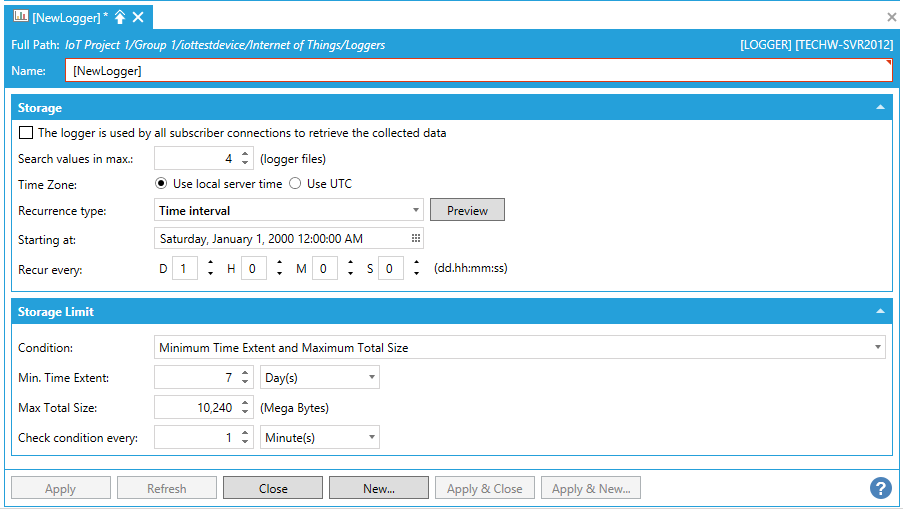
This opens the Logger properties in the Workbench, as shown below.
Logger Properties

Storage
The logger is used by all subscriber connections to retrieve the collected data - Check this checkbox if you wish for this logger to retrieve collected data for all subscriber connections. If this box is checked, you will see a "Buffered Data" folder under each device in the Internet of Things node in the data browser, which will allow you to access the device's buffered data.
Search values in max - Enter a maximum (in logger files) in the text entry field or use the up/down arrow buttons.
Time Zone - Select either 'Use local server time' or 'Use UTC'.
Recurrence type - Use the pulldown menu to select from One time only, Time interval, or Specific dates and times. Click the Preview button to open the Recurrence Preview window to see your set recurrences.
Starting at - Enter a date and time in the text entry field or click on the  button to open the date and time control to select your preferred date and time.
Recur every -Enter a value in the text entry field and then use the nearby pulldown menu to select units [Second(s), Minute(s), Hour(s), Day(s), Week(s), Month(s), or Year(s)].
If 'Specific dates and times' is selected for Recurrence type:
Pick specific times - Click this checkbox in order to set specific times. This activates the Seconds field below.
Seconds - Enter a value in the text entry field or click on the  button, which allows you to make a multi selection of units.
Storage Limit
Condition - Use the pulldown menu to select from 'Minimum Time Extent and Maximum Total Size', 'Minimum Time Extent', or 'None'.
Min. Time Extent - Enter a value in the text entry field (or use the up/down arrow buttons) then use the pulldown menu to select units from Minute(s), Hour(s), or Day(s).
Max. Total Size - Enter a value in the text entry field in megabytes (or use the up/down arrow buttons).
Check condition every - Enter a value in the text entry field (or use the up/down arrow buttons) then use the pulldown menu to select units from Second(s), Minutes(s), Hour(s), or Day(s).
Click Apply to save your changes then Close to return to the Workbench.
See Also:
IoTWorX Configuration in Workbench