|
|
The features on this page require a GENESIS64 Advanced license and are not available with GENESIS64 Basic SCADA . |
|
|
The features on this page require a GENESIS64 Advanced license and are not available with GENESIS64 Basic SCADA . |
You can add Subscriber Connections for use later on when creating a new IoT Project. This makes it easier; to select from existing Subscriber Connections from a pulldown menu; than to add the required connection string information and related properties each time.
To Create a Subscriber Connection:
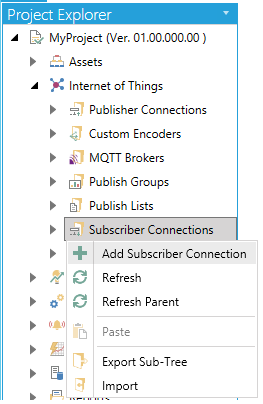
In the Workbench, expand a project and the expand the Internet of Things node. Right-click on the Subscriber Connections node, as shown below, and then click on Add Subscriber Connection.
Add Subscriber Connection from Project Explorer in the Workbench

-OR-
Select Subscriber Connections then click on the Add Subscriber Connection button (shown below) in the Edit section of the Home ribbon in the Workbench.
Add Subscriber Connection Button

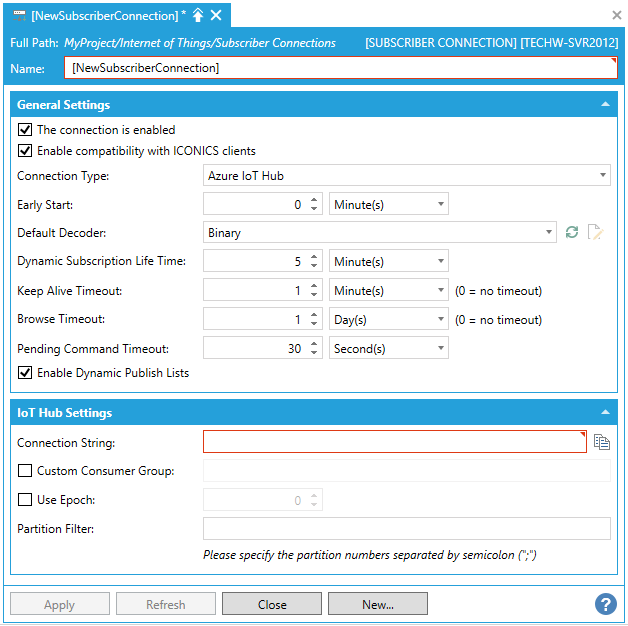
This opens the Subscriber Connection properties window, as shown below, in the Workbench. Enter a Name for the Subscriber Connection in the top text entry field.
Subscription Connection Properties in the Workbench

General Settings
The connection is enabled - Click this checkbox in order to keep the Subscriber Connection enabled.
Enable compatibility with ICONICS clients - Click this checkbox to ensure compatibility with ICONICS clients.
Collect the logged data retrieved with this subscription - Click this checkbox if you would like to include collected logged data from Hyper Collector data buffered on the devices.
Connection Type - Use the pulldown menu to select from Azure Event Hub, Azure IoT Hub, or MQTT.
Early Start - Enter an early start amount of time in the text entry field and then set the units [Minute(s), Hour(s), Day(s)] in the nearby pulldown menu.
Default Decoder - Use the pulldown menu to select from Binary, Binary Gzip, JSON, or JSON Gzip.
Dynamic Subscription Life Time - Enter the dynamic subscription life time amount in the text entry field and then set the units [Minute(s), Hour(s), Day(s)] in the nearby pulldown menu.
Keep Alive Timeout - Enter the keep alive timeout in the text entry field and then set the units [Second(s), Minute(s), Hour(s), Day(s)] in the nearby pulldown menu. Entering '0' indicates no timeout.
Browse Timeout - Enter the keep alive timeout in the text entry field and then set the units [Second(s), Minute(s), Hour(s), Day(s)] in the nearby pulldown menu. Entering '0' indicates no timeout.
Pending Command Timeout - Enter an amount of time for a pending command timeout in the text entry field and then set the units [Second(s), Minute(s), Hour(s), Day(s)] in the nearby pulldown menu.
Enable Dynamic Publish Lists - Click this checkbox to enable dynamic publish lists.
Datasets Support
Dataset Update Mode -Use the pulldown menu to select from either Overwrite values or Append values.
Append up to -If 'Append values' is selected from the previous setting, you can enter a number of items to append up to in the text entry field (or use the up/down arrow buttons).
Selecting 'Azure Event Hub' in the Connection Type setting in General Settings activates the following section.
Event Hub Settings

Event Hub Settings
Connection String - Enter the connection string for the Event Hub in the text entry field. Once you have entered the connection string, you can then click on the  button in order to copy the string to the clipboard for use external to the Subscriber Connection settings.
Custom Consumer Group - Click this checkbox if you intend to use a custom consumer group with the Azure Event Hub.
Use Epoch - Click this checkbox if you intend to use the Epoch parameter with the Azure Event Hub.
Partition Filter - Enter partition numbers in the text etnry field, separated by a semicolon (;).
Early Start Settings

Early Start Settings
Retrieve messages -Use the pulldown menu to select from From the End, From the Start, From Enqueued Timestamp, From Offset, or From Sequence Number.
Fallback to -If activated based on selection in the previous menu item, use the pulldown menu to select from From the End or From the Start.
Note: The server will create a position using the last offset, timestamp, or sequence number retrieved. If they are not available, it will retrieve the value from the position specified in the fallback setting.
Include the event specified -If activated by previous menu item selection, click this checkbox to include the event specified from the hub.
Selecting 'Azure IoT Hub' in the Connection Type setting in General Settings activates the following section.
IoT Hub Settings

IoT Hub Settings
Event Connection String - Allows sending receiving message on the device-side endpoints. Enter a connection string which allows the device to communicate with the IoT Hub. Click on the  button to copy the text entry field contents to the clipboard. Click on the
  button to configure the Event Hub connection string. This opens the Event Hub Connection Configurator.
Hub Owner Connection String - Allows sending commands to the remote endpoints. Enter the string in the text entry field. Click on the  button to copy the text entry field contents to the clipboard.
Custom Consumer Group - Click this checkbox if you intend to use a custom consumer group with the Azure IoT Hub. If selected, you can enter the group in the now activated text entry field.
Use Epoch - Click this checkbox if you intend to use the Epoch parameter with the Azure IoT Hub. If selected, you can enter a number in the now activated text entry field (or use the up/down arrow buttons).
Partition Filter - Enter partition numbers in the text entry field, separated by a semicolon (;).
Early Start Settings

Early Start Settings
Retrieve messages -Use the pulldown menu to select from From the End, From the Start, From Enqueued Timestamp, From Offset, or From Sequence Number.
Fallback to -If activated based on selection in the previous menu item, use the pulldown menu to select from From the End or From the Start.
Note: The server will create a position using the last offset, timestamp, or sequence number retrieved. If they are not available, it will retrieve the value from the position specified in the fallback setting.
Include the event specified -If activated by previous menu item selection, click this checkbox to include the event specified from the hub.
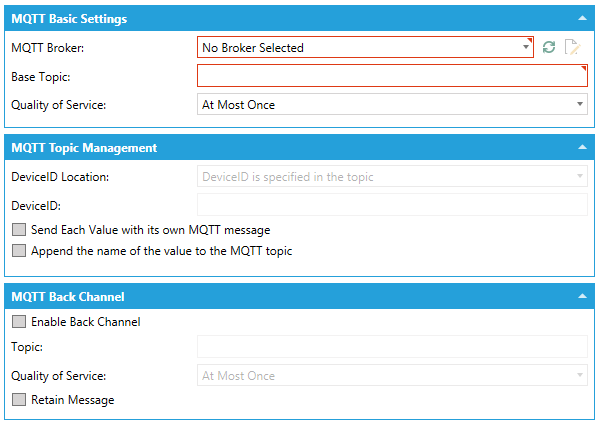
Selecting 'MQTT" in the Connection Type setting in General Settings activates the following sections.
MQTT Settings

MQTT Basic Settings
ClientID - Enter a client ID in the text entry field. Make sure that the Client ID is unique for all MQTT publishers in order to avoid conflicts when publishing the data.
MQTT Broker - Use the pulldown menu to select a MQTT broker. Click on the  button to refresh the list of brokers. Click on the
  button for further configuration.
Base Topic - Enter a base topic in the text entry field. It's possible to subscribe to subtopics using the wildcard "#" at the end of the connection string. The wildcard is mandatory when the compatibility mode is enabled or when the Device ID and value names are appended at the end of the topic. Also, the wildcards "+" and "/" are allowed.
Quality of Service - Use the pulldown menu to select from At Most Once, At Least Once, or Exactly Once.
MQTT Security Settings
Override Client Certificate -Click the checkbox to override the client certificate and set a new one.
Client Certificate -If the prior setting is enabled, enter a client certificate in the text entry field or click on the  button to open the Certificate Browser and navigate to your selected client certificate.
Override security credentials -Click this checkbox to override the security credentials and set new ones.
Username -If the prior setting is enabled, enter a user name in the text entry field.
Password -If the Override security credentials setting is enabled, enter a password in the text entry field.
MQTT Topic Management (not available when compatibility is enabled)
DeviceID Location - Use the pulldown menu to select the DeviceID location.
Device ID - Enter the device ID in the text entry field.
Each Value is sent with its own MQTT message - Click this checkbox to send each value with its own MQTT message.
Name of the value is appended to the MQTT topic - Click this checkbox to append the name of the value to the MQTT topic.
MQTT Back Channel (not available when compatibility is enabled)
Enable Back Channel - Click this checkbox in order to enable a MQTT back channel.
Topic -What will be used to publish the data. Enter a topic name in the text entry field.
Quality of Service - Use the pulldown menu to select from At Most Once, At Least Once, or Exactly Once.
Retain Message - Click this checkbox in order to keep the MQTT Back Channel message.
When you have completed your settings, click on the Apply button. Click on Close to return to the Workbench. Your new Subscription Connection will now appear in the Project Explorer.
See Also:
IoTWorX Configuration in Workbench