|
|
The features on this page require a GENESIS64 Advanced license and are not available with GENESIS64 Basic SCADA . |

![]()
|
|
The features on this page require a GENESIS64 Advanced license and are not available with GENESIS64 Basic SCADA . |
![]()
The CFSWorX solution empowers an organization to alert the right field worker to respond to equipment service needs. One popular notification method is SMS messaging. CFSWorX supports SMS messaging via Twilio, Vonage (formerly known as Nexmo), Azure Communication Service (ACS) and directly through AT&T. The Twilio, Vonage, and ACS services allows you to send SMS messages to a wide range of cell carriers located around the world.
These sections describe how to create connections to:
Twilio Configuration (WhatsApp)
The following table explains which communication methods are supported in each of version of the software.
|
Communication Provider |
Message Type |
ICONICS Minimum Version |
|
Twilio |
SMS (outgoing) |
10.96.0 |
|
Twilio |
SMS acknowledgement |
10.96.0 |
|
Twilio |
Voice (outgoing) |
10.96.0 |
|
Twilio |
Voice acknowledgement |
10.96.2 |
|
Twilio |
Whatsapp (outgoing) |
10.96.0 |
|
Twilio |
Whatsapp acknowledgement |
10.96.1 |
|
Vonage |
SMS (outgoing) |
10.96.1 |
|
Vonage |
SMS acknowledgement |
10.96.2 |
|
Vonage |
WhatsApp(outgoing) |
10.96.1 |
|
Vonage |
WhatsApp acknowledgement |
10.97.0 |
|
Vonage |
Voice (outgoing) |
10.96.1 |
|
Vonage |
Voice acknowledgement |
10.97.2 |
|
SendGrid |
Email (outgoing) |
10.96.2 |
|
SendGrid |
Email acknowledgement |
10.96.2 |
|
AT&T |
SMS (outgoing) |
10.96.0 |
|
AT&T |
SMS acknowledgement |
NA |
|
Azure Communication Services |
SMS (outgoing) |
10.97.1 |
|
Azure Communication Services |
SMS acknowledgement |
10.97.2 |
|
Sendinblue |
Email (outgoing) |
10.97.1 |
|
MSTeams |
Outgoing IM |
10.97.2 |
CFSWorX also supports traditional SMS (using a modem) and email. For these methods, see AlertWorX - Alert Notification for Email and SMS or the the AlertWorX - Alert Notification for Email and SMS application note.
Go to the link below to make an account to use the ATT API. Note the client ID and client secret for later use.
https://developer.att.com/developer/flow/apiPlaygroundFlow.do?execution=e1s1
Open Workbench.
Expand Alarms and Notifications > AlertWorX.
Add a new ATT Configuration in that folder.
Give the configuration a name.
Enable Is Default Configuration.
In the Credentials section, fill the Client ID and Client Secret with the information from your AT&T account.
Apply the changes.
Go to the link below to make a Twilio Account:
https://www.twilio.com/try-twilio
Open Workbench.
Expand Alarms and Notifications > AlertWorX.
Add a new Twilio Configuration in that folder.
Go to the Phone Numbers tab.
Add the phone number provided by Twilio.
Go to the WhatsApp Numbers tab.
Add the WhatsApp number provided by Twilio.
Go to the General Settings tab.
Enable Is Default Configuration.
Choose a Default Phone Number and Default WhatsApp Number.
Apply the changes.
The next steps require these Windows Environment Variables to be changed for the user running the CFSWorX Services. To do this, we must sign into Windows as that account.
Log into Windows as the user configured to run the ICONICS Connected Field Service services.
Open Windows Settings.
Search for Environment Variables.
Select Edit environment Variables for your account.
Add the following variables and their values:
Ico_Twilio_AccountSid: This is the account SID associated with your Twilio account. You can find it in your Twilio account console.
Ico_Twilio_AuthToken: This is the Authentication token associated with your Twilio account. You can find it in your Twilio account console if you have a Twilio account.
Ico_Twilio_UserName: This is any identifier; this is basically used for us to recognize that Twilio is in fact sending you the updates. It is important that you do not use special characters in this. (See link below where Twilio specifies this). Example value: ICONICS
Ico_Twilio_Password: This is any identifier; this is basically used for us to recognize that Twilio is sending you the updates. It is important that you do not use special characters in this. (See link below where Twilio specifies this). Example: Gen64
Note: It is very important that the environment variables and the services are under the same user, if not they will not be read by the service correctly. Please also do not include any special characters in your username and password. See https://www.twilio.com/docs/usage/security for more information on this.
Restart the ICONICS Alert REST Service and the ICONICS Web API Service after making these changes.
Go to the link below to make a Vonage account
https://dashboard.nexmo.com/sign-up
Open Workbench.
Expand Alarms and Notifications > AlertWorX.
Add a new Vonage Configuration in that folder.
Give the configuration a name.
Go to the Phone Numbers tab.
Add the phone number provided by Vonage.
Go to the WhatsApp Numbers tab.
Add the WhatsApp number provided by Vonage.
Go to the General Settings tab.
Enable Is Default Configuration.
Choose a Default Phone Number and Default WhatsApp Number.
In the Credentials section, fill the API Key and API Secret with the information from your Vonage account.
To set up voice go to https://dashboard.nexmo.com/applications to create an Application.
Give the application a name.
Enable voice.
Generate the Public and private key and store the downloaded private key as Nexmo.key to C:\ProgramData\ICONICS\pki\own\private or the OEM equivalent of this location.
Copy the Application ID in the Additional Settings for text to talk section of the Workbench Vonage Configuration. Link the Vonage number to this newly created application in the Vonage dashboard online.
Apply the changes to the Vonage configuration in the Workbench.
Restart the ICONICS Alert REST Service after making these changes.
[Note: Acknowledgement can also be done via Twilio WhatsApp.]
CFSWorX can be set up to acknowledge alarms through response messages using Alert Rest’s Twilio Configuration. The following steps need to be followed.
A default Twilio configuration and its associated environment variables. Please refer to the product help for AlertWorX Twilio Configurations.
The Web API Service should be set up and running to receive incoming messages. Please refer to the app note “GENESIS64 - Voice Machine Interface” for details.
The Twilio console should have the Webhook setup to point to the Web API Service.
For this, go to https://www.twilio.com/console/phone-numbers/ and select your number.
Under Messaging, set up the Webhook for ‘A MESSAGE COMES IN’ field as Http Post.
Figure 1 - Messaging Configuration
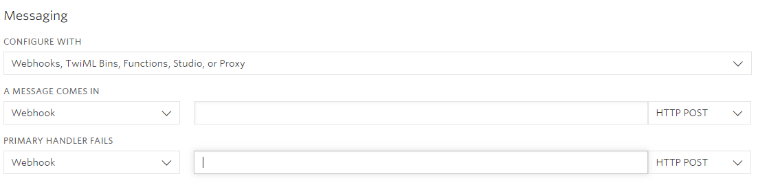
The format of the Webhook is:
https://yourusername:yourpassword@yourdomain.com/fwxapi/twilio/sms
Where ‘yourusername’ and ‘yourpassword’ is the Ico_Twilio_UserName and Ico_Twilio_Password environment variables respectively that you set up initially. These are used by Web API Service to authenticate the origin of incoming messages. ‘yourdomain.com’ is the domain set up while setting up the Web API Service. The rest of the link should be used as is.
Create a new user in Workbench -> Security. The user must use Ico_Twilio_UserName as the Username and Ico_Twilio_Password as the Password for this new user’s login. This is necessary if you want to get status updates of SMS, receive incoming messages for acknowledge, blacklisting etc.
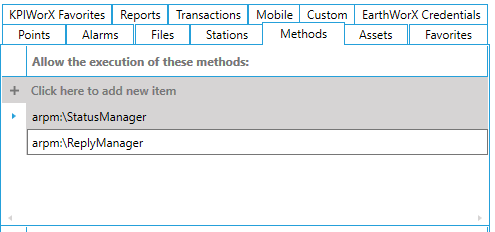
For this newly created user you should essentially give permissions in the Method Tab of Security for the following two methods, so it is more secure.
arpm:\ReplyManager
arpm:\StatusManager
Figure 2 - Methods Tab in Security
And under the Stations tab, you should give the station name.
Make sure to restart the ICONICS Alert REST Service and the ICONICS Web API Service after making these changes.
Additionally, if the Callback URL (see below) is specified in the Workbench, the message status of an outgoing message will also be updated in the database. The Callback URL is set up while configuring IcoWebAPIService. Eg: yourdomain.com
Figure 3 - Twilio Configuration

Once this is set up and you have CFSWorX set up to send messages (the format of outgoing message is “MsgID :123 Msg: xyz” where MsgID is auto generated and Msg is set up in your CFSWorX workflow template) on Alarm generation, you can respond to the messages to acknowledge the alarm.
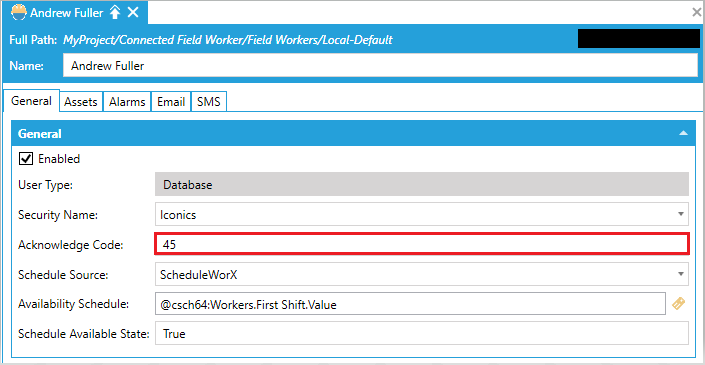
It is assumed that the responses for acknowledging alarms will have at a minimum the MsgID followed by the AckID. The AckID must match the Acknowledge Code that assigned on the Field Worker’s General tab.
Note: Acknowledge Code could be the default Acknowledge Code configured for the workflow configuration of CFSWorX or BridgeWorX, in case the worker does not have an acknowledge code assigned. BridgeWorX does not currently support the Worker Lookup activity so it will always need to use the default Acknowledge Code.
Figure 4 - Field Worker's General Tab
Lastly, the comment part is accepted as anything that follows MsgID and AckID, but it can be empty.
An example is: 12 45 Acknowledging Alarm from phone.
Here ‘12’ is MsgID, ‘45’ is AckID and ‘Acknowledging Alarm from phone.’ is comment. If comment is not provided a default comment is added by AlertRest.
Please Note:
This is not a reliable way of acknowledging since messages may get delayed or not get delivered by cell carriers. You can verify if an alarm was acknowledged by viewing it in the AlarmWorX64 Viewer.
If two messages have the same Msg ID and same Ack ID (due to reaching message ID limit - configurable in Platform Services in Workbench) the latest one gets acknowledged.
Users can respond to a Twilio WhatsApp alert message from CFSWorX to acknowledge the alarm.
Similar to acknowledging messages via SMS sent by Twilio, to acknowledge an alarm the recipient can respond to the WhatsApp alerts with the message ID, their acknowledge code, and an optional comment.
Note: Acknowledge Code could be the default Acknowledge Code configured for the workflow configuration of CFSWorX or BridgeWorX, in case the worker does not have an acknowledge code assigned. BridgeWorX does not currently support the Worker Lookup activity so it will always need to use the default Acknowledge Code.
Acknowledging via WhatsApp requires a WhatsApp business account. Currently only WhatsApp messages sent from Twilio support this feature.
For more information on setting up Twilio (including WhatsApp) configurations, see Twilio Configurations and Setting Up Twilio.
See Also: