![]()
![]()
A smart symbol is a re-usable model that has dynamic components. It is a grouping of graphical objects that you can store in the Symbols Library so that you can reuse it later in GraphWorX64 displays. In GraphWorX64, the Dynamics ribbons for 2D and 3D have a Smart Symbols section that you can use to create Smart Symbols and define their Smart Properties. In 2D, there is a third button that lets you update Smart Symbol components that share a ShareKeyword. This topic describes smart symbols and how to use the Smart Symbols buttons.
The Smart Symbols section on the Dynamics Tab; Update Shared is available in 2D only
Note that smart symbols are either 2D or 3D models: 2D smart symbols can be used only in 2D GraphWorX displays, and 3D smart symbols can be used only in 3D GraphWorX displays. GraphWorX64 comes with a modest set of 2D and 3D smart symbols for you to experiment with located in the Symbol Library. You can add to the symbols library by purchasing industry-specific models from ICONICS or by creating your own smart symbols.
Creating smart symbols from your own models can save time when developing graphical displays. For example, create a smart symbol for a model such as a wind turbine or the floor of a building for reuse in 3D displays. Or create a smart symbol for a conveyor you want to reuse in 2D.
A smart symbol has a unique set of properties, called SmartProperties, that expose the smart symbol’s dynamic components. The SmartProperties section of the smart symbol’s properties contains properties that are bound to inner objects but allow you to configure them as properties of the smart symbol itself. In fact, if you ungroup a smart symbol, its SmartProperties settings will be lost. A Smart Property sets one or more properties of the smart symbol’s child or descendant objects. A child object is not limited to “visual” features of the smart symbol; a child object can be a non-visual object such as a dynamic. For information about configuring Smart Properties see Smart Symbol Binding the Ranges and Complex Data Binding.
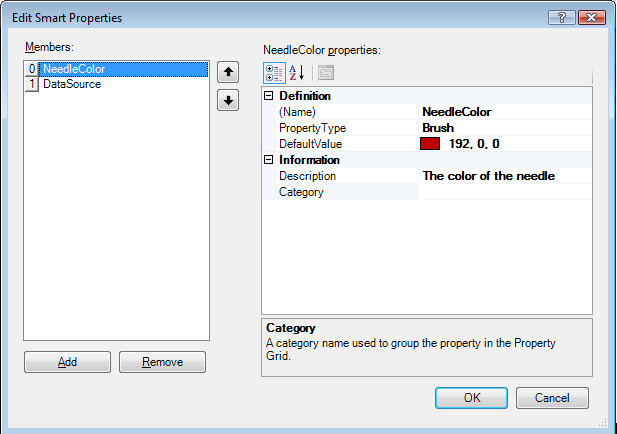
A Smart Property definition consists of the name, property type, default value, description, and category. You can edit Smart Properties in the Properties tab, or set a Smart Property’s value using scripting.
|
|
Warning: If you ungroup a smart symbol, a warning tells you that your smart symbol configuration settings will be lost. |
The remainder of this topic tells you how to:
You can also Use a Symbol from the Symbol Library. 2D smart symbols have an additional feature for making uniform changes to components that share a ShareKeyword. For more information, refer to Updating Shared Objects.
To create a smart symbol:
Create the model you want to save for re-use, then group the model so that all components are grouped in the Explorer. For information on grouping, refer to the topics for grouping in 2D and grouping in 3D.
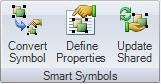
Make sure the group is selected in the Explorer, then click the Convert Symbol button in the Smart Symbols section of the Dynamic ribbon; or right-click the group and select Convert To Smart Symbol from the pop-up menu.
In the Automatic Smart Binding Options dialog box that appears, select one or both of the options (each is described below), then click the OK button. (More advanced information about configuring Smart Properties is provided in Tips for Creating Smart Symbols.)
Expose data sources as Smart Properties. Putting a checkmark in the check box saves the data source properties of the smart symbol as SmartProperties so they can be changed with each use of the smart symbol; all properties that are connected to data go into the SmartProperties section. If you leave this box empty, the data sources will be saved with the smart symbol and can’t be changed when the smart symbol is reused; this is useful when you want to reuse a smart symbol whose data sources are always the same ones.
Optimize hierarchical data sources. When this option is selected, all descendant objects of the group are examined for existing data source connections. All found data sources are analyzed to determine common hierarchical roots. Then a new Smart Property is added for each unique hierarchical root, and the descendant data source properties are automatically bound to that Smart Property by combining the Smart Property value (the common hierarchical root) with the remaining unique portion of the data source. See Complex Data Binding for more information.
In the Edit Smart Properties dialog box that appears, click the Add button to add a Smart Properties. Add and define any smart properties that you want to expose in configuration mode. For example, to expose the Smart Symbol object's DataSource property, change the Smart Property's name to "DataSource". Specify the property's PropertyType and enter a DefaultValue for it. Then click Add again to add more properties that you want to expose.
When you are done, click the OK button. This creates the smart symbol and exposes the properties you defined as Smart Properties.
Copy and paste your new smart symbol into a Symbol Library. To do this:
In the Explorer, make sure the new smart symbol is selected.
Move your cursor over the smart symbol in the display and right-click. This pops up a menu.
Click Copy.
Click the Symbols tab to display it. From the drop-down list at the top of the tab, expand the categories and click the folder you want to add the new symbol to. (Add 3D a smart symbol to a 3D folder, and 2D smart symbols to a 2D folder.) Wait for the folder to load. For other options, you can refer to Symbol Library.
In the folder area below, right click to display the popup menu and click Paste. The Symbol Properties dialog box appears.
Specify a name and title and description. Include any search and shared keywords that will help others find the symbol. (To learn how a smart symbol's shared keywords are used, refer to Updating Shared Objects.) Then click OK. Your new smart symbol is saved in the 3D folder.
To use the smart symbol in another display, navigate to the folder where you saved it, and drag if from the folder into the 3D viewport in the display. Then modify its exposed properties as you would any other smart symbol.
Typically, when you put a smart symbol to use in multiple displays, you’ll want to assign different names to the properties. To do so, you must edit the smart symbol’s properties in each display.
In the Explorer, select the smart symbol in the display.
Click the Define Properties button. The Edit Smart Properties dialog box appears.
To modify a Smart Property, select it in the Members list. Its values appear on the right side of the dialog box. Change its name, default value, property type, category, or description. [See options below]
To remove a Smart Property, select it in the Members list and click the Remove button.
To add a Smart Property click the Add button. A new property is added to the Members list. On the right side of the dialog box, define the Smart Property by specifying its name, default value, property type, category, or description.
Click OK when you are done.
If you want to propagate your changes to objects that share the smart symbol's ShareKeyword, refer to Updating Shared Objects.
The following options for Smart Symbol Properties are available via the DataSource pulldown menu:
AliasCommandType
AliasCommandTypeAllowNone
AnimationModes
BitmapEffect
Boolean
BooleanOptionType
Brush
Byte
CharacterCasing
ClickMode
Color
ComparisonType
ComparisonTypeRangeValidation
CornerRadius
Cursor
CustomDateFormat
CustomTimeFormat
Dashes
DecimalPlaces
DigitGrouping
Dock
Double
DoubleAngle
DoubleAutomatic
DoubleInfinity
DoubleLineWidth
DoublePercentage
DoublePercentageWithDefaults
EdgeMode
EdgeProfile
Effect
FillBehavior
FillRule
FontFamily
FontSize
FontStretch
FontStyle
FontWeight
HorizontalAlignment
ImageSource
Int16
Int32
Int64
KernelType
Key
Material
MaximumLength
MessageBoxButton
MessageBoxImage
MessageBoxResult
ModifierKeys
PartitionModes
PenLineCap
PenLineJoin
PickCommandName
PickGroupName
PickModes
PlacementMode
Radix
RangeSelectorMode
RepeatCount
SByte
ScrollBarVisibility
Single
StatefieldMode
Stretch
StretchDirection
String
StringDataSource
StringDataSourceWithTokens
StringDisplayFileName
StringFileName
StringMultiline
TextAlignment
TextDecorationCollection
TextTrimming
TextWrapping
Thickness
TimeDateFormats
TimeDateModes
TypeCode
UInt16
UInt32
UInt64
VerticalAlignment
Visibility
WindowStartupLocation
WindowState
WindowTargetType
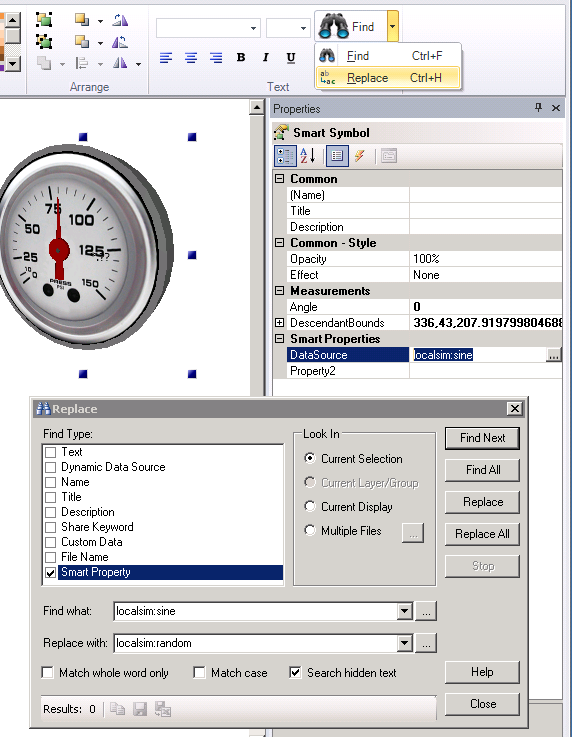
At some point, you may wish to either find or replace Smart Properties values within a display. Any Smart Symbol has properties where you can assign value. For example, imagine having multiple smart symbols as part of your display and wishing to perform a Find and Replace on the value of those Smart Symbol properties. This is useful for complex objects with smart properties where users must duplicate and change the properties quickly across displays and it is very important to be able to change smart properties without having to drill down into the symbol.
GraphWorX64 now includes a "Smart Property" option to the Find/Replace dialog. To use this option:
From the GraphWorX64 Home Ribbon, click on the Find button. Clicking on the downward pointing carat next to the button that allows you to select from either 'Find' or 'Replace'. You can also use keyboard commands (CTRL+F for 'Find' or CTRL+H for 'Replace').
Depending on what you have selected (Find or Replace), you'll see the resulting window appear. In this example, we've selected the 'Replace' function. In the top right of the window, you now have the option of selecting 'Smart Property' as the searchable option (in addition to Text, Dynamic Data Source, Name, Title, Description, Share Keyword, Custom Data and/or File Name).
As with other searchable elements, you'll be able to decide where you wish to find or replace the specific values [in the 'Look In' section of the window]. For finding alone, you can enter the value in the 'Find what:' text box, OR use the pulldown menu for pre-existing values OR click on the ellipsis [...] button to open the data browser. If you selected the 'Replace' function, you'd also be able to enter an additional value in the 'Replace with' text box OR use the pulldown menu or data browser. In this illustrated example, we are replacing the 'localsim:sine' value with 'localsim:random'. You can decide to 'Match whole word only', 'Match case' and/or 'Search hidden text'.
You can then proceed to 'Find Next', 'Find All', 'Replace' or 'Replace All' (depending on the selected Find/Replace function). The Find/Replace tool will then perform your requested search. You can click on 'Stop' at any point to end the process before completion. When the function has completed, you'll see the results within the same window.
Note: When using Find/Replace in Smart Properties, the Smart Property value must be something that is convertible within a To/From string. If the value cannot be converted within a To/From string (for example, a gradient color), then it won't work within the text-based Find/Replace tool.
See also: