![]()
![]()
Use the Symbol Library to store graphical objects as symbols and to build and maintain symbol categories. A symbol is a group of objects that is treated as a single object. Symbols can be user-created (for more information, refer to Smart Symbol Basics) or can be loaded from the Symbol Library categories delivered with GENESIS64. Symbols in the default Symbol Library are 2D symbols for use in 2D GraphWorX displays as well as 3D symbols for use in 3D viewports in GraphWorX displays. There is no limit to the number of Symbol Library category files you can create, or to the number of symbols that can exist within each file.
The main purpose of the Symbol Library is to preview and import previously stored GENESIS64 symbols back into GENESIS64. Additional features let you manage the content of the Symbol Library by:
Creating, renaming, and deleting categories and directories
Storing, renaming, and deleting symbols in a category
The remainder of this topic describes the following:
Also refer to:
To use a symbol from the Symbol Library in a display, do the following:
Click the Symbols tab to open it. (If you don't see the Symbols tab on your work surface, go to the 2D View ribbon and, in the Show/Hide section of the ribbon, make sure Symbols has a check mark beside it.)
![]()
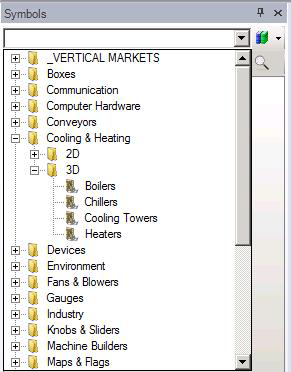
Click the list box under the title bar, navigate to the symbol library (folder and item), and select the symbol folder that you want to use. Drill down into the folders until you find the symbol you are looking for. Note that if you are adding a symbol to a 3D display, the symbol must be a 3D symbol. 3D folders contain 3D symbols.
|
|
Tip. You have the option of always defaulting to the last open folder by using a preference setting. Go to the GraphWorX64 Preferences tab, select General Settings, and change the RememberLastSymbolCategory property to True. The next time GraphWorX64 is closed, it will remember the last symbol folder that was open, and that folder will become the default symbol folder the next time GraphWorX64 is opened. |
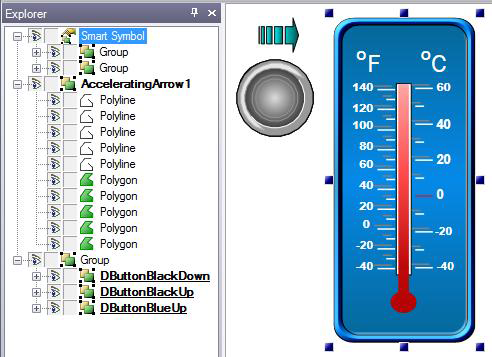
Go to the Explorer tab to see the objects that make up the symbol. A dynamic symbol that has a data source (such as a slider) appears in the Explorer as a Smart Symbol. A static symbol such as an arrow may appear as its own grouped object or as a series of grouped objects.
If the symbol is dynamic, go to the object's Properties tab to attach the appropriate data source(s) to it. You'll find the data sources in a smart symbol's Smart Properties section.
Three Symbols in the object Explorer: a thermometer (Smart Symbol), an arrow (AcceleratingArrow1), and a button (Group)
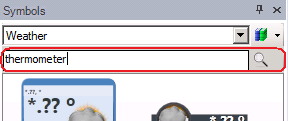
To search for a symbol in the Symbol Library, do the following:
In GraphWorX64, go to the Symbols tab. (If you don't see it, go to the 2D ribbon's View tab and put a check mark in the Symbols check box and try again.)
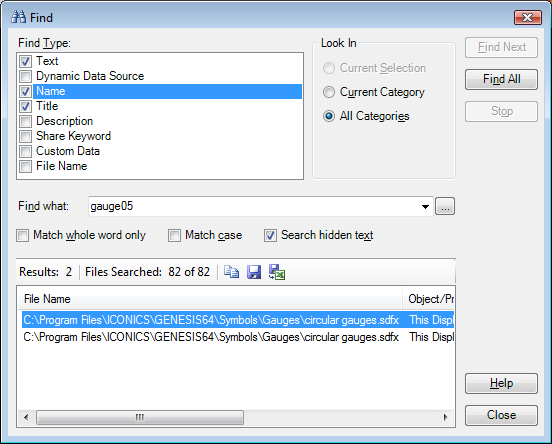
If you are searching for properties for one particular symbol, navigate to and select that symbol in the library. If you are searching for a symbol or symbols in one particular category, navigate to that category. Then, in the quick-search line, enter a search string and click the magnifying glass icon. The Find dialog box appears with a listing of the symbols that contain the string.
If you are searching for a symbol or symbol that could be in any category, continue to the next step.
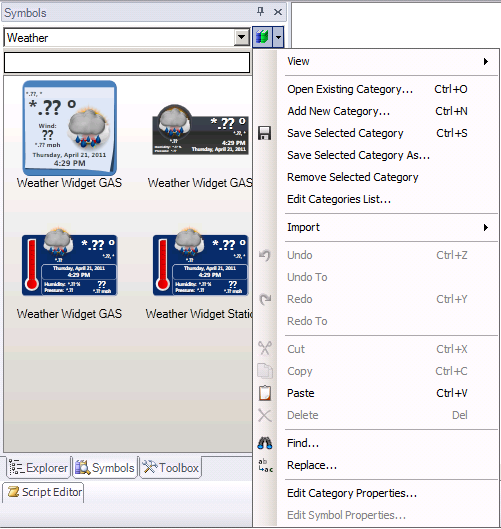
Click the Symbol Menu icon ![]() to open the Symbol Library menu (to see what it looks like, click here) and select Find. (You can also right-click any shape in the Symbol panel to open this menu.) The Find dialog box appears.
to open the Symbol Library menu (to see what it looks like, click here) and select Find. (You can also right-click any shape in the Symbol panel to open this menu.) The Find dialog box appears.
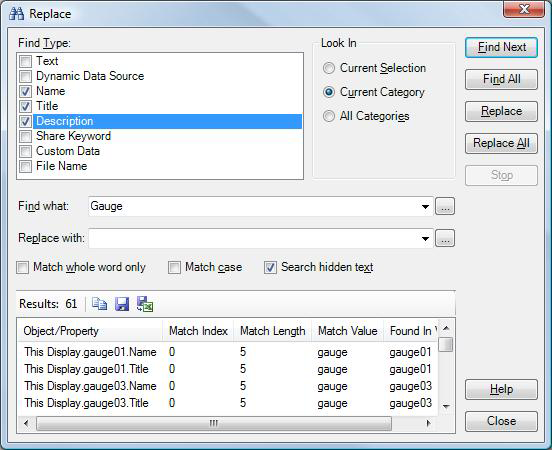
The Replace operation works in a similar way and replaces the Find What string(s) with the Replace With string(s). To use the Replace feature to find and replace text in symbol properties, do the following:
In GraphWorX64, go to the Symbols tab.
If you are searching for properties for one particular symbol, navigate to and select that symbol in the library. If you are searching for a symbol or symbols in one particular category, navigate to that category. If you are searching for a symbol or symbol that could be in any category, continue to the next step.
Click the Symbol Menu icon ![]() to open the Symbol Library menu (to see what it looks like, click here) and select Replace. (You can also right-click any shape in the Symbol panel to open this menu.) The Replace dialog box displays.
to open the Symbol Library menu (to see what it looks like, click here) and select Replace. (You can also right-click any shape in the Symbol panel to open this menu.) The Replace dialog box displays.
In the Find Type box, specify the properties in which you want to replace the text string. Putting a check mark beside an option indicates you want to replace the text string in the property:
|
Option: |
Replaces text in the: |
Adds to the Find What drop-down list: |
|
Text |
Text property of symbols |
|
|
Dynamic Data Source |
OPC tags used as data sources in symbols' DataSource property |
All data sources referenced in the current selection |
|
Name |
Name property of symbols |
All symbol names in the current selection |
|
Title |
Title property of symbols |
|
|
Description |
Description property of symbols |
|
|
Share Keyword |
ShareKeyword property of symbols |
|
|
Custom Data |
CustomData property of symbols |
|
|
File Name |
Names of referenced files |
Names of all files referenced in the current selection |
In the Look In section, choose where you want to search and replace text. (If the selection you want is grayed out, click the Close button then select the category or symbol in the Symbols tab, then restart the Replace feature.)
Current Selection searches the symbol that is currently selected in the Symbols tab.
Current Category searches the category that is currently open in the Symbols tab.
All Categories searches all categories in the Symbol Library. Selecting this option will cause the search to open every category in the Symbols tab; depending on how many categories there are and their size, this could take some time.
In the Find What box, specify the text that will be replaced by doing one of the following:
Type the text to be replaced.
Drop-down the list to choose the name of a tag, symbol, or file in the Symbol Library (available if you selected Dynamic Data Source, Name, and/or File Name in the File Type box).
Drop-down the list to choose a text string you used earlier.
Click the ellipsis button ![]() to open the Data Browser to help you. The Data Browser can be helpful when replacing a complex path to a data source or some other string that is difficult to enter precisely or remember.
to open the Data Browser to help you. The Data Browser can be helpful when replacing a complex path to a data source or some other string that is difficult to enter precisely or remember.
Check Match Whole Words Only to replace the text string only when it is an entire word, not when it is part of a word.
Check Match Case to replace text that matches the text string's case exactly.
Check Search Hidden Text to include in the search any text that is set to Hidden; hidden text will also be replaced.
Do a test search by clicking one of the Find buttons. Matches are displayed in the Results section.
Click the Find Next button to find the first instance of the string you are looking for and highlight it in the Symbols tab.
Click the Find All button to find all instances of what you are looking for.
Refine your search criteria until the result set shows the symbol text strings you want replaced.
Replace strings one symbol at time by clicking Find Next until you find a symbol where the replacement needs to be made, then clicking the Replace button; continue using Find Next and Replace until you are done.
Or replace all at once by clicking the Replace All button.
You can interact with the content in the Results:
To navigate to any symbol listed in the results, double-click it. This highlights it in the Symbols tab; the symbol's category may need to open, first, in the Symbols tab.
To copy the replacement criteria and the results to the clipboard, click the copy button ![]() . You can then paste the report into a file or work area of your choosing.
. You can then paste the report into a file or work area of your choosing.
To save the results in a comma-delimited file (.CSV), click the Save button ![]() . The Save As dialog box will display, allowing you to name the file and select where you want to save it.
. The Save As dialog box will display, allowing you to name the file and select where you want to save it.
To save and open the comma-delimited results file in an Excel spreadsheet, click the Save to Excel button ![]() . The results open in Excel, where you can modify it and save it in any format supported by your Excel filters.
. The results open in Excel, where you can modify it and save it in any format supported by your Excel filters.