![]()
![]()
You can arrange the object in your display different ways. In the Arrange section on the Home ribbon you can do the following with objects in your display:
Creating groups lets you manage a selection of graphical components as one (as described in Groups). You can assign properties to a group, select a group in the Explorer, and manipulate a group. You can lock a group, hide a group, and specify properties and dynamics for a group. Grouping lets you handle several objects as one.
To group objects together, select the objects, and then click the Group button  on the Home ribbon. Once the objects are grouped, you can select them as a group by selecting the group’s name in the Explorer. You will find each group in the Explorer with its objects nested under it in the navigation tree.
To ungroup an object that is grouped, select the group in the Explorer and then click the Ungroup button  .
.
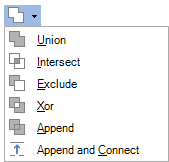
Use the Combine button on the 2D Home ribbon to combine one or more objects to become a more complex shape. In order to enable this button, multiple objects must be selected and touching. This feature works best if the objects you are combining overlap. The menu options on the Combine menu are shown below.
Combine Objects Button
To combine objects:
Select the objects you want to combine. To do this, hold down the Shift key while clicking the objects you are selecting.
Click the Combine button on the Home ribbon to display the menu.
Select the menu option you want to apply to the objects. (See the list below for options.)
Double-click on the combined object to show the handles where you can click and drag to reshape the object. Also, look in the Explorer to see that the combined objects are now one Path object.
Options you can choose from are:
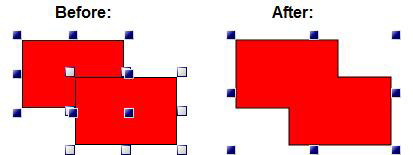
Union - Joins the objects together as one and removes the lines where they were joined. Click here to see two objects before and after a Union.
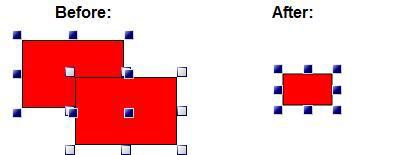
Intersect - Joins the objects together where they intersect and displays only the intersected section. Click here to see two objects before and after an Intersect.
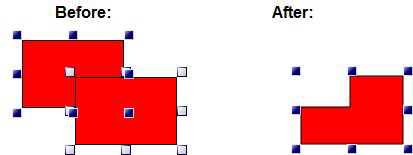
Exclude - Joins the objects together and displays the part of the object that has not been combined together. Click here to see two objects before and after an Exclude.
Xor - Joins the objects together and displays the intersecting part as transparent. Once you start to reshape the object the lines will not stay connected. This option is illustrated in one of the examples below.
Append - Joins the objects together and displays the intersecting part as transparent. When you reshape the object the lines will stay connected. This option is illustrated in the example below.
Append and Connect - Joins the objects together and displays the intersecting part as transparent. When you reshape the object the lines will stay connected. This option is illustrated in one of the examples below.
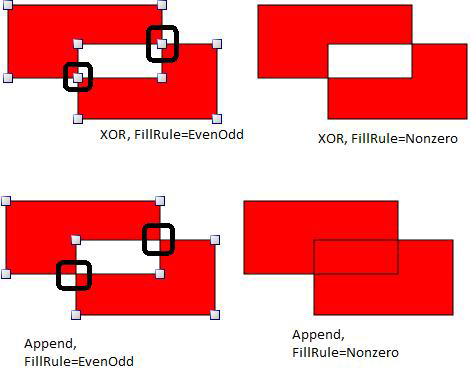
The difference between Xor and Append relates to how vertices are defined at intersection points. Look at the illustration below. Append simply combines the existing vertices of the shapes into one object (so in this case, it is still essentially two overlapped rectangles in a single path object). Xor adds vertices at intersection points (in this case, the two rectangles become two "L"-shaped pieces). Notice also how the FillRule property affects the results.
Comparison of Xor and Append
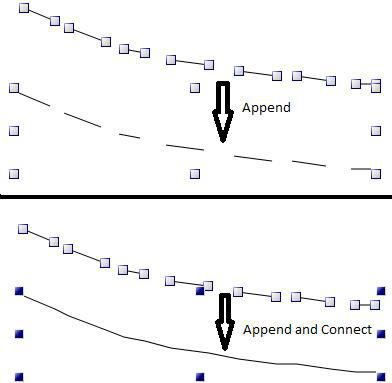
A good way to see the difference between the Append option and the Append and Connect option is with the following example of line segments. When you use Append, the individual segments become a single Path object but the spaces in between the segments remain. But when you use Append and Connect, the individual segments become a single path object where the segments are connected to each other, filling in the gaps.
Comparing the Append Option to the Append and Connect Option
If you have an object or label behind another and you want it to be in front use the Bring Object Forward button on the 2D Home ribbon.
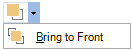
Select the object or label you want to bring to the front.
Click the Bring Object Forward button and select Bring to Front.
If you have an object or label in front of another and you want it to be in behind the object, use the button on the 2D Home ribbon.

Select the object or label you want to send to the back.
Click the Send Object Backward button and select Send to Back.
You can align multiple objects, by their edges, on the right, middle, make them the same size and so on. To align multiple objects click the Align button on the 2D Home ribbon to drop down a menu with alignment options. For an example, refer to Align Multiple Objects.
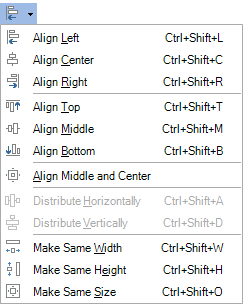
Select the objects you want to align.
Click the Align button on the 2D Home ribbon.
Select how you want to align the objects from the menu that displays. Note: The Distribute Horizontally and Vertically menu options are active only if 3 or more objects are selected.
You can rotate and /or skew the shape:
To rotate the shape, hover over one of the corner handles of the shape until the cursor changes into a double arrow bow ![]() . Grab the corner to freely rotate the shape or, if you hold down the Shift key, the rotation happens in 15° steps. (You can change the 15 degree increment to a different value on the Preferences tab. Go to General Settings and change the RestrictAngle property.)
. Grab the corner to freely rotate the shape or, if you hold down the Shift key, the rotation happens in 15° steps. (You can change the 15 degree increment to a different value on the Preferences tab. Go to General Settings and change the RestrictAngle property.)
To skew the shape, hover over one if the side handles until you see the cursor changes into a slash with 2 arrows ![]() . Grab the handle and move it using your mouse to skew the shape.
. Grab the handle and move it using your mouse to skew the shape.
You can rotate the selected object(s) 90 degrees to the right with each click of the Rotate Right button  on the 2D Home ribbon.
Select the object to rotate.
Click the Rotate Right button on the 2D Home ribbon.
You can rotate the selected object(s) 90 degrees to the left with each click of the Rotate Left button  on the 2D Home ribbon.
Select the object or label to rotate.
Click the Rotate Left button on the 2D Home ribbon.
To flip a label or object horizontally or vertically use the Flip button.

Select the label or object to flip.
Click the Flip button on the 2D Home ribbon to display the menu.
Select Flip Horizontally or Flip Vertically.