![]()
![]()
To Add a MQTT Broker:
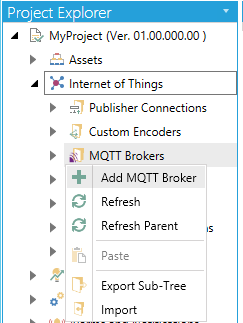
In the Workbench, expand a project and the expand the Internet of Things node. Right-click on the MQTT Brokers node, as shown below, and then click on Add MQTT Broker.
Add MQTT Broker from Project Explorer in the Workbench
-OR-
Select MQTT Brokers then click on the Add MQTT Broker button (shown below) in the Edit section of the Home ribbon in the Workbench.
Add MQTT Broker Button

This opens the MQTT Broker properties window, as shown below, in the Workbench. Enter a Name for the MQTT Broker in the top text entry field.
MQTT Broker Properties in the Workbench
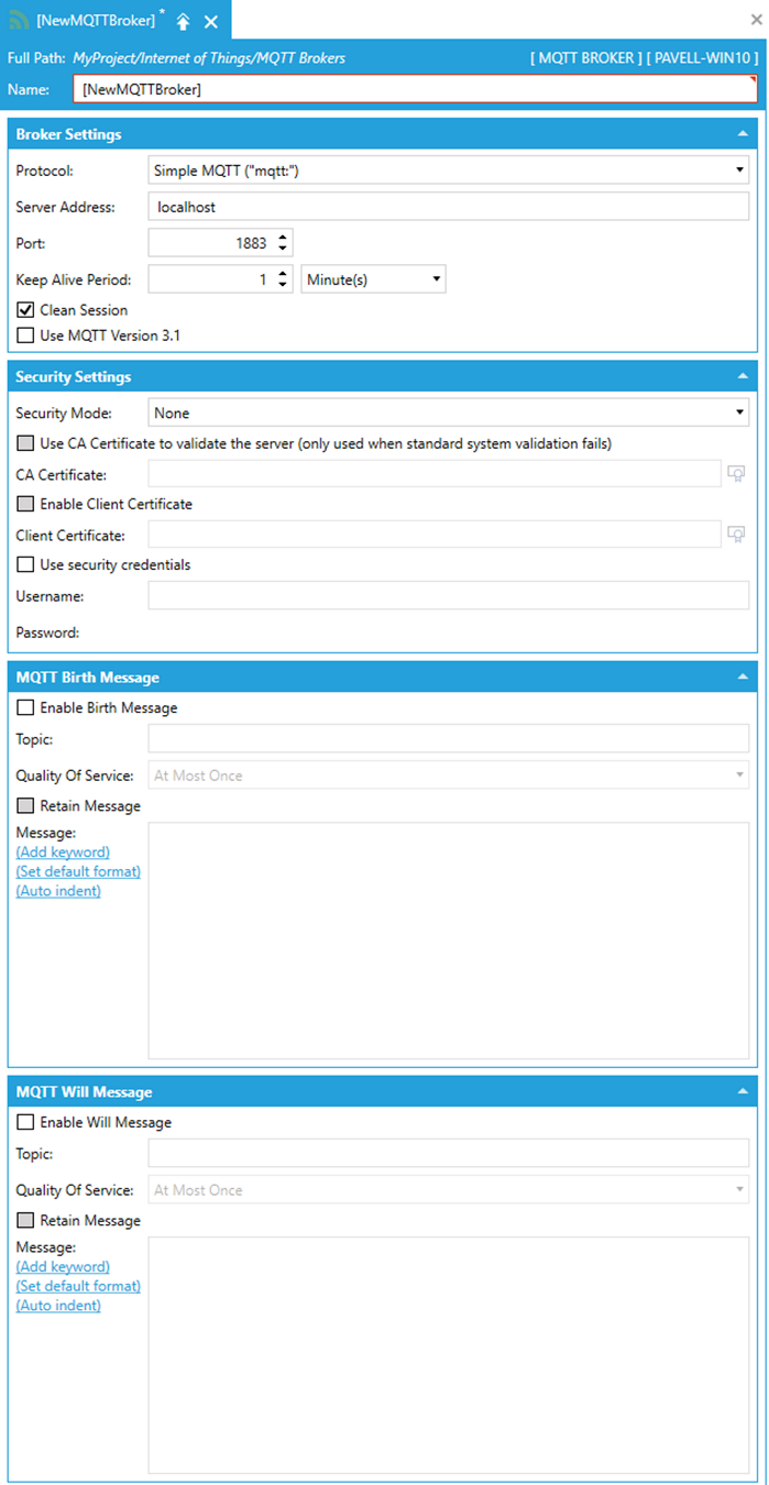
Protocol - Use the pulldown menu to select from Simple MQTT ("mqtt:"), Secured MQTT ("mqtts:"), Web Sockets ("ws:"), or Secure Web Sockets ("wss:").
Server Address - Enter the server address in the text entry field.
Port - Enter a port number in the text entry field.
ClientID - Enter a client ID in the text entry field.
Keep Alive Period - Enter a time, in seconds, for the keep alive period in the text entry field.
Clean Session - If unchecked, the connection is treated as durable, meaning that when the client disconnects, any subscriptions it has will remain and any subsequent ("At Most Once") QoS 1 or ("At Least Once") QoS 2 messages will be stored until future re-connection. If checked, all subscriptions will be removed for the client when it disconnects.
Use MQTT Version 3.1 - Select this box to ensure compatibility with MQTT Version 3.1.
Security Mode - Use the pulldown menu to select from None, TLS ver. 1.2 (recommended), TLS ver. 1.1, TLS 1.0, or SSL ver 3.0 (unsecure).
Use CA Certificate to validate the server (When disabled standard system validation will be used) - Select this checkbox to use the CA certificate to validate the server. Note that when unchecked, the system will use standard system validation.
CA Certificate - Enter the location of your CA certificate or click on the  button to open the Certificate Browser to navigate to your selected CA certificate.
Enable Client Certificate - Select this checkbox in order to specify a client certificate.
Client Certificate - Enter the location of your client certificate or click on the button to open the Certificate Browser to navigate to your selected client certificate.
Use security credentials - Select this checkbox in order to provide specific security credentials (username and password).
Username - This field is enabled if you opted to use security credentials. Enter the required username for security in the text entry field.
Password - This field is enabled if you opted to use security credentials. Enter the required password for security in the text entry field.
Note: Some cloud services (e.g. Amazon Cloud) require client certificate to be combined with the client key in Windows PFX certificate file format. Use the following command to create such PFX: “openssl pkcs12 -export -inkey MyThing.private.key -in MyThing.cert.pem -out MyThing.p12”, while replacing "MyThing" with the name of your device. Then import the certificate to the Windows system in the Local Machine - Personal certificate store.
Enable Birth Message - Select this checkbox in order to set the message upon service start.
Topic - Enter the topic for the birth message in the text entry field.
Quality of Service - Use the pulldown menu to select from At Most Once, At Least Once, or Exactly Once.
Retain Message - Select this checkbox if you wish to keep the birth message once sent.
Message - This text entry field will only be active if the Enable Birth Message checkbox is selected. Enter your message in the text entry field. You can use the Add keyword link to open the Keyword Selection Form window, allowing you to choose from provided keywords. You can also set default format using the currently shown content in the text entry field. You can also Auto indent the selected content in the text entry field.
Enable Will Message - Select this checkbox in order to set the message to notify other clients about an ungraceful client disconnect.
Topic - Enter the topic for the will message in the text entry field.
Quality of Service - Use the pulldown menu to select from At Most Once, At Least Once, or Exactly Once.
Retain Message - Select this checkbox if you wish to keep the birth message once sent.
Message - This text entry field will only be active if the Enable Will Message checkbox is selected. Enter your message in the text entry field. You can use the Add keyword link to open the Keyword Selection Form window, allowing you to choose from provided keywords. You can also set default format using the currently shown content in the text entry field. You can also Auto indent the selected content in the text entry field.
When you have completed your settings, select the Apply button and then Close to return to the Workbench. Your new MQTT Broker will now appear in the Project Explorer.
See Also:
IoTWorX Configuration in Workbench