A SQL Server database can have one or more configurations that can be used to change the manner in which the server collects data from the data source. Properties such as how often data is refreshed, how timestamps are administered, what global aliasing themes are used, and other properties are part of a database configuration. In AlarmWorX64 Server, an alarm configuration sets the parameters for OPC tags and defines how alarm information will be handled by the alarm server. The following is true of alarm configurations:
Only one configuration can be active for a single alarm server at one time
Only one alarm configuration can be active per node at one time
Only one alarm server can run per node at one time
Only one configuration can be the default configuration, and that configuration is used whenever a configuration isn't specified
When you are creating a configuration for an Alarm Server database, you can use an existing configuration as its basis or starting point if such a configuration already exists. To do this, you use the Import and Export features that are available in AlarmWorX64 Server. (For instructions, refer to Exporting and Importing AlarmWorX64 Server Components.) Otherwise, you must create the configuration from scratch.
To Create a New Configuration from Scratch, Do the Following:
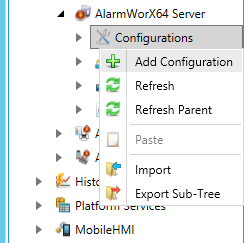
Right-click the Configurations node and select Add Configuration from the context menu, as shown below.
Add Configuration from the Tree Explorer
-OR-
Select the Configurations node, then click on the Add Configuration button, shown below, in the Edit section of the Home ribbon in the Workbench.
Add Configuration Button

The new configuration appears as [NewConfiguration] in the tree control and the Configuration properties window, shown below, appears in the right side of the Workbench.
Configuration Properties
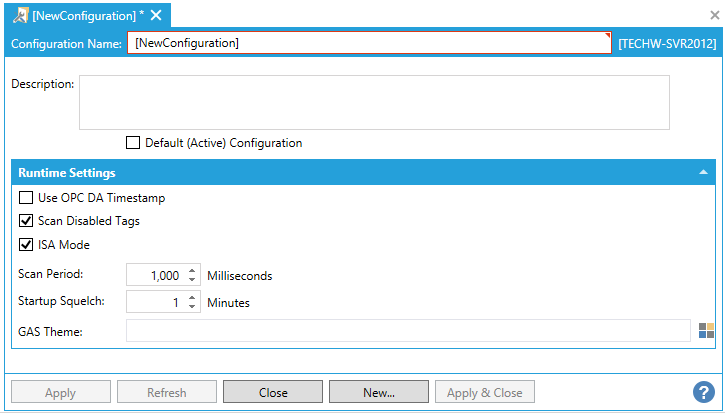
In the Configuration properties, enter a name in the Configuration Name text entry field.
In the Description text box, you describe the purpose of the configuration.
If you have multiple alarm configurations, you can specify a default configuration that will be used for the active database . If you wish to make this the default configuration for the database, enable the Default (Active) Configuration check box (optional).
In the Runtime Settings section, you can enter the parameters you wish to enforce.
When the alarm server starts, it may cause underlying OPC Data Access servers to start. During startup, many OPC Data Servers will send data values with BAD quality until an initial value is received from the device. Adjust this setting to eliminate erroneous errors at startup. At the end of the defined period, any event notifications being suppressed will be reported.
|
|
Note: This setting suppresses all alarm processing and reporting this period. |
Squelch all messages until squelch delay expires - Squelch timeout will start when the configuration finishes loading.
See also: