Alarm Tag Templates in AlarmWorX64 Server
A configuration in the AlarmWorX64 Server database exists for the purpose of holding alarms defined for data source tags. These alarms are called alarm tags, and there can be hundreds or thousands for a configuration. Creating them one by one takes time as well as attention to detail. You can however, create templates that are typically or always used by certain types of tags, then use those templates as the basis for creating multiple alarm tags one at a time. Not only does this save you time in creating alarm tags, it also makes it easier to maintain alarm tags as time passes. Why? Because after you use a template to create an alarm tag, when you change the template, the alarm tags continue to reference the template; changes that you then make to the template are also made to the alarm tags that reference the template.
The steps for defining a template are the same as for defining an individual alarm tag. The form for creating a template is nearly identical to the form for creating an alarm tag. One major difference is that the template form has one additional tab, the Alarms Assigned tab, where you can see the alarm tags that reference the template.
The remainder of this topic describes how to
Creating a Template for Alarm Tags
|

|
Tip: When you are creating new templates for a new configuration, you can use the existing templates from an existing configuration if appropriate. To do this, you can use the Import and Export features that are available in AlarmWorX64 Server to export the existing configuration's Template folder and import it into the new configuration. For instructions, refer to Exporting and Importing AlarmWorX64 Server Components.
|
You create a template for an alarm tag by using AlarmWorX64 Server and following the steps below:
-
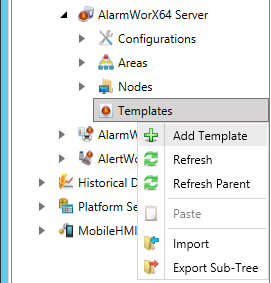
In the Project Explorer, right-click Templates in the AlarmWorX64 Server navigation tree, then select New Template from the context menu, as shown below.
Add Template from the Tree Explorer
-OR-
Select Templates in the tree explorer, then click on the Add Template button, shown below, in the Edit section of the Home Ribbon in the Workbench.
Add Template Button

-
The Template properties window, shown below, appears in the right side of the Workbench.
Template Properties
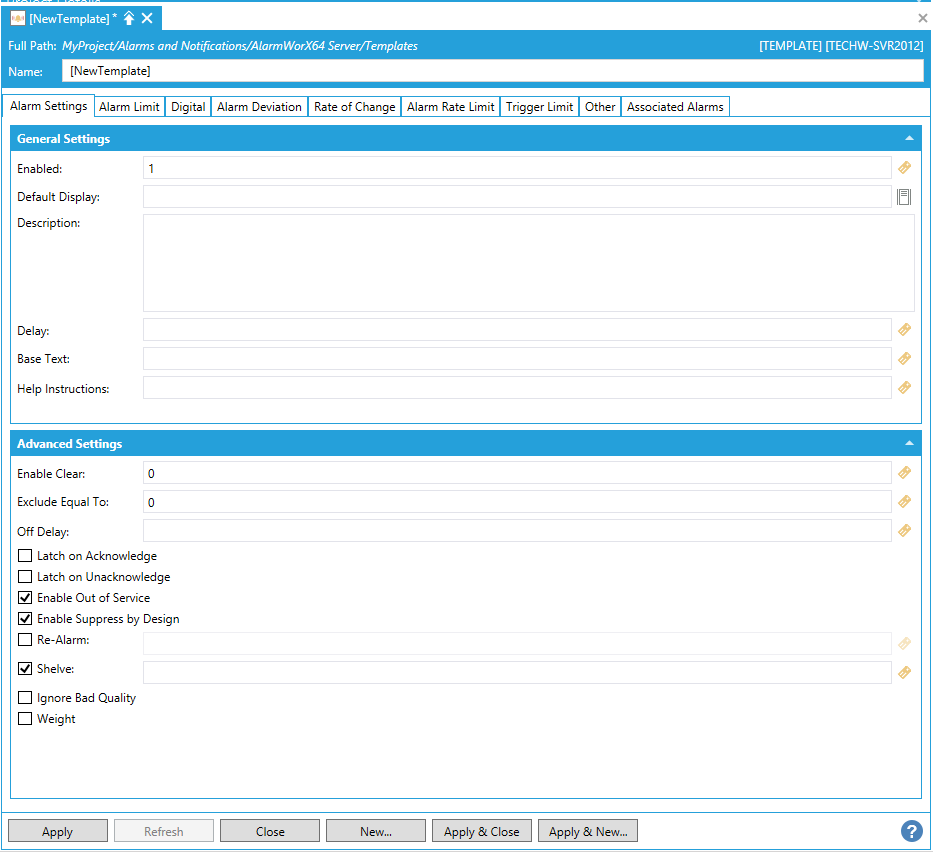
The new template appears at the bottom of the Templates configuration tree with the name [New Template]. Here, you can set the characteristics of the alarms that will monitor incoming values from OPC tags.
-
Enter a name for the template into the Name text entry field. Note that modifications to the template are made simultaneously to the alarm tags that reference the template.
Alarm Settings
-
On the Alarm Settings tab, in the General Settings section, enter 1 into the Enabled text box to activate tags created from this template. Active alarm tags are monitored. Alternatively, you can click the  button to create an expression that evaluates to True or 1. If you don't want to automatically enable alarm tags created using this template, set the value to 0. Changing the value in this field does NOT change it on alarm tags that reference this template.
|
|
Tip: You may prefer to enable and disable the alarm based on a condition. For example, you may not want to monitor water pressure when the valve is shut off because the drop in pressure would trigger the alarm. In this case, you can specify the tag for the valve’s reading in the Enabled field such that when the valve is open (1) the alarm is enabled, but when the valve is closed (0) the alarm is disabled.
|
-
Enter the file to display in the Default Display by clicking the  button and browsing for a file. This is the display to be used by default for all alarm tags created from the template. Changing the value in this field may change it on alarm tags that reference this template; for more information, refer to Maintaining Alarm Tags from Their Template, below.
-
Enter a description of the alarm's purpose in the Description text box. Although this field is optional, it may be a critical component later on for operators need to work with it but who are not familiar with its origins. Make the description complete so that the alarm's purpose is clear and can be understood by others who will need to work with it and maintain it. Changing the value in this field may change it on alarm tags that reference this template; for more information, refer to Maintaining Alarm Tags from Their Template, below.
-
Optionally, you can specify a delay in the Delay (seconds) field. A delay suppresses alarm reporting for a period of time after it is detected. If the alarm condition still exists after the delay, the alarm is reported. Using a delay is helpful for offsetting readings that fluctuate wildly or sensors that sometimes return faulty readings; you can also use it with equipment that typically returns to normal quickly. If you leave this field empty, the alarm is reported as soon as it is detected. Changing the value in this field may change it on alarm tags that reference this template; for more information, refer to Maintaining Alarm Tags from Their Template, below.
-
Specify the alarm's Base Text, which is the message that appears with the alarm when it is displayed. It is important to enter base text information for your users along with Help Instructions. The text and instructions should indicate the alarm's state, and can include informational text to runtime operators for responding to the state, such as providing phone numbers or contact information or listing steps for the operator to follow. Changing the value in these fields may change them on alarm tags that reference this template; for more information, refer to Maintaining Alarm Tags from Their Template, below.
|

|
Note: The Base Text field automatically adds a single space at the beginning of the text string, so you should be aware of this when filtering alarms.
|
The following settings can be configured in the Advanced Settings section of the Alarm Settings tab.
-
Enable Clear - Enables the clear state. The clear state is mutually exclusive with the latch states. The clear state is an additional state that occurs after an alarm has been both acknowledged and returned to normal.
-
Exclude Equal To - If true, the condition is evaluated as greater than or less than. If false, the condition is evaluated as greater than equal to or less than equal to.
-
Off Delay - Delay that occurs when a condition transitions from alarm state to normal state.
-
Latch on Acknowledge - Latching maintains alarm condition information in its current state until reset by the operator. Click this checkbox for the Latch to occur after the alarm is acknowledged and has returned to normal. The operator resets the Latch and the condition processes back to normal. Note: Even though there are two Latch states, the operator can only reset (e.g., Unlatch) a given alarm once per alarm cycle.
-
Latch on Unacknowledge - Latching maintains alarm condition information in its current state until reset by the operator. Click this checkbox for the Latch to occur after the alarm has returned to normal but is not yet acknowledged. The Latch operation replaces the acknowledge (e.g., the act of acking removes the Latch unack, but no additional acknowledgement is necessary). This state can transition into Latch ack (if the state is Latch Unack, the user can transition to Latch Ack by acknowledging the alarm). Note: Even though there are two Latch states, the operator can only reset (e.g., Unlatch) a given alarm once per alarm cycle.
-
Enable Out of Service - Click this checkbox to remove the alarm from service (typically used for maintenance). Clients are notified that the alarm is out of service. This option is intended for use via operator operation.
-
Enable Suppress by Design - Click this box for suppression of alarms to prevent alarms that are not needed due to intended or actual operating conditions. Clients are notified that the alarm is suppressed by design. This option is intended for use via software/hardware settings.
-
Re-Alarm (seconds) - Click this checkbox if you wish to transition alarms (after a period of time set via the nearby text entry field) from In Alarm and Acknowledged back to In Alarm and Unacknowledged.
-
Shelve (seconds) - Click this checkbox if you wish to temporarily suppress the alarm (for a period of time set via the nearby text entry field). Status is reported to clients as shelved, with an option to automatically unshelve.
-
Ignore Bad Quality - Turns off alarm notification for updates where the only change is a quality change.
-
Weight - Reserved for future use.
-
Now you must use the following tabs to create one or more alarm conditions for the alarm tags that will be created using the template: Alarm Limit, Digital, Alarm Deviation, Rate of Change, Alarm Rate Limit, Trigger Limit, Other, and Associated Alarms. The alarm conditions that you can configure using these tabs are described below. You can define the following types of alarms. Click on the hyperlink to see how to configure the alarm condition.
-
-
Alarm Limit: Triggers an alarm if the input value exceeds the high or low limits specified in the alarm tag.
-
Digital: Triggers an alarm if the comparison between the Alarm State Value (specified in the alarm tag) and the input state is TRUE.
-
Alarm Deviation: Triggers an alarm if the difference between two input values exceeds the high or low limits specified in the alarm tag.
-
Rate of Change: Triggers an alarm if, over the course of a second, an input value changes at a rate greater than or equal to the limit specified in the alarm tag.
-
Alarm Rate Limit: Triggers an alarm if, over the course of a second, an input value increases or decreases by an amount that exceeds the high or low limits specified in the alarm tag.
-
Trigger Limit: Triggers an alarm when the OPC tag's value changes. This alarm requires a runtime operator's acknowledgement.
-
On the Other tab, you can specify up to 20 OPC tag values to be collected when an alarm occurs. Collect this information when you need to troubleshoot the circumstances that caused an abnormal condition. For more about this tab, refer to Related Values.
-
The Associated Alarms tab allows you to view the alarms that are associated with the current template (if it has already been assigned).
-
When you are done, click Apply to create your alarm tag.
You can edit an existing template by double-clicking on the template in the tree control or by right-clicking the name and selecting the Edit or Edit on New Tab command in the context menu. You can also use the Copy and Paste commands to create copies of a template, or Cut and Paste to move a template from one database configuration to another. The context menu also is where can delete a template.
Return to Top
Using a Template to Create Multiple Alarm Tags
Once you have created a template, you can use it to create alarm tags. For information about how to do this, refer to:
Return to Top
Viewing the Alarms that Use a Template
-
In the Project Explorer, right-click the template in the AlarmWorX64 Server navigation tree, then select Edit or Edit on New Tab. The AlarmWorX64 Server Template form appears.
-
Go to the Associated Alarms tab.
Return to Top
Maintaining Alarm Tags from Their Template
If alarm tags were created using a template, the alarms still reference the template. Instead of modifying each alarm tag individually, you can maintain the alarms uniformly from the template. When you change a value on the template, the value is essentially "pushed" to the alarms that reference the template, allowing you to maintain a uniformity and making it easy to update alarm tags.
The fields that can be maintained from the template are identified in the table below.
Fields on an Alarm Tag that the Tag's Template Can Maintain
|
Alarm Tag Field:
|
Controlled by the template?
|
Tab or Alarm:
|
|
Name
|
No
|
|
|
Data Source
|
No
|
|
|
Enabled
|
No
|
General tab
|
|
Default Display
|
Yes
|
General tab
|
|
Description
|
Yes
|
General tab
|
|
Delay
|
Yes
|
General tab
|
|
Base Text
|
Yes
|
General tab
|
|
Help Instructions
|
Yes
|
General tab
|
|
Override Data Source
|
Yes
|
Limit alarm
Digital alarm
Rate of Change alarm
Rate Limit alarm
Trigger Limit alarm
|
|
Data Source 2
|
Yes
|
Deviation alarm
|
|
Deadband
|
No
|
|
|
LoLo, Lo, Hi, and HiHi values
|
Yes
|
|
|
Message Text
|
Yes
|
|
|
Severity
|
No
|
|
|
Req Ack
|
No
|
|
|
Alarm State Value
|
Yes
|
Digital alarm
|
|
ROC Limit/Sec
|
Yes
|
Rate of Change alarm
|
|
Enable
|
Yes
|
Trigger Limit alarm
|
|
Return to Normal
|
Yes
|
Digital alarm
Rate of Change alarm
|
|
Related Values
|
Yes
|
Related Values tab
|
When maintaining a template's values, keep in mind the following:
-
Only those alarm tags that were created using the template reference the template
-
One an alarm tag's field is changed, the field's link to the template is broken and that field can no longer be maintained from the template. Even if you restore the field to its original value, the link it broken. However, other unmodified fields on the alarm tag can still be maintained from the template.
To push changes to alarm tags from their shared template, follow these steps:
-
In AlarmWorX64 Server's Project Explorer, expand the navigation tree to expose the Templates node and its template.
-
Right-click the template you want to modify and select Edit on New Tab. The AlarmWorX64 Server Template form opens on its own tab.
-
Make the changes you want to push to the alarm tags that reference the template, noting the limitations listed above.
-
When you are done, click Apply.
-
To confirm that the change has been applied, go to the template's Associated Alarms tab to see the list of alarm tags that reference the template. Choose the alarm tag you want to review. Note the tag's configuration and name. Then:
-
-
If the alarm tag is already open in a tab, go to the alarm tag's tab and click its Refresh button at the bottom of the form. Then confirm that alarm tag's values are correct.
-
Otherwise, expand the tag's database configuration in the navigation tree, right-click the tag and select Edit on New Tab. Then confirm that alarm tag's values are correct.
Return to Top
See also:
Database Configurations
Alarm Tags