Areas in AlarmWorX64 Server
In your active AlarmWorX64 Server configuration, there are a myriad of OPC alarm tags that represent the inputs coming from any number of sources. You can group these alarm tags into areas. An area is nothing more than a folder that you create in AlarmWorX64 for a physical area in a plant, a category of sensor, or a grouping of machines or types of equipment. It can be any category for classifying alarms. They can even overlap so that OPC tags may belong to more than one area. Not only do these groupings let you manage and find alarms more easily in the configuration, but this information can be used by clients for filtering purposes.
The Areas section of the tags properties shows all areas to which the tag is linked. Clicking on an area takes you to the area's configuration. You can assign an alarm to more than one area; for example, a tank limit alarm may be part of both the "Tanks" area, as well as the "Water" area. An area can have sub-areas. Each area is defined by its name and the name of its parent areas; for example, a branch called Area 1 under plant Area A is different from Area 1 under plant Area B.
Although only one configuration can be active at a time, areas can contain alarm tags defined for any configuration. In the tree for each area, each alarm tag's configuration appears alongside the tag name. This is helpful when you have a configuration in production, but are working on a new configuration that you will be putting making active in the future.
Creating a New Area and Adding Area Tags to It
|

|
Tip: If you are creating a new configuration, you can copy an existing configuration's Area folder by exporting it from that configuration, then import it into the new configuration. You can also copy individual areas from one configuration to another. For instructions, refer to Exporting and Importing AlarmWorX64 Server Components.
|
To Create an Area from Scratch, Follow these Steps:
-
Right-click the Areas node or a sub-node that you want to add the area to, then select Add Area from the context menu, as shown below.
Add Area From Project Explorer

-OR-
Select the Areas node or a sub-node, then click on the Add Area button, shown below, in the Edit section of the Home ribbon in the Workbench.
Add Area Button

-
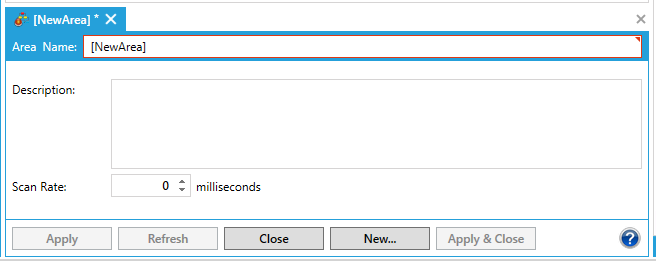
The Area properties open in the right side of the Workbench, as shown below.
Area Properties
-
Enter the Area Name and Description, then click the Apply button. Next, enter a Scan Rate for the Area in milliseconds.
NOTE: By default, the scan rate for Areas is set to 0 milliseconds. This 0 means that the Area-specific scan rate is set to Off and the Area will use the default scan rate.
Now you must add the area's alarm tags.
- To add an alarm tag to the area, do the following:
-
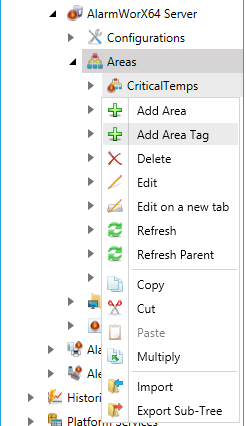
Right-click the area then click Add Area Tag from the menu, as shown below.
Add Area Tag in Project Explorer
-OR-
Select the area then click on the Add Area Tag button, shown below, in the Edit section of the Home ribbon in the Workbench.
Add Area Tag

-
The Area Tag properties, as shown below, open in the right side of the Workbench.
Area Tag Properties

-
Type a name for the tag in the Area Tag Name text field. Changing the name is useful when the same name tag is being used from different database configurations.
-
From the Configuration drop-down list, select the configuration that contains the tag. For more information, refer to Database Configurations. If the configuration has been added recently, click the Refresh Cfgs & Sources button to refresh the list, then look in the Configuration drop-down list again.
-
From the Tag drop-down list, select the alarm tag. If you don't see the alarm you are looking for, perhaps it has not yet been added as an alarm (as described in Alarm Tags). If it has been added recently, click the Refresh Cfgs & Sources button to see the latest list of alarm tags, then look in the Tag drop-down list again.
-
Review the content of the Tag Information section to make sure you have selected the alarm you intended to. If the information doesn't look right or has been changed recently, click the Refresh button at the bottom of the tab to show the latest information about the alarm tag. If necessary, choose a different configuration or tag from the top of the tab.
-
Click Apply to add the alarm tag to the area.
-
To remove an alarm tag from an area:
-
In the navigation tree, expand the area to show the area's tags.
-
Right-click the tag you want to remove, then click Delete from the pop-up menu.
-OR-
Select the tag you wish to remove, then click on the Delete button in the Edit section of the Home ribbon in Workbench.
-OR-
Select the tag you want to remove, then press the Delete key on your keyboard.