When you installed GENESIS64, you created a default database for use with the AlarmWorX64 Logger. If you need to use a different database or alter the parameters of the existing database, refer to the AlarmWorX64 Server's Database Configurations topic.
To configure the AlarmWorX64 Logger, follow the steps below.
In AlarmWorX64 Logger, the Configurations node manages the overall details of the logging session. You set the data source that supplies alarm events in the Alarm Subscription section of the form. Alarm events are generated by different types of alarm servers, as well as by the GenEvent server. Unless you set a filter, all of the alarms appear in the log. Use the filter to control the data set, choose particular classes and categories of alarms, and make the data set smaller, more selective, and more manageable.
To Create an Alarm Configuration:
From the Workbench, expand your Project in the Tree Explorer, then expand Alarms and Notifications. You'll see the AlarmWorX64 Logger provider.
AlarmWorX64 Logger in the Workbench
Expand the AlarmWorX64 Logger provider node. Right-click Configurations in the navigation tree and select Add Configuration, as shown below.
Add Configuration from Tree Explorer

-OR-
Select the Configurations node then click on the Add Configuration button, shown below, in the Edit section of the Home ribbon in the Workbench.
Add Configuration Button

This opens the New Configuration properties window, shown below in the right side of the Workbench. Enter a name for the configuration in the Configuration Name text box.
New Configuration Properties
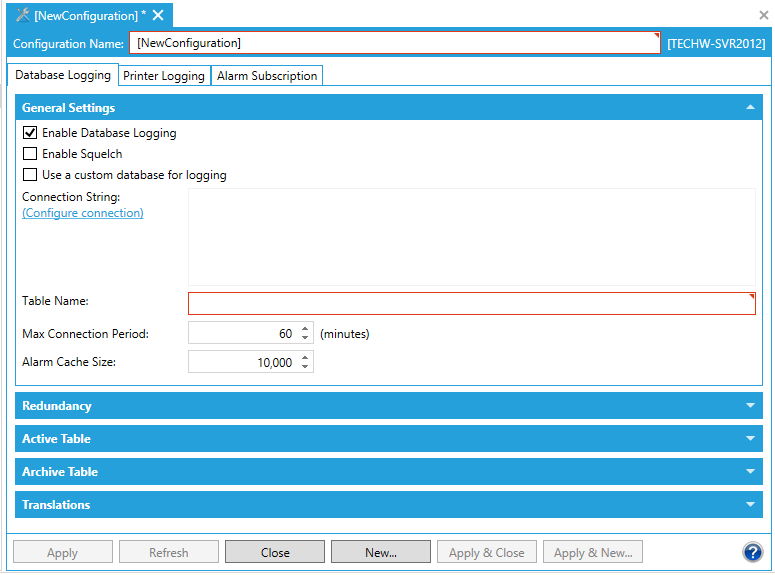
Database Logging Tab
The Database Logging tab of the AlarmWorX64 Logger Configuration properties provides database connections, redundancy options, table management and translation options. To set up this information, follow the steps below:
In the Configuration form, click on the Database Logging tab.
Make sure that the Enable Database Logging check box is enabled.
You can decide whether to Enable Squelch.
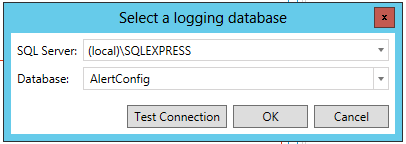
You can also opt to Use a custom database for logging. Clicking on this checkbox enables the Connection String section below. You can then enter the custom database location directly into the activated text box or you can click on the Configure connection link. Clicking on the Configure connection link opens the Select a logging database window, where you can select your desired SQL Server (via pulldown menu) and Database (also via pulldown menu).
Next, you can provide a Table Name in the text entry field.
Set the Max Connection Period in minutes.
Set the Alarm Cache Size.
Database Logging Tab - Redundancy Section
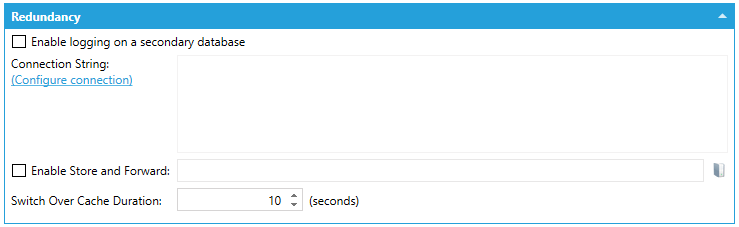
Optionally, use the Redundancy section to set up a redundant database for logging data when the primary database is not available, and for enabling store-and-forward data caching. Refer to the Redundant Databases for the AlarmWorX64 Logger topic for information about this section.
AlarmWorX64 Logger logs alarm data to one master Active Table. If no restrictions are placed on the size of the Active Table, then logging will continue to go to the active table as long as the AlarmWorX Logger is running. If, however, a restriction is placed on the size of the Active Table, then all logged data beyond the Active Table size will get logged to Archive Tables.
In this system, the Active Table will always have the most recent alarm data.
Database Logging Tab - Active Table Section

Max Records - Enter the maximum number of records
Max Interval - This sets the maximum time interval. Select from hours, days, months, or years).
Max Records Size - This is a performance setting, also known as Chunk Size, this is used to define the maximum data block size to use when archiving the table. It represents the maximum amount of records to archive in a single update.
The Archive Tables also have a maximum size determined by a number of records or time interval. When one Archive Table is full, archiving goes on to the next table. When all Archive Tables are full, the oldest Archive Table is deleted and a new one is set up. The name of each Archive Table is the name of the Active Table followed by the date and time of the first alarm in the table.
Database Logging Tab - Archive table Section
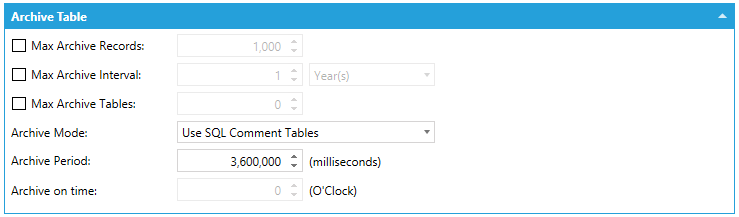
In this section, you can specify the quantity of archive tables and the condition(s) upon which each archive table is full.
Max Archive Records - Enter the maximum number of records
Max Archive Interval - This sets the maximum time interval. Select from hours, days, months, or years).
Max Archive Tables - Sets the maximum number of archive tables to maintain. When the number is exceeded, the tables are deleted, starting with the oldest tables first.
Archive Mode - Use the pulldown menu to select from Use standard Iteration, Create Views, Use SQL Comment Tables, Archive Daily, or Create Tables Daily
Archive Period - Sets the archive period in milliseconds
Archive on time - Sets a specific time of day to run the archive operation. The archive operation is run once per day near the hour specified. If the logger is started, and the hour specified has already passed for that day, an archive will occur immediately.
Database Logging Tab - Translation Section
![]()
The Translation tab of the AlarmWorX64 Logger Configuration properties used to provide a translation function for your alarm logs created using AlarmWorX64 Logger. It offers three different modes of operation.
Translation Mode - Use the pulldown menu to select from one of the following three modes:
No Translation - This mode does not allow for the language to be translated before getting logged. If you have items configured with special characters for use with Language Switching, they will remain with the items and be logged in this way. This is useful if you would like the next phase, such as reporting, to be able to determine which language translation to use.
Custom Translation - This mode allows you to set the language translation here so that it will always be the language used with the Alarm Logger for this particular configuration.
Use Registry - This mode uses the registry settings to determine what language to use. This means that if a user changes the language in another application, the Alarm Logger will also use the new language.
Language - Choose the language you wish to use from the list of available languages as configured in the Language Alias configurator.
Language Subset - If you are using a language subset, enter it here. It must be a language subset that has been defined in the Language Configurator.
Synchronize application LCID with selected language - If using application language converting also, you can synchronize with language switching by checking this check box and selecting a language to use for application language converting.
Configure options on the Printer Logging tab of the AlarmWorX Logger Configuration properties to send alarm events to printer(s) so that a written record may be made of your log file. The option requires that you check the Enable Printer Logging checkbox on the Printer Logging tab of the AlarmWorX64 Logger configuration properties.
Printer Logging Tab
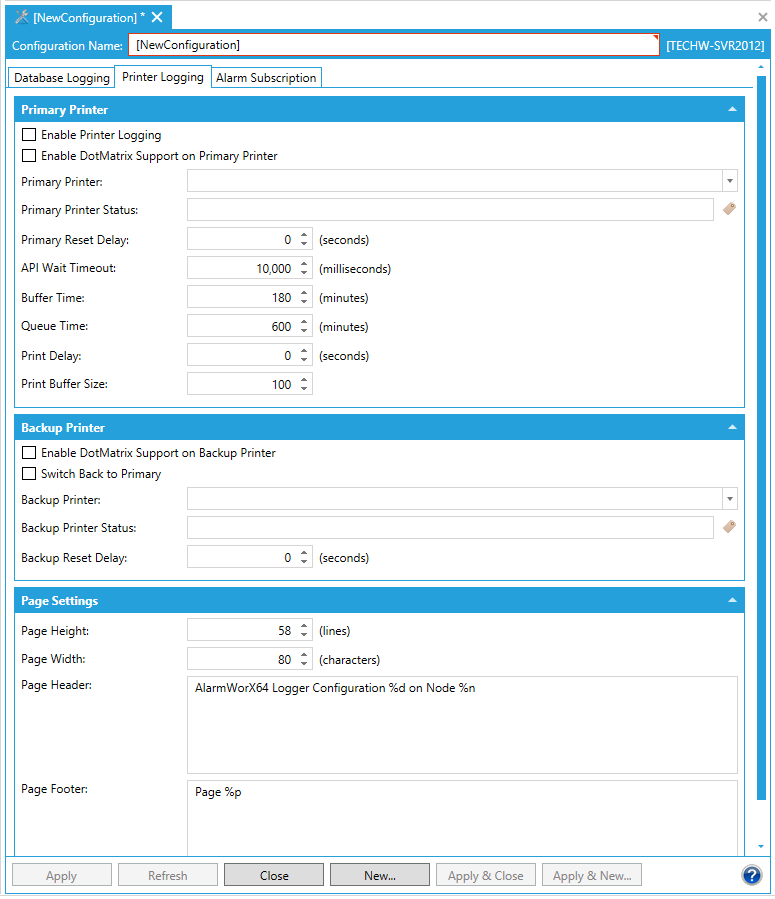
The Printing Logging form has the following fields:
Enable Printer Logging - Click this checkbox in order to send alarm events to printer(s) so that a written record may be made of the log file.
Enable DotMatrix Support on Primary Printer - Click this checkbox if you plan to use a dot matrix printer as your primary printer.
Primary Printer - Select the primary printer from the drop-down list. The AlarmWorX64 Logger sends each event directly to the printer as soon as it is received. This works best with a dedicated ink jet or dot matrix printer (be sure to click the Enable Dot Matrix Support checkbox for this option) that will print one line at a time, rather than a page-oriented printer like a laser printer. Laser printers will still work, but the page will not be ejected until it is full.
All event notifications will print on the Primary Printer unless an error is detected (offline, out of paper, etc.), in which case the Backup Printer will be used. Switchover from Backup to Primary occurs automatically when the error condition is cleared on the Primary Printer.
Primary Printer Status - This is an OPC DA or GENESIS64 plugin that reports the status of the primary printer. A zero value represents failed status.
Primary Reset Delay - The delay for the primary printer after which to reset the printer connection. Zero disables the feature. The delay starts after the last print job is sent to the printer. Disconnection should not affect existing print jobs. Use this option when dealing with a printer that auto-disconnects.
API Wait Timeout - Time in milliseconds to wait before AlarmWorX Logger determines that the print API has timed out. An API timeout results in AlarmWorX Logger evaluating the current print as failed and sending it to the alternative printer.
Buffer Time - Maximum time to keep print items in the buffer. The buffer is calculated by removing all print items in the print buffer that are older than the last print time plus the buffer time.
Queue Time - Reserved for future use.
Print Delay - Delay time prior to the start of each print job. This is calculated based on the time of the first print item plus delay. It allows a block of print requests to be received prior to sending to the printer. It can be used for printers that print on a page-by-page basis (laser, LaserJet, InkJet, etc).
Print Buffer Size - Keeps track of the maximum number of records to keep in the print buffer.
Enable DotMatrix Support on Backup Printer - Click this checkbox if you plan to use a dot matrix printer as your backup printer.
Switch Back to Primary - If true, will cause the active printer to switch from backup to primary printer when the primary printer is reported to the Awxlogger as back online.
Backup Printer - Select the Backup Printer from the drop-down list. The Backup Printer will be used whenever an error is detected (offline, out of paper, etc.) on the Primary Printer. Switchover from Backup to Primary occurs automatically when the error condition is cleared on the Primary Printer.
Backup Printer Status - This is an OPC DA or GENESIS64 plugin that reports the status of the backup printer. A zero value represents failed status.
Backup Reset Delay - Delay for backup printer after which to reset printer connection. Zero disables feature. The delay starts after the last print job sent to the printer. Disconnection should not affect existing print jobs. Use this option when dealing with a printer that auto-disconnects.
Page Height - Enter the number of lines your printer prints on a single page using its default font. The logger prints events "one line at a time," by sending raw text to the printer, bypassing the normal Windows page device context printing. Printers that accept this raw text will use an internal font to render the characters. The number of lines that will fit on a page using this internal font needs to be entered here. If you cannot find this information in the printer manual, you may need to experiment to find an acceptable value. A value of 58 will be safe for most printers.
Page Width - Enter the number of characters the printer is capable of printing on a single line using its default font.
Page Header and Page Footer - Edit the lines of text that will appear at the top and bottom of each printed page. The header and footer may contain more than one line. The following symbols will be replaced at runtime with their appropriate values:
%d = Name of the configuration
%n = Computer name the logger is running on.
%p = Page number.
The AlarmWorX64 Logger supports printing using character sets other than the standard 7-bit ASCII codes appropriate for English. Since the logger does not use "normal" Windows printing, the setup to use other character sets is more involved than for other typical Windows programs.
To Select the Desired Locale and Language:
Click Start > Control Panel and select the Regional and Language Options command.
Click the Administrative tab (shown below) and click the Change System Local button.
Locale Settings dialog box

Select the desired system locale; then click the OK button twice to confirm your selection.
|
|
Note: You must set the desired language in the Windows Control. It is not enough to choose the language only within GENESIS64 . |
By selecting the desired language in Windows, the Logger will convert the UNICODE characters to the 8-bit ASCII version using the DOS code page for the selected language. In order for the characters to print properly, the printer must be configured to use the correct code page.
The code page for the printer is selected by sending the printer special non-printable ASCII characters called control codes. The control codes are listed in the first column (Decimal 0 - 31) of the ASCII chart.
The configuration of the header and footer for the printed alarms understands the ASCII control codes so for example the character sequence ^[ will be interpreted as the ESC code (Decimal 27) instead of the two literal characters ^ and [.
The proper control code sequence to select a particular language varies by printer manufacturer and model. Please refer to the printer manual for your printer to obtain the correct code sequence. For example, the following sequence will assign the PC866 Russian code page to character table 1 and then make character table 1 active for International (non-US) Epson printers:
^[ ( t 3 0 1 14 0 ^[ t 1
To view the header configuration, see the Header and Footer text entry fields in the Printer Logging tab of the AlarmWorX64 Logger Configuration properties.
Alarm Subscription Tab

 button, which opens the Data Browser window, allowing you to navigate to your selected Logged Alarm Tag.
 button, which opens a separate window allowing you to set the Types, Categories and Attributes for the selected Logged Alarm Tag.
See also: