![]()
Note: If you want the local machine to run one or more non-default alarm logger configurations, you can use "localhost" or "anonymous" as the node name instead of specifying the actual node name.
Each node represents a computer or system on the network that is configured to run one or more of the named logger configurations in the active AlarmWorX64 Logger configuration database. When the logger executable is run, it looks for its network computer name in the list of nodes to determine which logger configuration(s) to run. If a logger cannot find its computer name in the list of nodes, it will run the default configuration.
|
|
Note: If you want the local machine to run one or more non-default alarm logger configurations, you can use "localhost" or "anonymous" as the node name instead of specifying the actual node name. |
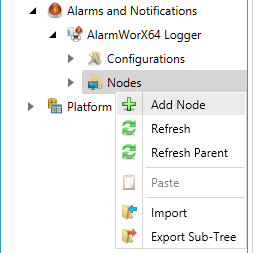
To Add a New Node:
Right-click the Nodes node and select Add Node, as shown below.
Add Node from Tree Explorer
-OR-
Select the Nodes node and click on the Add Node button, shown below, in the Edit section of the Home ribbon in the Workbench.
Add Node Button

The Node properties, shown below, appear in the right side of the Workbench. Enter the name of the network node in the Node Name text box.
Node Properties in Workbench
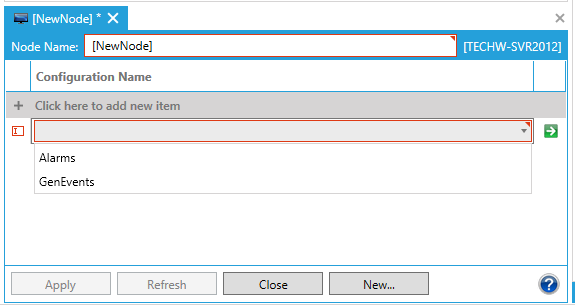
Click "+ Click here to add new item". You will then be allowed to select from saved Configurations from the pulldown menu for the node item (in the example above, these are Alarms and GenEvents). Once selected, a new window will open, allowing you to confirm or edit the properties for the selected Configuration. Confirm or edit the settings for the item and close the additional window to return to the Node Properties window.
Once a configuration is added to the Noded, you will also have the option to jump to the selected configuration by clicking on the  button.
Click the Apply button to save your new Node. It will now appear beneath the Nodes node in the AlarmWorX64 Logger tree explorer. You can now add a link to your newly created node.
See Also:
Configuring the AlarmWorX Logger