To install the NUI Component of GENESIS64, insert the GENESIS64 installation DVD and proceed with a Custom setup type, as shown below.
Select 'Custom' from the Setup Type Window

You will then see the Select Features screen, which allows you to install additional components. Expand the Client node and select Kinect Runtime by clicking on the checkbox to the left of it.
Select 'Kinect Runtime' from the Select Features Window

If this is the only item you selected, you'll see the Kinect for Windows Runtime Setup as shown below. Click on the 'I agree to the license terms and conditions' checkbox and then Install.
Kinect for Windows Runtime Setup Window

The necessary components will be installed on your system. When this installation is finished, you'll see the Setup Complete notification, as shown below.
Setup Complete

Users can begin NUI initialization by opening a new GraphWorX64 display.
In the Preferences section of the main GraphWorX64 window, select Runtime Options, as shown below.
Selecting Runtime Options within the Preferences Section of GraphWorX64

Next, click on the pulldown menu next to 'EnableNUIFeature' in the NUI Device section of the Preferences.
Enabling the NUI Feature

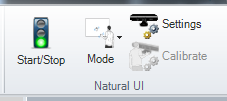
This will enable the Natural UI section of the GraphWorX64 ribbon, as shown below.
Natural UI Section of the Ribbon

See Also:
Natural User Interface Settings
Interacting with the NUI Device in Runtime
NUI Support for Multiple Window Scenarios