![]()
![]()
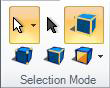
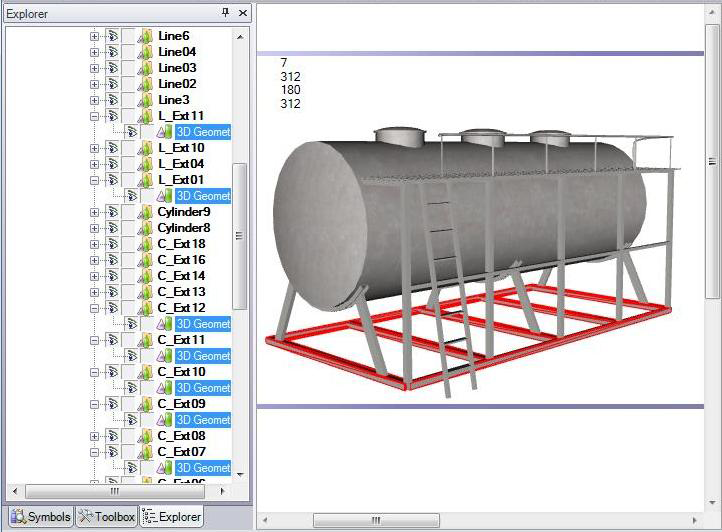
There is a collection of tools that let you select objects in GraphWorX64 3D. They are available as buttons in the Selection Mode section on the 3D Home ribbon.
|
|
Note: If an object is locked, you cannot select it. An object is locked if its Locked property is true or if in the Explorer the lock icon appears next to the object. You can unlock it by clicking the object’s lock icon. If the object is listed in the Explorer but you can not see it click the blank box next to the object. An eye icon will display, this is the hide, show icon. |
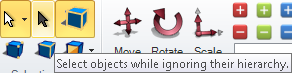
Before you can select a 3D object, one of the Select buttons must be activated on the 3D Home tab. In 3D, there are two select buttons that let you select objects in two distinct ways: the Select Hierarchy button on the left lets you select an element as well as its hierarchy of sub-elements, and the Select button on the right lets you select just one element at a time.
Some of these selections have been assigned hot keys, which allow you to edit your 3D display more quickly and easily.
Each selection is described in the remainder of this topic.
You can specify your own settings for the appearance of a selected object. For how to do this, refer to Selection Highlight Settings at the bottom of this topic.
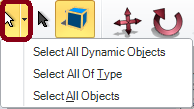
Click the Select Hierarchy Manipulator to select an object and each of its sub-elements, all at once. You can also click the Select manipulator's drop-down list button to access a menu that displays with the following options:
Select All Dynamic Objects menu item ( hot key = ZGJ) – Click this option to select all object dynamics. Note that, by default, objects at the top level in the Explorer are considered; grouped objects are not. To select all dynamics in objects in a particular group, click this option (top-level objects are selected), then click the group in the Explorer.
Select All Of Type: type menu item ( hot key = ZGT) – Click this option to select all objects of a particular type such as Primitive or Cube or Model. This menu item is available only when an object is selected; the selected object's type becomes the type that appears in this menu item. If multiple objects are selected, the key object’s type appears in this menu item.
Select All Objects menu item ( hot key = ZGA) – Click this option to select all objects in the 3D viewport. In this case, once objects are selected, the key object is the most-recently updated object.
Click the Select Manipulator to select an object hierarchy in the 3D viewport. You can also select a sub-element of the group using double-clicking to drill down to a particular sub-element. You may need to manipulate sub-elements such as a face, a vertex, or an edge.
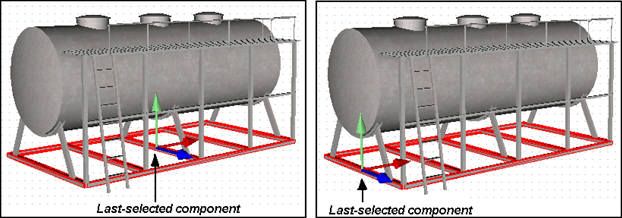
You can also select multiple objects or sub-elements. When you do this, the last selected object is the key object. Some tools use the key object to determine what to do with the selection. For example, when you transform multiple objects, the transformation uses the key object's pivot point.
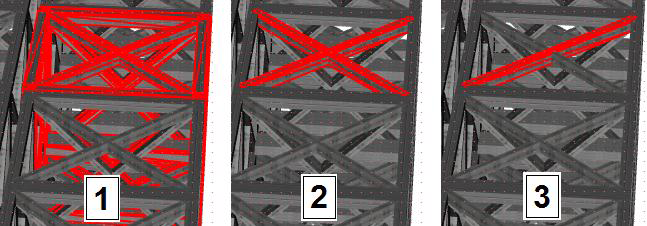
Because a 3D object (or group of objects) is typically made up of a complex assembly of many small graphical objects, selecting it or its sub-elements can be a fairly complex task. The selection process is illustrated below in which double-clicking on the desired object selects a cell [1], then a crossbar in the cell [2], and then an individual bar [3].
Sequence of Double-clicking for Drilling Down to Sub-elements
Alternatively, you can select the desired sub-element using the Explorer, but it isn't always easy to find the sub-element in the Explorer. By expanding objects in the Explorer tree, you can single out the sub-element you want and select it in the Explorer tree; you will see it selected in the viewport.
This need also underscores the importance of naming an object’s elements in a way that will be helpful for selecting them from the Explorer; if you name them generically (such as component 1, component 2, and so on), working with them can become very cumbersome. But naming them specifically after their form or function helps you (as well as other who will maintain the objects) identify components of the object. Unfortunately, this is not always possible.
To select a sub-element (or a set of sub-elements) in an object:
Click the Select button on the 3D Home ribbon, to activate it. You can also use the hot key , ZZ.
Then select the object by using the Explorer.
To select multiple objects:
In the Explorer, you must hold down the Ctrl key while clicking on each of the objects, or hold down the Shift key while clicking the first and last objects in a range.
In the 3D viewport, you must hold down the Shift key while clicking on each object you want to select.
You can edit sub-elements of an object, such as object vertices, edges, and faces. This lets you create complex objects just by manipulating the 3D primitives that are available to you GraphWorX, without having to modify primitives in an external 3D tool. You can move, scale, rotate or remove any of these sub-elements, including selecting triangles from a face to create reliefs or refine them to smaller triangles.
To do this, select the sub-element you want to manipulate by using the tools shown below, then use the tools in the Manipulator Section of the 3D Home Ribbon.
|
Command |
Icon |
Hot Key |
|
Select objects. |
|
Z1 |
|
Select vertices only. |
|
Z2 |
|
Select edges only. |
|
Z3 |
|
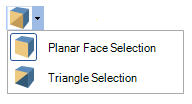
Select faces only. You can make an object's faces smaller by using the Divide Face button |
|
SFZ4 (for planes) or SFZ5 (for triangles) |
To see how these selection options might be put to use, see Manipulator Section of the 3D Home Ribbon.
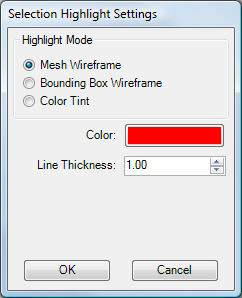
You can specify your own settings for highlighting selected objects in a 3D viewport in GraphWorX64. To do this, follow these steps:
From the File menu, select Options. The Selection Highlight Settings dialog box appears.
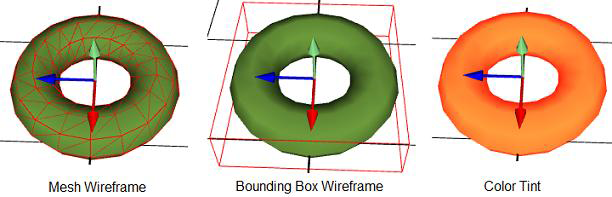
Under Highlight Mode, specify how you want selected objects to be highlighted: by a Mesh Wireframe, a Bounding Box Wireframe, or a Color Tint. See the examples of the highlighted donut primitive, below.
Select the Color to be used for identifying selected objects, and the Line Thickness to be used. In the example below, the selected color is red, and the line thickness is 1.
Click OK when you are done.
Highlight Mode Options
See also: