![]()
Note: Instead of creating your own button from scratch, you might be able to use a predefined button. For more information, refer to Buttons.
Pick Actions are dynamics that can be assigned to any GraphWorX64 object. Buttons on the 2D Dynamics ribbon come with their own Pick Action already created for them, but you can also use the Pick dynamic to create your own button by putting a shape on the display and adding a Pick dynamic to it.
A Pick dynamic runs based on a DataSource, variable assignment, or some other condition that you define as its trigger. Pick Actions are similar to Key Actions and have the same command types, but have a much broader range of applications because they aren't just display-only dynamics. For a description of command types that you can assign to a Pick action, click here. By default, the command is Load Display.
|
|
Note: Instead of creating your own button from scratch, you might be able to use a predefined button. For more information, refer to Buttons. |
To add a pick action to an object:
Click the object to select it.
Click the Pick Action button 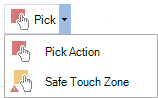 in the Buttons section on the 2D Dynamics ribbon, or click the Pick Action button
 ![]() on the Dynamics tab. An entry for the Pick Action appears in the Dynamics tab.
on the Dynamics tab. An entry for the Pick Action appears in the Dynamics tab.
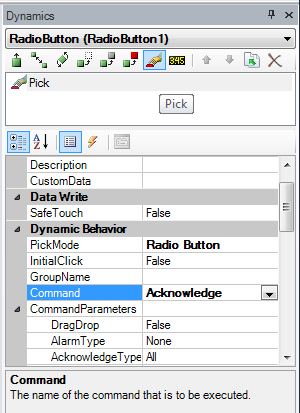
With the new Pick Action entry selected, go to the Command property and set the command type. For a description of the commands, refer to Commands for Buttons, Pick Actions, and Function Keys.
Dynamic Properties for a Normal Button
Fill in the Command Parameters. (You may have to expand the Command Parameters property to see them.) Command parameters are different for each command. For example, they may include the file name and target for a Load Display dynamic, or the value(s) for the Write Value actions. Detailed descriptions for some parameters are provided in Properties for the Pick Action Dynamic; others are described in Commands for Buttons, Pick Actions, and Function Keys.
If you are creating a Radio Button group or a Check Box group, add additional buttons as described in the prior steps. Then group them by selecting all of them, then from the Home tab's Arrange section click the Group ![]() button.
button.
In a radio button group, only one button in the group can be selected (on) at a time; whereas in a checkbox button group, any number of its members can be selected. In order to enforce the rules for radio button behavior, for each radio button in the group, go to its GroupName property on the Dynamics tab and enter its group name. For example, if the radio buttons let runtime users select a region, the group name you assign to the radio buttons might be SelectRegion. Make sure the name is not used by any other radio button group in the display; this field is case sensitive, so make sure you use the same capitalization for each radio button in the group.
Now identify the user action(s) that trigger the command. You can specify the key or keys that the runtime user must press and/or the mouse button that the runtime user must click. Do this by going to the three Execution Trigger sections (Key, Mouse, and When) in the Dynamics tab and identifying the triggers. For help setting them, refer to Properties for the Pick Action Dynamic.
There are additional property values that you must set on the Dynamics tab. For help setting them, refer to Properties for the Pick Action Dynamic.
Go to runtime mode and test that the mouse clicks and/or keystrokes execute the command correctly.
Note: You can acknowledge alarms here as well; just look under "Dynamic Behavior" to "Command" and select the pick action "Acknowledge" from the drop down list under Global Commands. (Must be in the AlarmWorX64 Viewer).
In the example below, the pick action's shortcut keys are Ctrl+W and the LeftMouseButton property is True. The command is CloseWindow and the Target is CurrentDisplay. So the current window closes when the runtime user presses Ctrl+W or clicks the left mouse button on the object.
A Key Action Defined in the Dynamics Properties Pane

Whether you have created a pick action for an object, or you are using a button that has its own pick action, the pick action's Dynamics tab has its own properties that you use to create the pick action. Below are the properties for the Pick Action dynamic. Not all properties are described in this table; common properties such as Name, Description, Tooltips and other features that appear for common objects have been omitted. The properties listed in the table are those you would set as part of your Pick Action dynamic definition. You determine the default values for the Pick dynamic's properties by setting them on the Preferences tab; for more information, refer to New Pick Default Settings.
|
Dynamic Property: |
Settings & Descriptions: |
|
Data section: (Radio buttons and Checkbox buttons only) |
|
|
DataSource |
Specify the data source for the Pick dynamic. It can be an input, value, expression, or OPC data source. |
|
Data Write section: (Radio buttons and Checkbox buttons only) |
|
|
Confirm |
Select True to prompt runtime users with a confirmation message before writing a new value to the data source. |
|
Dynamic Behavior section: |
|
|
PickMode |
Determines the type of button.
|
|
InitialClick |
Select True if you want the command to be executed when you enter runtime mode. Select True to simulate a runtime user's action to trigger this dynamic to help you configure and test the dynamic. Set it to False when you are done testing. |
|
GroupName |
The name of the group of Radio buttons. Only one button in the group can be selected (on) at a time. In order to enforce the rules for radio button behavior, each radio button in the group must have the same group name. This field is case sensitive, so make sure you use the same capitalization for each radio button in the group. |
|
Command |
Choose the command that the Pick action executes. For a list of commands and their descriptions, refer to Commands for Buttons, Pick Actions, and Function Keys. |
|
CommandParameters |
Command parameters control the command that you choose in the Command property. For that reason, they are different for each command. For a description of command parameters, refer to Commands for Buttons, Pick Actions, and Function Keys. |
|
Execution Trigger - Key section: |
|
|
ShortcutKey |
From the drop-down list, select the key that will trigger the command. |
|
ShortcutModiferKeys |
If you want runtime users to have to hold down a modifier key (such as Shift or Ctrl) while pressing the shortcut key, select the modifier key from the drop-down list. |
|
Execution Trigger - Mouse section: |
|
|
LeftMouseButton |
Select True if clicking the left mouse button at runtime will trigger the command. |
|
MiddleMouseButton |
Select True if clicking the middle mouse button at runtime will trigger the command. |
|
RightMouseButton |
Select True if clicking the right mouse button at runtime will trigger the command. |
|
MouseModiferKeys |
If you want runtime users to have to hold down a modifier key (such as Shift or Ctrl) while clicking a mouse button, select the modifier key from the drop-down list. |
|
Execution Trigger - When section: |
|
|
ExecuteOnDown
|
True executes the command when the runtime user initially clicks the mouse button or presses the shortcut key(s) selecting the Normal button object. |
|
ExecuteWhileDown |
True executes the command as long as the runtime user holds down the mouse button or the shortcut key(s) when the object is selected. The command executes at the interval specified in the WhileDownInterval property. |
|
WhileDownInterval |
Click the ellipsis button |
|
ExecuteOnChecked |
True executes the command when the runtime user puts a check mark in the Checkbox button or selects the Radio button. |
|
ExecuteWhileChecked |
True executes the command as long as the check box has a check mark in it or the radio button is selected at runtime. The command executes at the interval specified in the WhileCheckedInterval property. |
|
WhileCheckedInterval |
Click the ellipsis button |
|
ExecuteOnUp |
True executes the command when the runtime user initially releases the mouse button or the shortcut key(s) at runtime. |
|
ExecuteOnUnchecked |
True executes the command when the check mark is removed from the check box or the radio button is unselected at runtime. |
|
AutoUncheckDuration |
A time delay, in milliseconds, after which the box is checked that the check mark will be automatically removed. You can click the ellipsis button |
|
ExecuteOnDoubleClick |
True executes the command when the runtime user double-clicks the mouse button on the object. |
|
ExecuteOnMouseMove |
True executes the command when the runtime user moves the mouse over the object. |
|
ExecuteOnMouseEnter |
True executes the command when the runtime user moves the mouse to the object. |
|
ExecuteOnMouseLeave |
True executes the command when the runtime user moves the mouse off the object. |
|
ToolTip section: |
|
See also:
Dynamics in the GraphWorX64 Interface