To navigate your way through a 3D viewport in GraphWorX64, you’ll need to take advantage of the Explorer and use your mouse. You can also use the perspective buttons available in the View Section of the 3D Home Ribbon.
When working with 3D objects in GraphWorX64, you will find the Explorer to be especially helpful. It has a lot of little tools you can use to quickly interact with your design and increase your productivity. The Explorer gives you an easy way to drill down into graphics and access information. Its hierarchical outline shows the content of a display in a tree-like structure, with branches that you can expand (so you can see more information) and collapse (to unclutter the Explorer). You can move objects in the Explorer, select them, and group them easily.
There are three types of geometry used in GraphWorX64 that you will see displayed in the Explorer. The three types are:
3D Model is any 3D object created in GraphWorX64. A 3D Model can contain a 3D Group or 3D Geometry.
3D Group contains only 3D Geometry—no other combinations are possible. The 3D Model and 3D Group are geometries for grouping objects.
3D Geometry is an object imported from an external application.
In the Explorer, you can quickly select and move an object from one group to another, and you can quickly reorganize objects. Once you have completed a design and definition of an object, you can lock the object to prevent further editing.
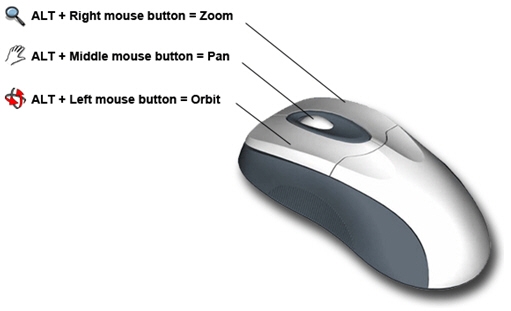
Use the mouse to navigate within the 3D view and to change the orientation of the scene, by orbiting, panning and zooming. You’ll need a three-button mouse, or a mouse with a wheel—it works especially to your advantage if you have a mouse with a wheel.
Actions in a 3D View Using a Wheeled Mouse

|
|
Note. These runtime actions described here are supported on Multitouch Platforms in Windows 7. If runtime users use touch-sensitive Windows 7 enabled devices, refer to GraphWorX64 on Windows 7 for a description of the hand gestures for performing the runtime actions described here for the mouse. |
Use keyboard shortcuts to quickly change the orientation of the scene.
Press any of the following keys to alter the view of your 3D Viewport.
Front view: O
Side view: I
Perspective: P
Top: T
Orbiting lets you change the perspective so you can see an object or the scene from different angles. Hold down the Alt key, then hold down the left mouse button and drag the mouse in any direction to tumble or rotate the camera’s view around a particular center of interest to achieve a higher or lower vantage point.
|
|
Note: The camera’s view is the distance and viewpoint from which you and runtime uses see the 3D scene. |
Orbiting in 3D

Panning lets you scan the width and depth of your scene. Hold down the Alt key, then hold down the middle mouse button (or the wheel) and drag the mouse in any direction to move the camera up, down, or sideways in relation to the scene.
Panning in 3D

Zooming in and out allows the user to view items in a scene close up or from further back.
Hold down the Alt key, then hold down the right mouse button and drag the mouse in any direction to zoom. Take precautions when using this function, as the speed of the zoom can be elevated. Alternatively, rolling the mouse wheel backward and forward zooms in and out of the object in a more controlled manner.
Zooming in 3D

Hotkey Shortcuts
3D objects within GraphWorX64 feature hotkeys that allows the user to maneuver them and alter their depths quickly.
Hotkeys for Configuration/Runtime mode:
A - Moves the figure to the right
D - Moves the figure to the left
E - Moves the figure downward
Q - Moves the figure upwards
W - Zooms in on the object
S - Zooms out from the object
U - Rotates the figure upwards
J - Rotates the figure downwards
H - Rotates the figure to the left
K - Rotates the figure to the right
See also: