|
|
The features on this page require a GENESIS64 Advanced license and are not available with GENESIS64 Basic SCADA . |

![]()
|
|
The features on this page require a GENESIS64 Advanced license and are not available with GENESIS64 Basic SCADA . |
![]()
Disclaimer: This feature must be used in strict accordance with all applicable laws. See the ICONICS licensing agreement for further details.
This topic describes the steps needed to set up the configuration and graphics needed to view the historical path of workers.
CFSWorX comes with sample Workbench configurations that can assist with getting started. These include the Hyper Historian and BI Server configurations that are shown in the examples later in this help topic. Please follow the instructions for deploying the CFSWorX AnalytiX Dashboards.
First, configure all Workers for CFSWorX as described in Workers.
You will also need to use the MobileHMI CFSWorX feature to transmit worker GPS updates back to the CFSWorX Workers Point Manager. This feature must be enabled on every device (phone) that will be used to collect GPS coordinates. See Setting Up Mobile Device Health for more information:
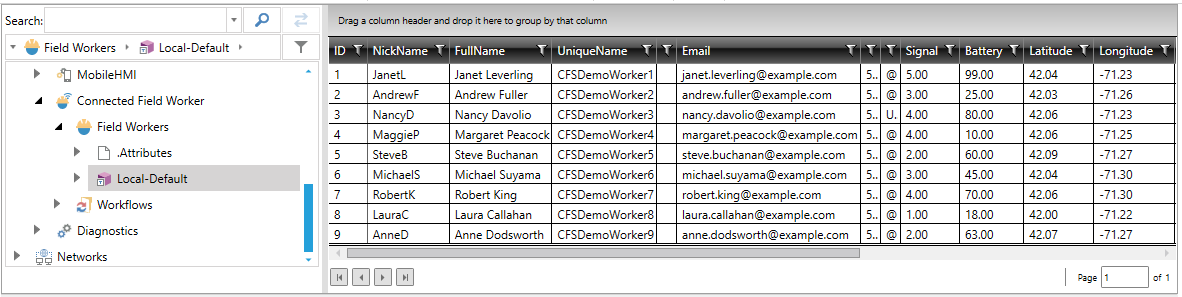
Before continuing, you should test to be sure that the worker GPS positions are updating. This can be done using a client app such as the Data Explorer. You can view information about multiple workers by subscribing to the dataset (as shown below), or you can view the Latitude and Longitude properties for a specific worker.
Subscribing to the Dataset
You will need to verify that you are seeing the GPS updates from actual worker phones, not the sample workers shown above.
Once the previous items are configured and you are able to get the GPS updates in CFSWorX Workers Point Manager, then you can proceed to the next step.
CFSWorX Workers Point Manager Point Manger exposes a new property "GPSByteArray" for each worker, which is a byte array.
Example point syntax:
wa:<Local-Default>/Andrew Fuller/GPSByteArray
Point Syntax Example in Data Browser
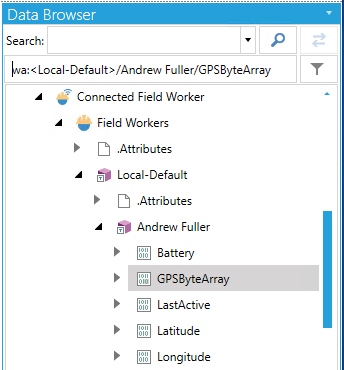
This property contains a serialized byte array, so it cannot be directly viewed. Its purpose is to be logged in Hyper Historian. Since it is a single property, we are guaranteed that the latitude and longitude are captured simultaneously. The byte array data from Hyper Historian can later be parsed by the BI Server which converts this data back into longitude and latitude information.
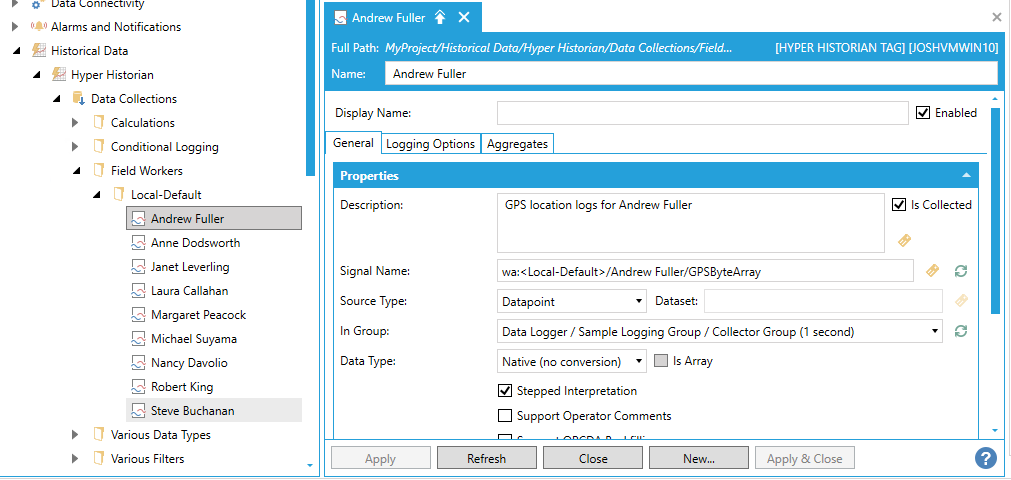
Hyper Historian must be configured to log the GPSByteArray property described above. This should be logged for every worker whose path needs to be displayed later.
Below you can see an example configuration that logs this property.
GPSByteArray Property Logged in Hyper Historian
You will want to turn on the Hyper Historian logging and let it run for at least a couple of hours. Then you should have multiple samples that can be processed by the BI Server to allow worker path replay in KPIWorX.
The following BI Server configuration is used to extract the worker information from Hyper Historian and prepare the data for usage in KPIWorX. It is based on the sample workers but can be modified to include additional Hyper Historian logged data.
This Data Flow extracts the worker paths for the last 24 hours, taking the last sample per 1 hour timeframe. It converts the byte array back into latitude and longitude. And it adds the worker name column.
Note: You may wish to modify the Processing Interval to provide more frequent samples. However, this may reduce the performance of KPIWorX when displaying the paths on the map. It is best to limit the number of samples that will be displayed.
Here is a brief description of the steps involved in this Data Flow:
Import the worker position data from Hyper Historian using 1 hour aggregates, taking the sample per hour. Take samples for the latest 24-hour period.
Remove bad or empty samples.
Convert the byte array tags to separate latitude and longitude values.
Build the CFSWorX Workers Point Manager signal name.
Get the worker's full name by parsing the Hyper Historian tag.
This data flow is used to retrieve additional information about the workers. It can be combined with the worker path data to provide more information about the workers.
This table simply connects to the WorkerInformation Data Flow.
This Data Table connects to the “WorkerLocations1Hour” Data Flow.
This Data View is used to combine fields from the two previous Data Tables. This is ultimately the view that KPIWorX will connect to.
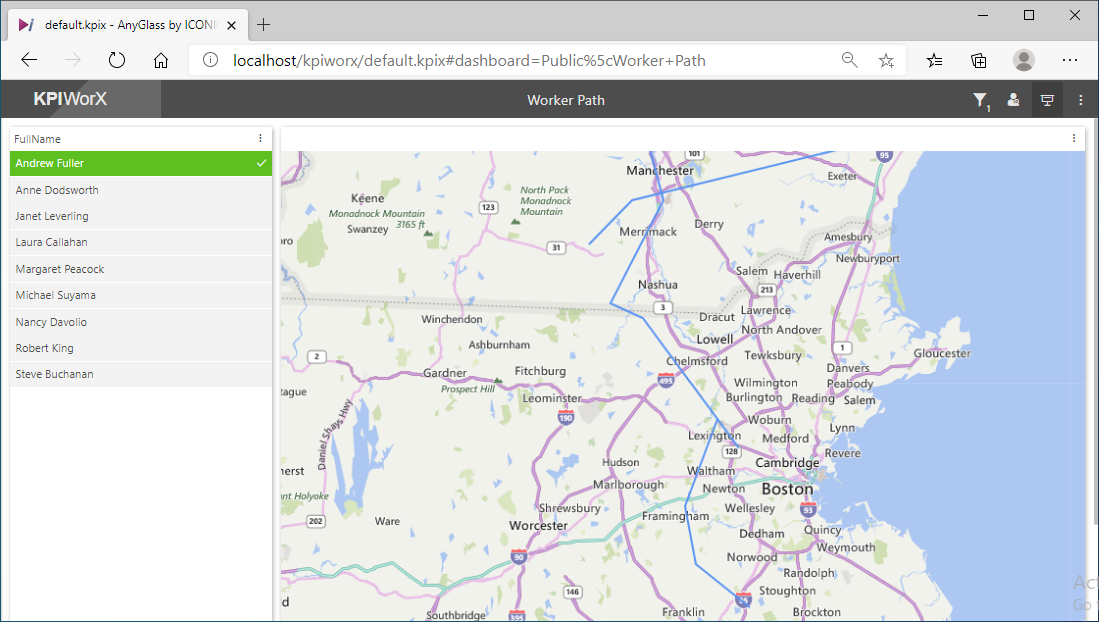
Now it is possible to choose a new “Path” symbol option for the Map widget in KPIWorX. This symbol option should be connected to the WorkerPathReplayView. All Data fields should be filled in to provide the latitude, longitude, worker name, and timestamp. It is also useful to include a filter widget in the display, to enable focusing on the path of an individual. For example:
Filter Widget in KPIWorX Display
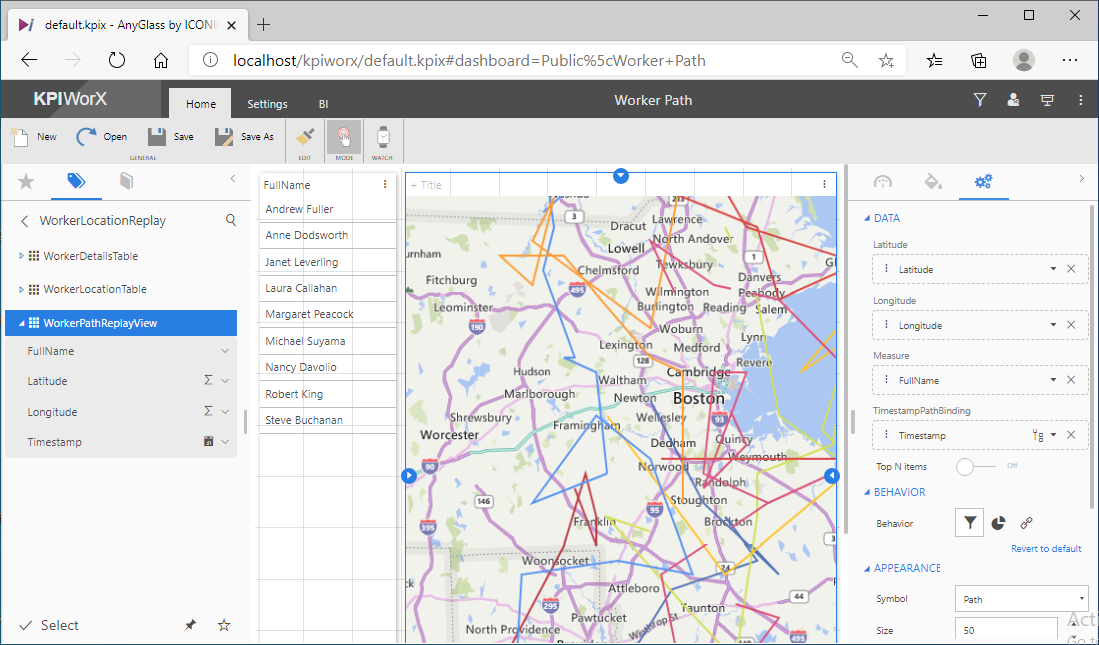
Here you can see the blue line representing the path of Andrew Fuller, who is selected in the filter on the left.
Selected Worker's Path
It is important to realize that the worker path can only be logged when the communication channel(s) are active and GPS coordinates are being transmitted to the server. Here are some examples, but not a comprehensive list of why communications to the server may be interrupted or stopped:
Worker disables the CFSWorX feature in MobileHMI
Worker’s device is turned off for any reason
Worker’s device runs out of battery power and turns off
Worker’s device becomes damaged or destroyed
Worker places the device in airplane mode
Worker turns of Wi-Fi or cellular connection
Worker’s device has no cellular or Wi-Fi signal
See Also:
Using the Data Collections and Groups Nodes