The GenBroker64 Settings can be used to configure the Classic OPC connection settings for the remote server.
To Configure GenBroker64 Settings:
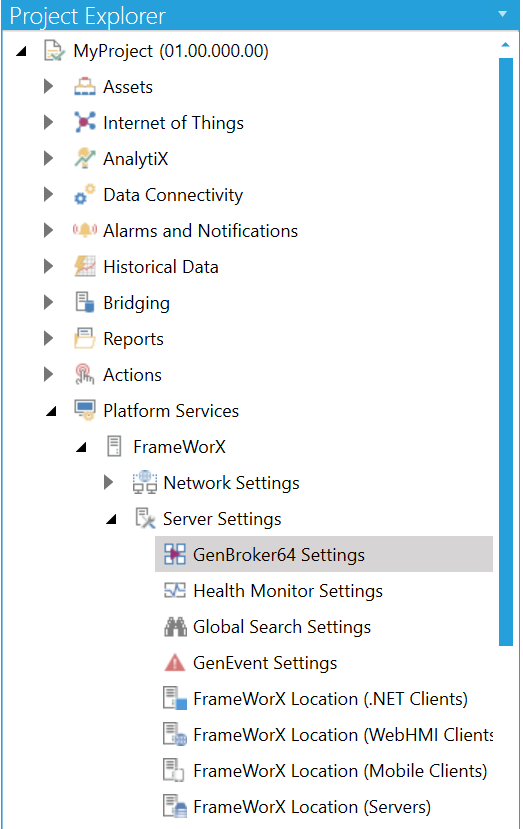
Open the Workbench and expand the Platform Services node in your project in the Project Explorer, then FrameWorX, then Server Settings, as shown below.
Configuring GenBroker64 Settings in the Project Explorer in the Workbench.
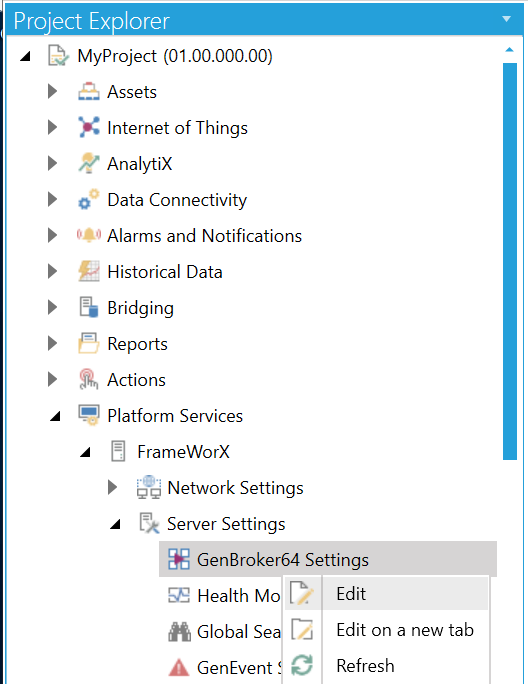
Double-click on the GenBroker64 Settings node itself, or right-click and select Edit from the dropdown menu, as shown below.
Edit GenBroker64 Settings from the Project Explorer
-OR-
Select the GenBroker64 Settings node, then click on the Edit button, shown below, in the Edit section of the Home ribbon in the Workbench.
Edit Button

This opens the GenBroker64 Settings properties in a window, shown below, in the middle of the Workbench.
GenBroker64 Settings
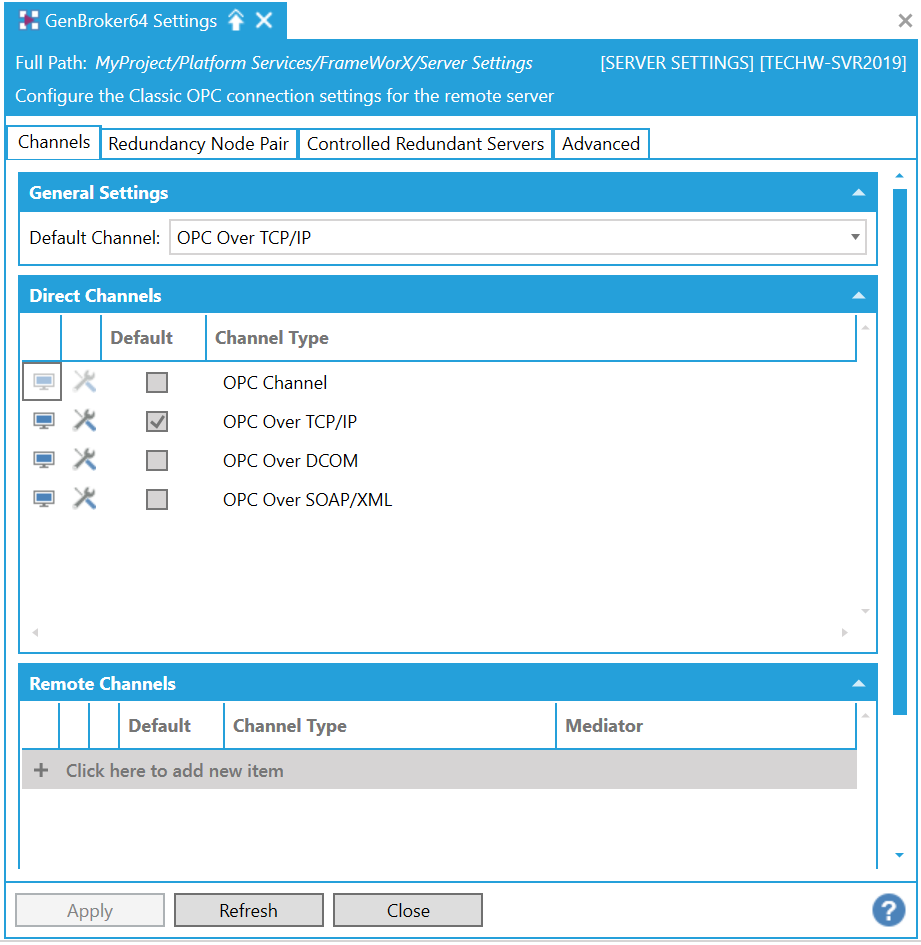
GenBroker64 Settings - Channels Tab

General Settings
Default Channel - Use the pulldown menu to select from OPC Channel, OPC Over TCP/IP, OPC Over DCOM, or OPC Over SOAP/XML.
Direct Channels
The Direct Channels section lists each available Channel Type [OPC Channel, OPC Over TCP/IP, OPC Over DCOM, or OPC Over SOAP/XML] and shows which has been selected as Default. It also provides the ability to Configure Nodes (via the  button) for the Channel Types. You can also configure Advanced Settings for each listed Channel Type via the
  button.
OPC Channel - Advanced Settings
Remote Channels
+ Click here to add new item link - Click on this link to add a new Remote Channel.
 (Configure Nodes) - Opens the Configure Channel Nodes window.
 (Advanced Settings) - Opens the Advanced Settings for the selected Channel Type (OPC Channel, OPC Over TCP/IP, OPC Over DCOM, or OPC Over SOAP/XML).
Default - Click the checkbox for the selected Channel Type to make it the default.
Channel Type - Use the pulldown menu to select from OPC Over TCP/IP, OPC Over DCOM, or OPC Over SOAP/XML).
Mediator - In some cases, where there is a firewall between your GENESIS64 machine and the remote OPC server, for example, you may need to create a Mediator node. In such cases, after you have selected preferred channel of communication, you can enter your mediator node name or IP address in this text entry field.
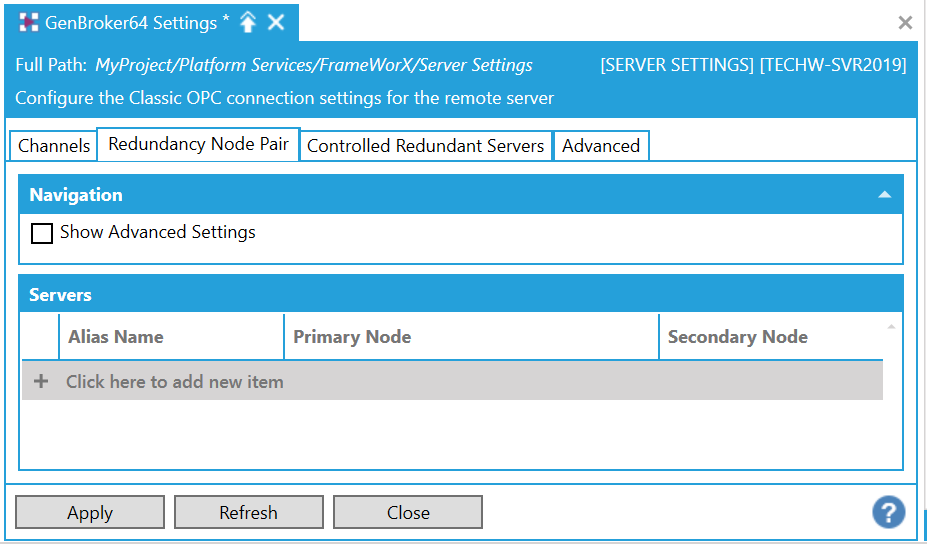
Redundancy Node Pair Tab
Navigation
Show Advanced Settings - Click this checkbox if you would like to complete the Auto Fail Back, Watchdog Timeout (sec.), Shutdown Period (sec.) and Pre-request Points settings for the Redundancy Node Pair servers in the Servers section below.
Servers
+ Click here to add new item - Click this link to add a new Redundancy Node Pair server.
Alias Name - Enter the server alias name in the text entry field.
Primary Node - Enter a primary node in the text entry field or click on the pulldown menu to select from a preconfigured listed primary node, if available.
Secondary Node - Enter a seconday node in the text entry field or click on the pulldown menu to select from a preconfigured listed primary node, if available.
These additional settings appear only if the Show Advanced Settings checkbox in the Navigation section is checked.
Auto Fail Back -
Watchdog Timeout (sec.) - Used as an interval between connection checks or reconnect attempts in the case of a connection interruption. Enter a time, in seconds, in the text entry field.
Shutdown Period (sec.) -Enter a shutdown period, in seconds, in the text entry field.
Pre-request Points -True to utilize pre-requested points, which help to provide faster switchover.
Controlled Redundant Servers Tab
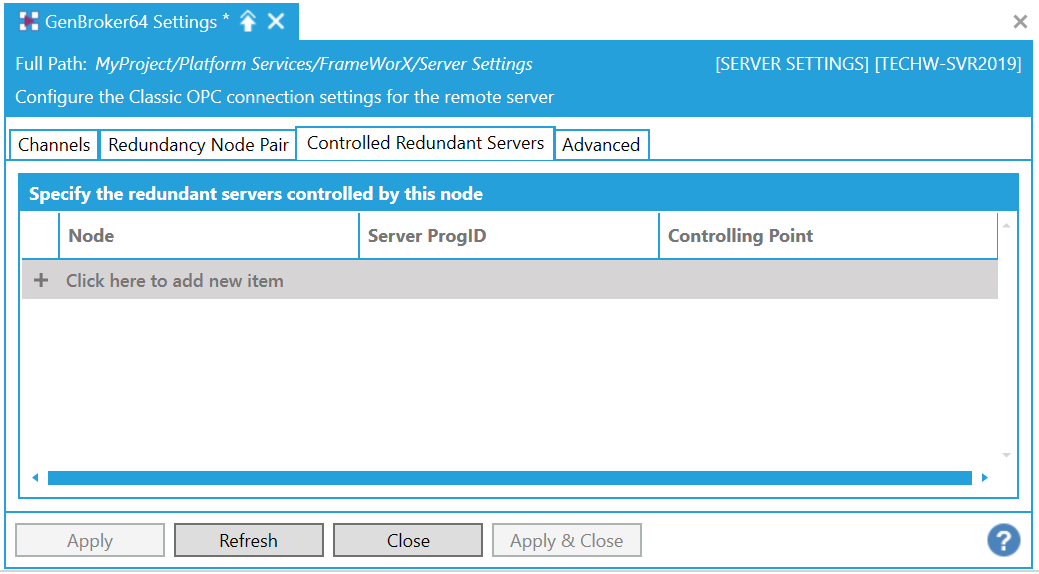
+ Click here to add new item - Click this link to add a new Controlled Redundant Server.
Node - Enter a Controlled Redundant Server node in the text entry field.
Server ProgID - Enter the Server ProgID in the text entry field.
Controlling Point - Enter the Controlling Point in the text entry field.
Advanced Tab
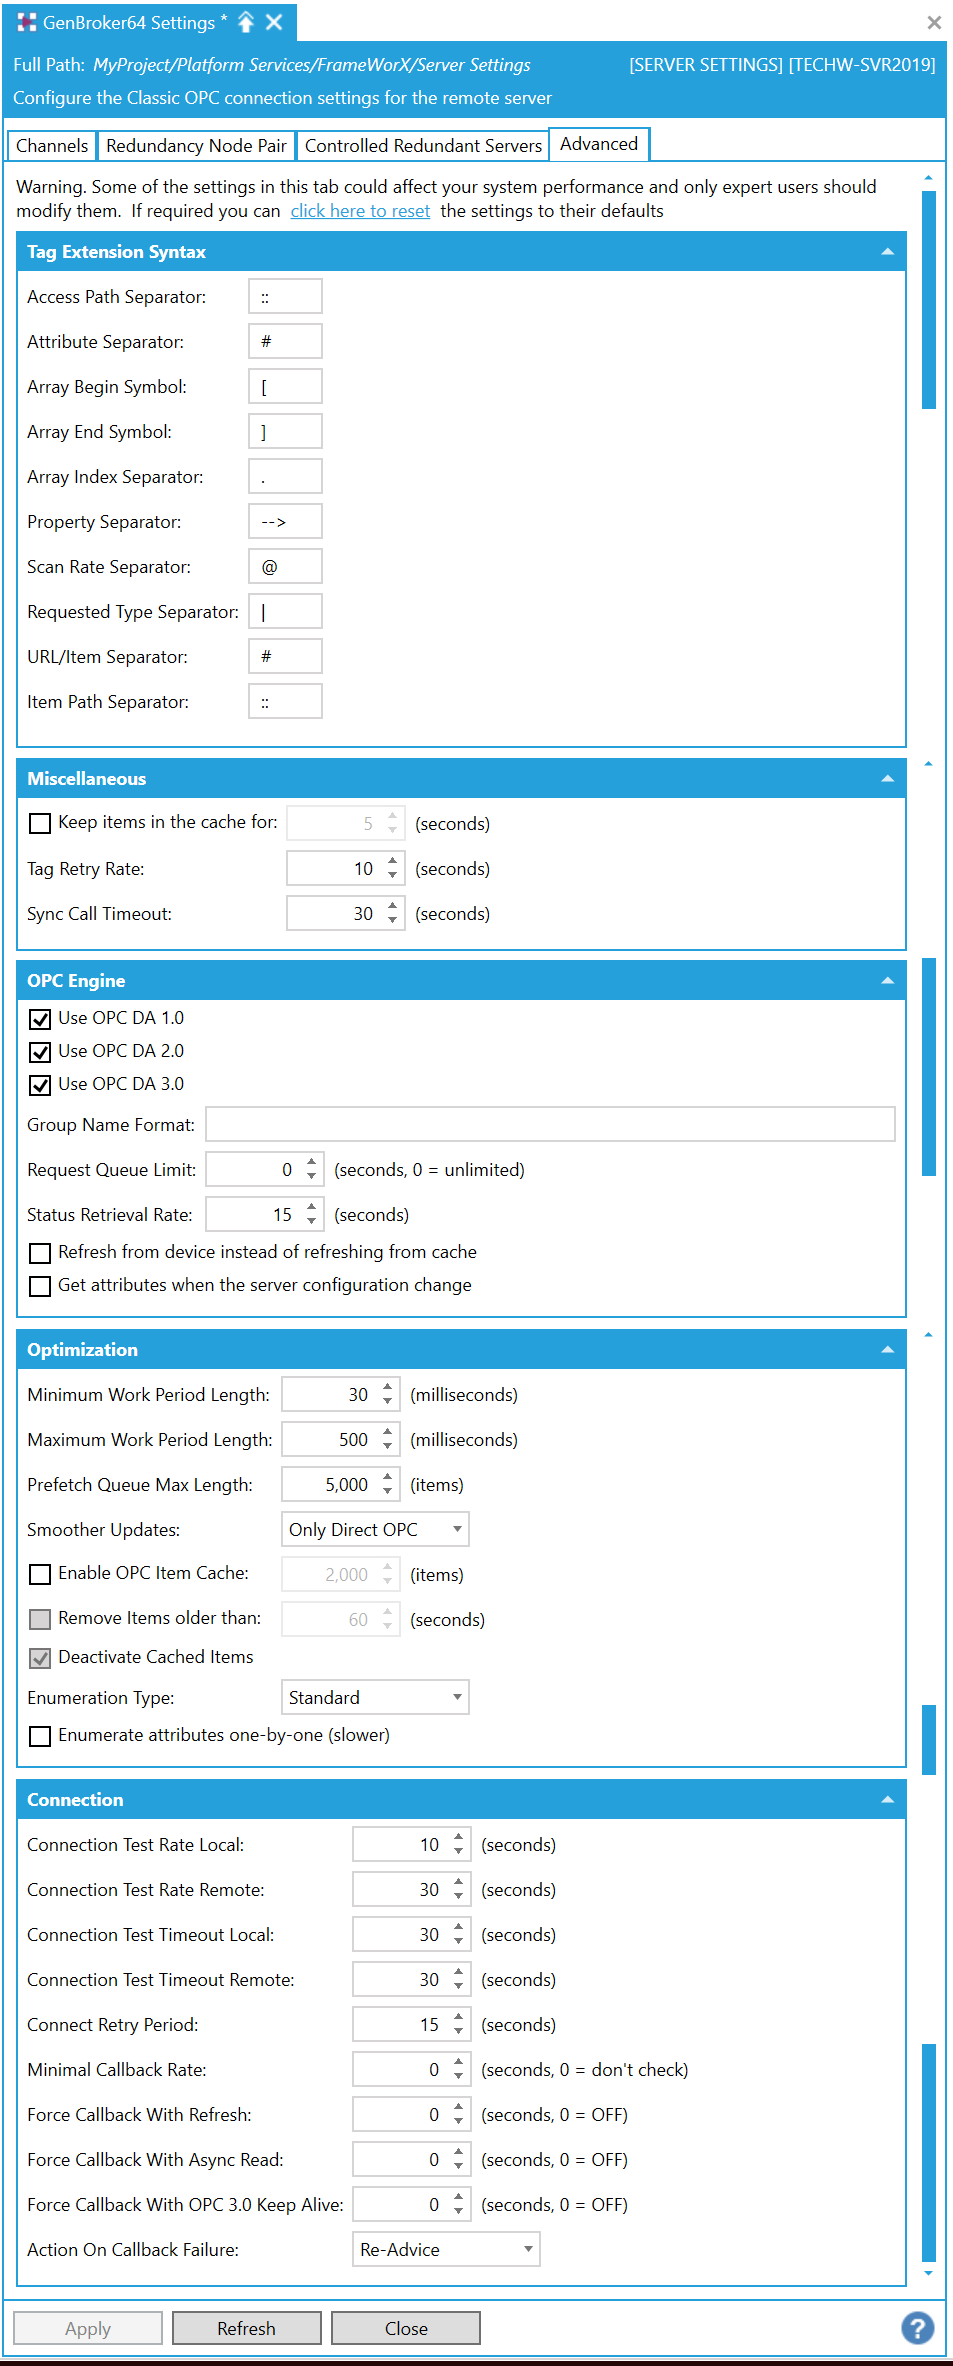
Warning: Some of the settings in this tab could affect your system performance and only expert users should modify them. If required, you can click on the click here to reset link on the Advanced Tab of the GenBroker64 Settings properties to reset the settings to their defaults.
Tag Extension Syntax
Access Path Separator -Default is :: - Enter a new Access Path Separator in the text entry field.
Attribute Separator - Default is # - Enter a new Attribute Separate in the text entry field.
Array Begin Symbol - Default is [ - Enter a new Array Begin Symbol in the text entry field.
Array End Symbol -Default is ] - Enter a new Array End Symbol in the text entry field.
Array Index Separator -Default is . - Enter a new Array Index Separator in the text entry field.
Property Separator - Default is --> - Enter a new Property Separator in the text entry field.
Scan Rate Separator - Default is @ - Enter a new Scan Rate Separator in the text entry field.
Requested Type Separator -Default is | - Enter a new Requested Type Separator in the text entry field.
URL/Item Separator -Default is # - Enter a new URL/Item Separator in the text entry field.
Item Path Separator - Default is :: - Enter a new Item Path Separator in the text entry field.
Miscellaneous
Keep items in the cache for -Click this checkbox in order to set how long to keep items in the cache. Once activated, enter a time, in seconds, in the text entry field or use the up/down arrow buttons.
Tag Retry Rate -Enter the tag retry rate, in seconds, in the text entry field or use the up/down arrow buttons.
Sync Call Timeout -Enter the sync call timeout, in seconds, in the text entry field or use the up/down arrow buttons.
OPC Engine
Use OPC DA 1.0 - True to use OPC DA 1.0 communication.
Use OPC DA 2.0 - True to use OPC DA 2.0 communication.
Use OPC DA 3.0 - True to use OPC DA 3.0 communication.
Group Name Format - Enter a group name format in the text entry field.
Request Queue Limit - Enter a time for request queue limit, in seconds, in the text entry field or use the up/down arrow buttons. 0 = unlimited.
Status Retrieval Rate - Enter a status retrieval rate, in seconds, in the text entry field.
Refresh from device instead of refreshing from cache -True to refresh from the connected device instead of from cache.
Get attributes when the server configuration change -True to receive attributes when the server configuration changes.
Optimization
Minimum Work Period Length - Enter a time, in milliseconds, in the text entry field or use the up/down arrow buttons.
Maximum Work Period Length - Enter a time, in milliseconds, in the text entry field or use the up/down arrow buttons.
Prefetch Queue Max Length - Enter a number, in items, in the text entry field or use the up/down arrow buttons.
Smoother Updates - Use the pulldown menu to select from None, Always, or Only Direct OPC.
Enable OPC Item Cache -True to enable OPC item cache. Once activated, enter a number, in items, in the text entry field or use the up/down arrow buttons.
Remote Items older than - True to remove older items based on set time. Once activated, enter a number, in seconds, in the text entry field or use the up/down arrow buttons.
Deactivate Cached Items - True to deactivate cached items.
Enumeration Type -Use the pulldown menu to select from None, Intelligent, or Standard.
Enumerate attributes one-by-one (slower) - True to enumerate items one-by-one. Note that this process is slower.
Connection
Connection Test Rate Local -Enter a time, in seconds, in the text entry field, or use the up/down arrow buttons.
Connection Test Rate Remote -Enter a time, in seconds, in the text entry field, or use the up/down arrow buttons.
Connection Test Timeout Local -Enter a time, in seconds, in the text entry field, or use the up/down arrow buttons.
Connection Test Timeout Remote - Enter a time, in seconds, in the text entry field, or use the up/down arrow buttons.
Connect Retry Period - Enter a time, in seconds, in the text entry field, or use the up/down arrow buttons.
Minimal Callback Rate -Enter a time, in seconds, in the text entry field, or use the up/down arrow buttons. 0 = don't check.
Force Callback With Refresh - Enter a time, in seconds, in the text entry field, or use the up/down arrow buttons. 0 = OFF.
Force Callback With Async Read - Enter a time, in seconds, in the text entry field, or use the up/down arrow buttons. 0 = OFF.
Force Callback With OPC 3.0 Keep Alive - Enter a time, in seconds, in the text entry field, or use the up/down arrow buttons. 0 = OFF.
Action on Callback Failure - Use the pulldown menu to select from Re-Advice, Re-Create Group, or Re-Create Server.
Click Apply to save your settings, then Close to return to the Workbench.
See Also: