Using Camera Views for 3D Objects
Camera views are preset views that focus on a certain part of the display. It allows you to zoom into an object during runtime with a click of a button. It is a quick and useful way to navigate around your 3D viewport. In order to take advantage of Camera views, you need to create them in configure mode.
Creating a Camera View
- Open a GraphWorX64 display with one or more 3D objects in configure mode.
NOTE: If you do not have one available, please refer to the 3D Objects Quick Start topic.
- Double-click on the 3D View control to edit it.
- Move around your 3D View control to a desired view. You can do that by pressing the Alt key while dragging the viewport.
- Click on the down arrow of the
 Camera button from the View section of the Home tab.
- Select ‘Add current view’ and give the view a name.
- Repeat the above steps to add as many views as you like.
Camera View in Runtime
- Put your display in runtime.
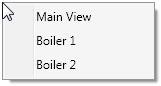
- Right click anywhere on the display and Camera View menu will appears.
Figure 1 - Runtime Camera View
NOTE: By default, the animation from your current view to the selected one will last for 5 seconds. If you want to alter this behavior, you can alter the “CameraAnimationDuration” property of the 3D View control using a different value. Specifying 0 for this property will make an instant transition between the views.
Creating the Pick Action
To change created camera view in runtime, we can also use a simple script.
- Put your display in configuration mode.
- Rename your 3D control to be ‘MainViewport’ as shown in Figure 2.
Figure 2 - 3D View Control: Main Viewport

- On the Dynamics tab of the ribbon, click on
 in the Buttons section to add a button to the display.
- From the Dynamics tab of the button, change the Command field in the Dynamic Behavior section to be ‘Set View’ as shown in Figure 3.
Figure 3 - Dynamic Behavior
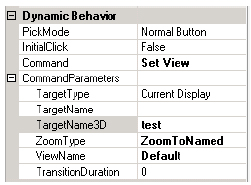
- Enter the name of the 3D viewport in the “TargetName3D” filed. In this example, it is “test”.
- Enter the name of the view in the “ViewName” field.
- Repeat steps 3-6 for any other view that you wish to set using a button.
- Put your display in runtime.
- Now, click on the button will bring you to the 3D view that you have set for the button.
NOTE: If you see nothing happening, make sure that you are not already looking at the viewport from that view. In this case, simply move your view and then try clicking again on the button.
See also:
Animating 3D Views at Runtime
Controlling the Runtime Behavior of 3D Views