![]()
![]()
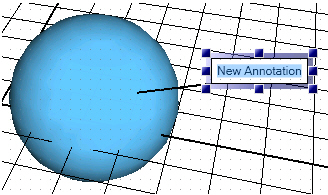
Annotations are 3D graphic labels that remain in place when a 3D display or an object rotates or moves in a 3D view. An annotation is anchored to the object that it labels. The label can contain an object's description or can display a digital readout. For example, you can use a gauge from the Symbols Library in an annotation of an animated tank object, which the gauge monitors; runtime users can rotate the animated tank, but the gauge always faces runtime users so that it can always be read.
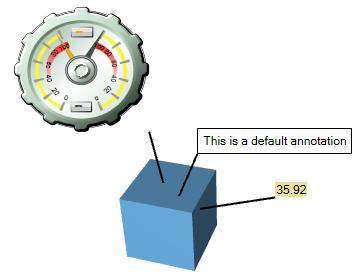
Three Annotations Attached to a Cube: A Gauge, a Label, and a Process Point
You can put anything you like in an annotation. For example, the annotation can have an animated object, a trend, and even an alarm. You are not limited to what you put into an annotation.
You can create annotations so that their display measures are culture-sensitive or language-sensitive. Using one display with one set of annotations, you can set up the annotations so that, for example, a temperature gauge shows readings in Celsius to users in Europe and in Fahrenheit to users in the United States. The same display’s annotations can also be language-sensitive to users. You can use the Hide dynamic to hide and show such gauges depending on the runtime user. You can even include a button in the annotation so that runtime users can change the language if necessary.
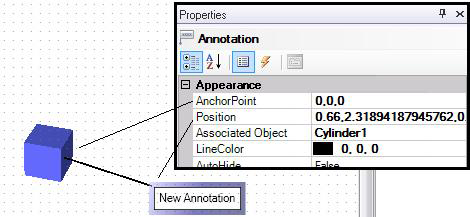
Like all objects in a GraphWorX display, annotations have properties that you can modify in the Properties tab. The default values of an annotation's properties are set in Preferences using the New Label Default Settings preference.
The remainder of this topic describes the following:
|
|
Editing tips: Editing an annotation can be confusing at first. Until you become accustomed to working with annotations, the following tips may be of some help:
|
To create an annotation:
Select the object you want to annotate.
Click the Annotate  icon on the Primitives section on the Home ribbon. This places an annotation in the 3D view and attaches the annotation to the selected object.
Note that the annotation is flush with the XZ plane. If you want move the annotation (for example, raise the annotation so that it appears above the plane), in the Explorer select the annotation. When you do this correctly, the Move manipulator appears on the annotation. Use the move manipulator to move the annotation to the desired location.
Type the text of the annotation or add an object to the annotation, such as a process point or a symbol from the Symbols Library (you can add 3D and non-3D symbols), a GraphWorX64 object, or an AlarmWorX64 object. Configure any objects in the annotation as you would configure them for any other display; the boundaries of the annotation expand to accommodate the size of objects you add to the annotation.
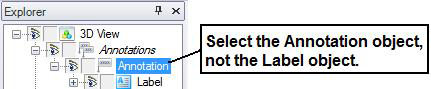
Use the annotation's properties (described in Annotation Properties) to control the annotation. An annotation has two sets of properties: select the Annotation object to set Annotation properties; select the Label object to set Label properties. Default values for Label properties are set in the New Label Default Settings on the Preferences tab.
An annotation might not be attached to an object if you forgot to select the object before adding the annotation to the 3D view or if the object's name changed, causing the object to become detached from its annotation. Furthermore, it may be attached to the wrong object, or its line may not be anchored to the object. If this is the case, you can attach the annotation to the correct object by following these steps:
In the Explorer, select the annotation you want to attach to an object. Note that all annotations appear under the Annotations section at the top of the 3D View. When you do this correctly, the Move manipulator appears on the annotation.
On the annotation's Properties tab, in the AssociatedObject property, type the name of the object you want the annotation to attach to. The object name is case sensitive, so make sure the name entered here is identical to the object's name as it is listed in the Explorer.
Set the ShowLine property to True. (If the ShowLine property is already True, you may have to set it to False, then set it back to True or order to attach the annotation.) This makes the line that connects the annotation to the object visible.
In the 3D view, right-click the annotation to reveal the pop-up menu. Select Reset Anchor Point. The annotation line's anchor point should now connect to the object.
If the anchor point does not appear in the correct spot, right-click the annotation again, and select Edit Anchor Point. This puts a move manipulator at the annotation's anchor point. Move the anchor point to the desired location in the object. If the object moves during runtime, this establishes the object's starting point.
If at any point the annotation's anchor point becomes detached from the object, repeat these steps as a way of troubleshooting a solution.
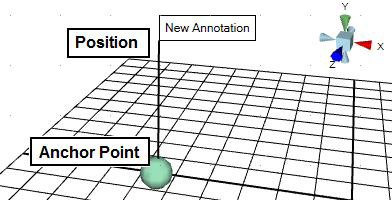
The placement of an annotation (called its position) or its anchor point in an object may not suit your needs. You can move either.
You Can Move an Annotation or Its Anchor Point
To move the annotation to another spot in the 3D viewport:
In the Explorer, select the annotation you want to attach to an object. Note that all annotations appear under the Annotations section at the top of the 3D View. When you do this correctly, the Move manipulator appears on the annotation.
Use the Move manipulator to move the annotation wherever you want it to be. Note that this changes the coordinates in the annotation's Position property in the format: X,Y,Z. You have the option of typing new coordinates in the Position property if you require a more exact way of positioning the annotation.
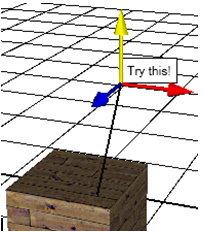
Check the annotation's orientation by clicking the perspective buttons on the View Section of the 3D Home Ribbon. For an example, click here. In any of these views you can move the annotation.
To move the annotation line's anchor point in an object:
In the Explorer, select the annotation you want to attach to an object. Note that all annotations appear under the Annotations section at the top of the 3D View. When you do this correctly, the Move manipulator appears on the annotation.
In the annotation's Properties, make sure that [a] the object is correctly entered in the AssociatedObject property and then [b] the ShowLine property is True.
In the 3D view, right-click the annotation and select Edit Anchor Point. The Move manipulator appears at the annotation's anchor point.
Use the Move manipulator to move the anchor point to the desired spot in the object. Note that this changes the coordinates in the annotation's AnchorPoint property in the format: X,Y,Z. The coordinates 0,0,0 put the anchor point in the center of the object. You have the option of typing new coordinates in the AnchorPoint property if you require a more exact way of positioning the anchor point in the object.
Check the anchor point's orientation in the object by clicking the perspective buttons on the View Section of the 3D Home Ribbon. For an example, click here. In any of these views you can right-click and move the annotation's anchor point.
|
|
Note: If you select the annotation incorrectly before deleting it, the line that connects it to the object will not get deleted. If you end up with a residual line, use the Undo command (in the Quick Access toolbar) to re-add the annotation, then follow the steps below to delete the annotation properly. |
In the Explorer, select the annotation you want to attach to an object. Note that all annotations appear under the Annotations section at the top of the 3D View. When you do this correctly, the Move manipulator appears on the annotation.
Press Delete. This deletes the annotation and the line that connects it to the object.
Annotation properties for an annotation are described below. Note that annotations also come with an inner 2D label object; for more information, refer to Labels.
|
|
Note: If changes to these properties are not reflected immediately on the graphic, rotate the scene around and the line position will update. |
The top, Appearance section has the following properties that are specific to annotations:
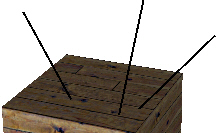
AnchorPoint identifies the coordinates (in X,Y,Z format, where X, Y, and Z are the axes) on the object where the line is anchored in configuration mode (see the illustration of the AnchorPoint and Position properties below). Note that these coordinates are in relation to the associated object, not in relation to the 3D view's grid. For example, 0,0,0 places the anchor point in the center of the object. If the ShowLine property is True, this is the coordinate on the object where the line connects to the annotation. To change the AnchorPoint's coordinates, refer to Moving an Annotation or Its Line.
Position identifies the coordinates (in X,Y,Z format, where X, Y, and Z are the axes) of the annotation box, as shown in the illustration below. To change the coordinates, select the annotation in the Explorer and then move it using the Move manipulator.
AnchorPoint and Position Properties
AssociatedObject identifies the name of object that the annotation labels. If the object was selected when you clicked the annotation icon, that object's name appears here. If the object's name changes, you must make sure to change its name in this property. You can type a new object name at any time; make sure you type the name that appears for the object in the Explorer. This field is case sensitive. If you enter the name of the different object, the annotation automatically annotates that object.
LineColor determines the color of the line that connects the annotation to the object, assuming the ShowLine property is set to True.
AutoHide, when set to True, hides the annotation in runtime when it collides with other objects in the display. Set this property to True when the annotation is in a congested display of objects and other annotations and this is an annotation that runtime users don't necessarily need to see constantly. If the annotation is attached to an object that moves in runtime, consider where in the display the object will be moving and what other objects are will be in those locations.
ShowLine, when set to True, shows a line from the annotation to the object. Setting this value to True also makes the Reset Anchor Point and Edit Anchor Point menu items appear on the annotation's right-click menu.
Annotation Horizontal Alignment determines where in the annotation the text appears. Options are Auto (the default), Left, Center, and Right.
Annotation Vertical Alignment determines where in the annotation the text appears. Options are Auto (the default), Top, Center, and Bottom.
See also:
The X, Y, and Z Axis Legend in the 3D Viewport
Find and Replace Properties in Displays and Symbols