
Following the procurement of the IoT Gateway device hardware and the setup of the Cloud connection, the next step is to provision the IoT Gateway hardware itself.
Typically, a new IoT Gateway device does not yet contain an Azure SQL Database (and therefore no configuration databases). In addition, the box itself does not yet know how to communicate with anything. It needs to be provisioned to tell it how to communicate with the Cloud and the Azure IoT Hub.
Provisioning Setup
Via an included Local User Interface, a user can enter:
Device_ID
Location
Connection Strings
The Gateway will then communicate with IoT.Iconics.com, which is a global service that will register the Gateway within the IoT Hub. The IoT Hub must have a registered Gateway in order to initiate communication.
IoT.Iconics.com sets up:
IoT Gateway Connections
IoT Gateway Default Configuration Databases
IoT Gateway License
Connecting to the IoT Gateway (the hardware itself) and accessing the provisioning settings for IoTWorX is similar to how to connect to and configure a home WiFi router.
On either the gateway or a remote PC on the same network as the gateway, open a Web Browser and go to http://<gateway>:1447/, replacing “<gateway>” with the computer name or IP address of the gateway device.
IoTWorX Login Page

Log in with the credentials:
Username: admin
Password: iconics
You can alternatively enter "user" as the Username, as well.
You'll be able to change the login credentials later on.
ICONICS IoTWorX - Overview Page

IoTWorX will open to the Home/ Overview tab, which includes the following Device Information:
Computer Name - The name of the computer where IoTWorX has been installed will be listed automatically.
Computer IP Address - The IP address of the computer where IoTWorX has been installed will be listed automatically.
IoT Hub Device ID - This will appear once the IoT Gateway device has been provisioned. In the example above, this has not yet occurred so it shows "N/A".
IoT Gateway Status- Similar to the Device ID, this will appear once the IoT Gateway device has been provisioned.
Cloud License Mode - This shows the status of the current Cloud license. In the image above, this is listed as Demo Mode.
Click on the Provisioning tab pulldown menu and select "Device Set Up".
NOTE: The Provisioning tab also allows you to go straight to the Cloud License and Device Location settings by themselves.
Provisioning Tab in IoTWorX

You are asked, "How would you like to provision your device?" and have the option of:
I want to use my private IoT Hub.
I want to use ICONICS' IoT Hub.
In this example, we will connect to an IoT Hub on Azure, so click on the top selection and then Next.
You will then be asked to "Please, select an option that fits your needs.", as shown below.
Hub Options in IoTWorX

You can select from:
I want to register this IoT Gateway as a new device in my IoT Hub.
I already have a registered device in my IoT Hub and want to link it with this IoT Gateway.
In this example, we have an existing IoT Hub but need to register a device, so click on the top selection, then Next.
You will then be asked to "Please, enter the information required for the provisioning of the IoT Gateway." as shown below.
Licensing, IoT Hub and Database Settings for IoTWorX
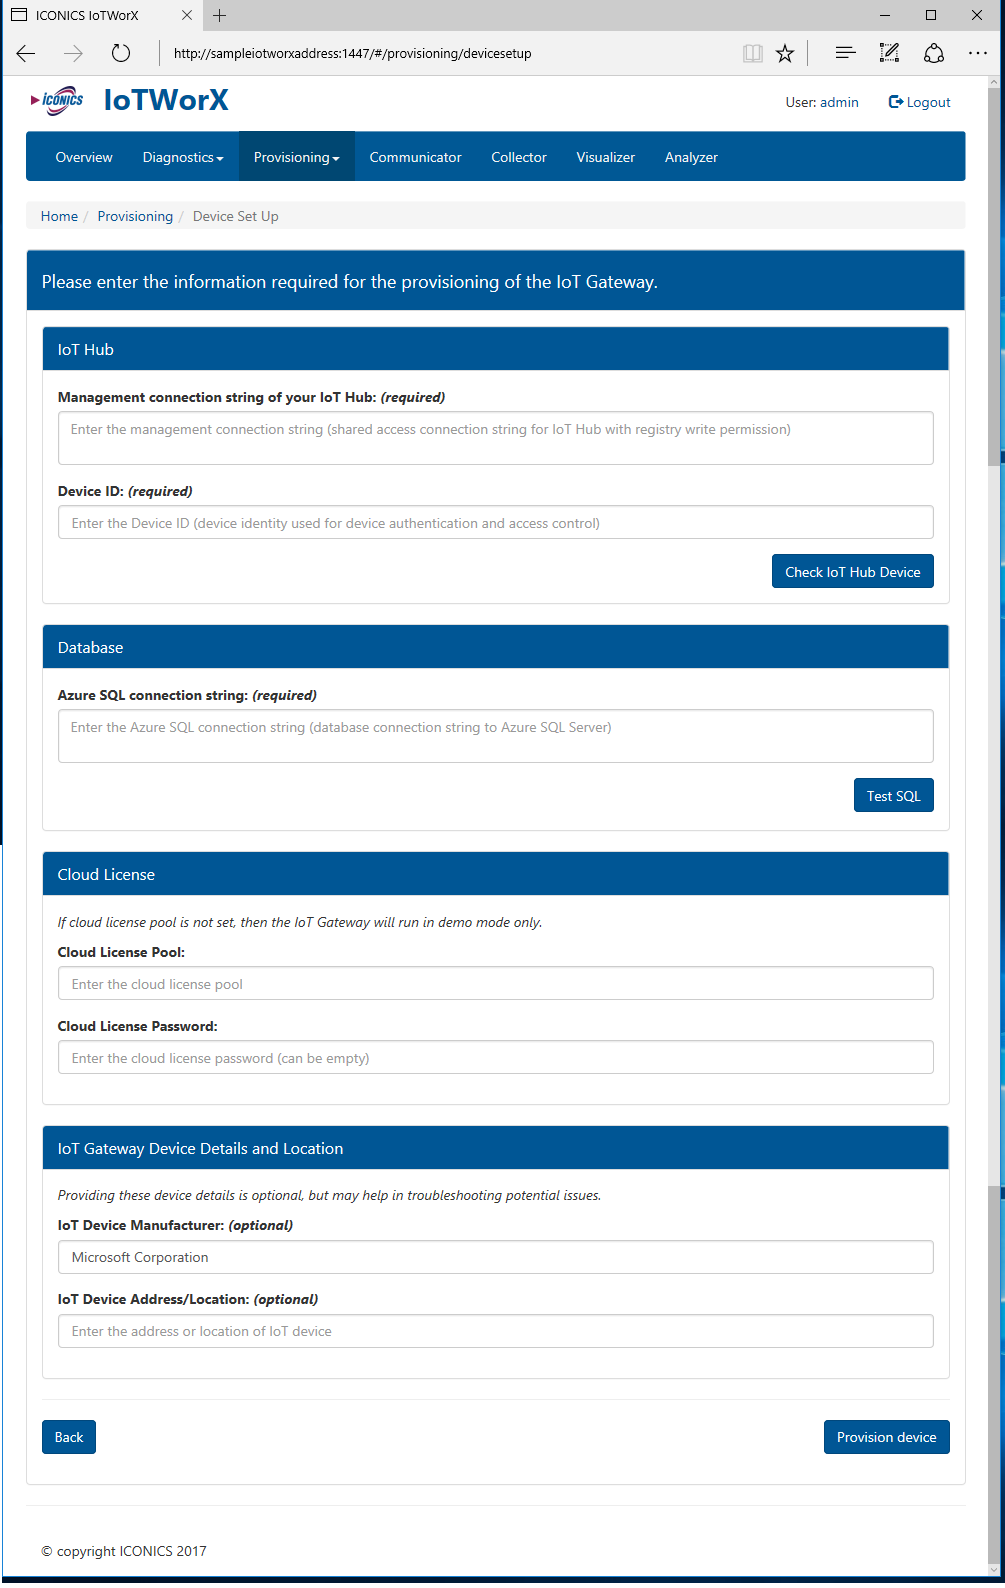
IoT Hub
Management connection string of your IoT Hub: (required) - Enter the connection string information that was set up during IoT Hub Setup during the Azure Portal Setup; the shared access connection string for IoT Hub with registry write permission.
Device ID: (required) - Provide the ID for this IoT Gateway device for device authentication and access control.
Database
Azure SQL connection string: (required) - Enter the connection string information that was set up during SQL Database Setup during the Azure Portal Setup; the database connection string to Azure SQL Server. Click the Test SQL button in order to ensure that the connection will be successful.
If the cloud license pool is not set, then the IoT Gateway will run in demo mode only.
Cloud License Pool - Enter the cloud license pool in the text entry field.
Cloud License Password - Enter the password for the cloud license in the text entry field.
IoT Gateway Device Details and Location
Providing details in this section is optional, but it may help in troubleshooting potential problems.
IoT Device Manufacturer (optional) - Enter the manufacturer of the IoT device, in the text entry field, that you are using with IoTWorX.
IoT Device Address/Location (optional) - Enter the IoT device's address and location in the text entry field.
Once you have completed your settings, click on the Provision device button.
Several processes take place at this point. The IoT Gateway with the Device name that you provided will be created and registered on your specified IoT Hub (in this case, on the Azure Portal). Once the device is registered there, you will get the Connection String for the IoT Gateway. This Connection String is unique so each device name also has to be unique in the IoT Hub (on the Azure Portal). The Connection String will be used in the Publisher to be able to publish data from the device to the IoT Hub. The Connection String to the SQL Azure database will be used to create default configuration databases for use with Modbus, BACnet, SNMP, and publish lists on the SQL Azure database.
Once these processes are complete, you will see a message that your device has been provisioned.
Click on the Overview tab, and you will see that your set device name now appears in the IoT Hub Device ID section.
If you return to the Azure Portal, you can then see that your provisioned IoT Gateway has been added to your listed devices, as shown below.
IoT Gateway Device Listed in Azure Portal's Device Explorer

See Also:
IoT Gateway Configuration in Workbench