Acknowledgment of an Alarm via Email or SMS
AlarmWorX Multimedia is a distributed, enterprise-wide alarm notification system that delivers real-time alarm information to the end-users, wherever they may be. The notification messages are sent to a recipient via Multimedia Agents (such as email, pager, fax, voice, text-to-speech, phone, software or Ethernet hardware marquees and more).
The Email and SMS agents send alarm messages to end-users via modem or email. The recipient can acknowledge the alarms remotely by using the mobile device or replying to the email. This application note describes how to setup the Email and SMS agents to allow acknowledgement. Similar steps can be used for Messenger. In this topic you can find examples for configuring:
PC Setup, Before You Begin
Before you begin setting up AlarmWorX Multimedia agents with acknowledgment you need to know how to install AlarmWorX Multimedia correctly.
Email: During the installation, the default active email agent is SMTP (outgoing mail only), but if you want to receive alarm acknowledgment via email you need to select “For use with Microsoft Outlook” (or Outlook Express) during installation. (For more details, refer to the Email Agents topic.)
SMS: For SMS, you need to select the Modem/ISDN carrier and GSM/PCS during the installation and configure your device (cellular phone or modem). Please consult the help files or look for the application note entitled "AlarmWorX Multimedia - SMS with a Cellular Phone" or "AlarmWorX Multimedia - SMS with a Modem".
Once you have the right email agent or mobile operator/modem installed and configured, you need an alarm in the AlarmWorX64 Server that will cause the message to be sent out. You can generate a new alarm or use the ones from the sample configuration. For more details, refer to the Alarm Tags topic.
Before you begin configuration, please make sure that UAC is turned off on your computer.
Email Agent Configuration - Example
This example uses the default AlarmWorX64 Server and AlarmWorX Multimedia Configurations. For more details on how to customize these configurations, refer to the AlarmWorX Multimedia Quick Start topic.
You can follow the steps below to configure the Email Agent in AlarmWorX64 Multimedia Workbench.
- Open AlarmWorX Multimedia Workbench from Start -> Programs -> ICONICS AlarmWorX Multimedia -> AlarmWorX64 -> AlarmWorX64 Multimedia
- In the tree explorer, expand Localhost -> Your Alarm Configuration -> Configurations -> Multimedia Agents E-mail.
- Right-click on E-mail and choose “Edit on New Tab”.
- Click on “General Setting”. For Mail Client Interaction, select one of the “Acknowledge On” options. Fill out the MAPI settings accordingly.
Figure 1 - Email Agent General Settings
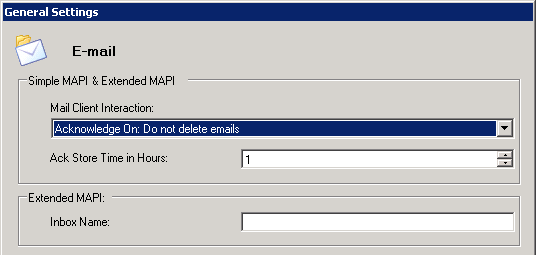
NOTE: Remember that SMTP does not support acknowledgement.
- Click on “OK” to close the General Settings dialog when you are done.
- Right-click on the E-mail folder and create a new Media Item. Name it “Test Email”.
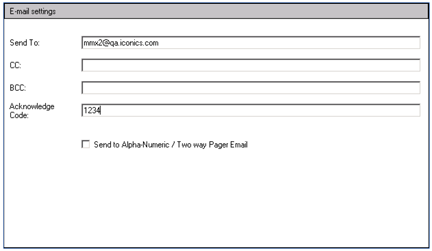
- Select “Default Email” as the email template, select Scheduling and Role as desired, and enter the “Send To” email address.
- In order to acknowledge alarms you must enter a number in the “Acknowledge Code” field.
Figure 2 - Email Setting
- In the tree explorer, expand Configurations Default Email Action Set.
- Right-click on Email Action Set and select “Edit on New Tab”
- In the right-hand pane, check the box “Enable” if it is not already checked.
NOTE: You may want to change the filter if you plan on testing this with a different alarm.
- In the Action Destination column, select your “Test Email” agent.
- In the “Stop Actions Condition” section, check the box for “Acknowledgement Received”. Additionally you can set the “Actions Loop” settings to repeat the actions.
Test Email Agent settings
To test the Email Agent with acknowledgment we need to create a simple alarm in the AlarmWorX64 Server using a process point and modify it to generate the alarm.
- Go to AlarmWorX64 section in Workbench64.
- Locate the “MMXCoreTemp” alarm.
- Change the OPC Input to @sim64:Bool.Square(60,0).Value
- This is a Boolean tag that will change value on its own every 60 seconds. You can modify this value to your liking.
- Generate the alarm by starting up the Alarm Server and wait 60 seconds. You cannot really see the alarm until you have an action set configured in AlarmWorX Multimedia. Click on “Apply” to save the changes.
- Open your mail client.
- Put both AlarmWorX64 Server and Multimedia Server to runtime mode.
- Wait for the alarm to generate and look for the email from AlarmWorX64 Multimedia.
- The two long strings of letters and numbers at the end of the email is an ID number that uniquely identifies this alarm message. To acknowledge the alarm, reply to the email with a message that contains the alarm ID and acknowledgement code in this format:
??ID1??
??ID2?? Ack
For example, if the ID in the email was:
??1234567??
??8912345??
and the acknowledge code was 1234, you could acknowledge the alarm by replying with this message:
??1234567??
??8912345?? 1234
- Watch your AlarmWorX64 Viewer on a GraphWorX64 display to verify that the alarm has actually been acknowledged.
SMS Agent Configuration - Example
If you already know how to setup an Email agent, the SMS Agent settings are similar. A cellular phone or any modem must already be prepared and configured. For more details how to set up a modem or cellular phone, see the application notes entitled "AlarmWorX64 Multimedia –SMS with a Cellular Phone" or "AlarmWorX64 Multimedia – SMS with a Modem".
Follow these steps to allow acknowledgement from the pager agent. Like the email example, this example uses the default AlarmWorX64 Server and AlarmWorX Multimedia configurations.
- Open AlarmWorX Multimedia from Start Programs ICONICS AlarmWorX Multimedia AlarmWorX64 AlarmWorX Multimedia
- In the tree explorer, expand Configurations Multimedia Agents Pager/SMS/GSM/TAP
- Right-click on Pager/SMS/GSM/Tap and select “+ Multimedia Agent Setting”
- In the new agent setting tab, give it the name “Test SMS”.
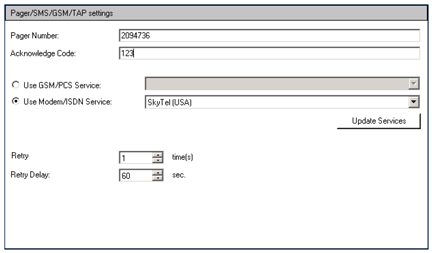
- Select one of the “Default Pager” templates and enter your cell phone or pager number in the Pager Number field. If you don’t have a pager template set up, you will need to create one of the “Pager” type.
- Select “Use GSM/PCS Service” and choose the service provider for your pager.
- In order to acknowledge alarms you must enter a number in the “Acknowledge Code” field.
- In the tree explorer, click on Configurations -> Default, and create an action set and name it ‘Pager Action Set’.
Figure 3 - Pager/SMS/GSM/TAP Settings
- In the right-hand pane, check the box “Enable” if it is not already checked.
- In the Action Destination column, select your “Test SMS” agent.
- In the “Stop Actions Condition” section, check the box for “Acknowledgement Received”. Additionally you can set the “Actions Loop” settings to repeat the actions.
- Run the Multimedia Server and trigger the appropriate alarm to test.
Test SMS Agent Setting
You will need to follow the steps in the “Test Email Agent settings” section to create an alarm. Also, follow the steps in the “SMS Agent Configuration” to set up the Pager/SMS agent. We will then test acknowledging with the pager agent. You can use the same tag for the alarm and not use filter to get the same effect.
- If you have “Enable SMS Dialog” checked in the pager General Settings, the MMX Pager SMS Diagnostic Dialog will appear after you have triggered the alarm.
Figure 4 – Pager SMS Dialog Window
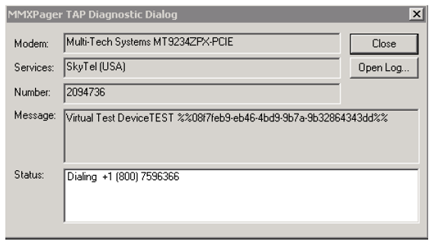
- The alarm message will include a number between question marks. This number is an ID that uniquely identifies the alarm message. To acknowledge the alarm, reply to the page with a message that contains the alarm ID and acknowledgement code in this format:
??ID?? Ack
For example, using the ID in the figure above and an acknowledge code of “1234” you could acknowledge the alarm by replying with this message:
??1?? 1234
- Watch your AlarmWorX64 Viewer on the GraphWorX64 display or see the status of the alarm from within AlarmWorX64 Server to verify that the alarm has actually been acknowledged.
See also:
Media Templates