To Add a Template:
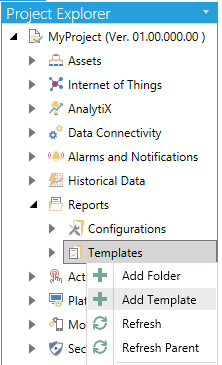
Open the Workbench and expand the Reports node. Right-click on the Templates node, then click on Add Template, as shown below.
Add Template from Project Explorer in the Workbench
-OR-
Select the Templates node then click on the Add Template button, shown below, in the Edit section of the Home ribbon in the Workbench.
Add Template Button

This opens the New Template Properties, shown below.
New Template Properties

Enter a name in the Template Name text entry field.
Once you enter a Template Name, the following Upload a new version of the template window will appear.
Upload a new version of the template Window
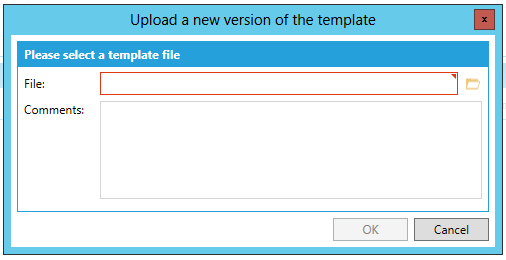
Enter the location of your selected template file in the File text entry field or click on the  button to open a file explorer to navigate to your selected template file. You can also add Comments about the file to upload. Once you have completed your selection, click OK to return to the Templates properties in the Workbench.
Active Version - When template versions are added to the Available Versions section of the Template Properties, you can use this pulldown menu to select which template version to make active.
Description - Adding a description for the selected template version, in the text entry field, may make it easier to identify later on.
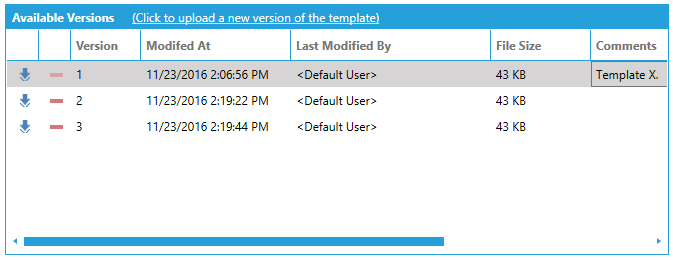
Once additional template versions have been added, the Available Versions section of the Template Properties will look similar to the image below.
Available Versions Section of the Template Properties
Click on the Click to upload a new version of the template link to add a version. [See the Upload_a_new_version_of_the_template section above for instructions.]
 - Click this button to Download the selected version to your desired location.
 - Click this button to Delete the selected version from the Available Versions section of the Template Properties.
The remaining columns are Read Only, listing Version (sequentially assigned), Modified At (listing the date and time for the last version file modification), File Size and Comments.
If you have not already set an Active Version in the General Properties of the Template Properties, you can do so after adding an Available Version.
See Also:
About Reports in the Workbench