In the Bridging (BridgeWorX64) component within the Workbench, the Templates node contains the templates used for workflow diagrams in Transactions.
Although ICONICS has tried to anticipate what the most common use activities will be for users, there may be times when a custom activity other than the standard templates provided may be required. In these instances, ICONICS has provided instruction for how to create a BridgeWorX64 Custom Activity.
NOTE: Creating a BridgeWorX64 Custom Activity involves the use of Visual Studio 2015 in order to create the activity in C#.
NOTE: The following instructions reference a Sample Project, whose contents are contained in either of the following linked ZIP files:
Two classes need to be created:
Activity Class, derived from Ico.Workflow.Activities.Custom.CustomActivityBase (defined in IcoWorkflowCore.dll);
Activity Class Editor, a plug-in for the Transaction Diagram Designer, derived from Ico.Workflow.Controls.CustomActivityEditor (defined in IcoWorkflowEditor.dll);
ICONICS recommends the implementation of these two classes in different assemblies, since this provides the most efficient runtime operation. BridgeWorX64 runtime does not need to load the Editor class, so keeping it in a separate assembly would speed up loading and scheduling the execution of transaction with custom activity.
Typically, the individual creating the BridgeWorX64 Custom Activity would start by creating a blank solution in Visual Studio, then adding two “Class Library” projects. In our sample solution, they are named “MyCustomActivity” and “MyCustomActivityDesign”. Also, be sure to see which ICONICS assemblies they need to reference (for convenience, they are placed into “ReferencedIconicsBinaries” subfolder).
For the Editor project, you need to add a “WPF User Control”, then change its base class from “UserControl” to CustomActivityEditor. For the Activity project, just add a new Class item and indicate CustomActivityBase as its base class.
There are several properties that you need to override in your Activity Class:
CompanyName
ProductName
ActivityVersion
Category
TypeName
TypeDescription
Then, you can add any additional configuration properties. They should be public read/write properties of serializable data types (or arrays of serializable data types). In the Editor Control, you would create corresponding UI elements to databind and configure your custom configuration properties.
The most important method to override in Custom Activity Class is:
Task<ActivityResult> DoWork(CancellationToken cancToken)
This is where you would implement all custom operation(s) and logic that your Activity will need to execute.
Please see our Sample Solution. There, the MyCustomActivity implements truncating a given file. It deletes all content of a file, making it zero size. Also, there are some code examples of what you can do with base class members and some useful helper classes.
After you compile and build MyCustomActivity.dll and MyCustomActivityDesign.dll please copy them both into “C:\Program Files\ICONICS\GENESIS64\Components”.
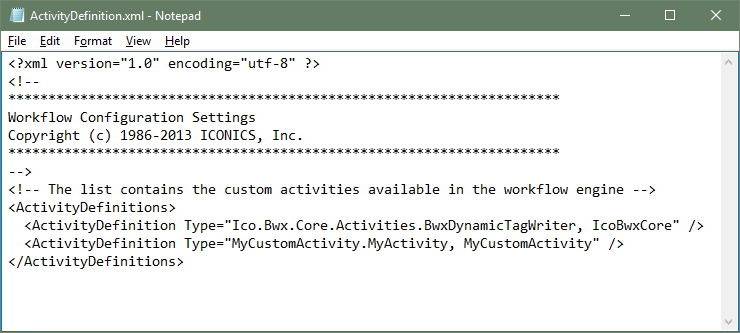
Locate the “ActivityDefinition.xml” in “C:\Program Files\ICONICS\GENESIS64\Components” and add a reference to your Custom Activity.
Activity Definition.xml
As you may have already guessed, BwxDynamicTagWriter is also implemented as a custom activity.
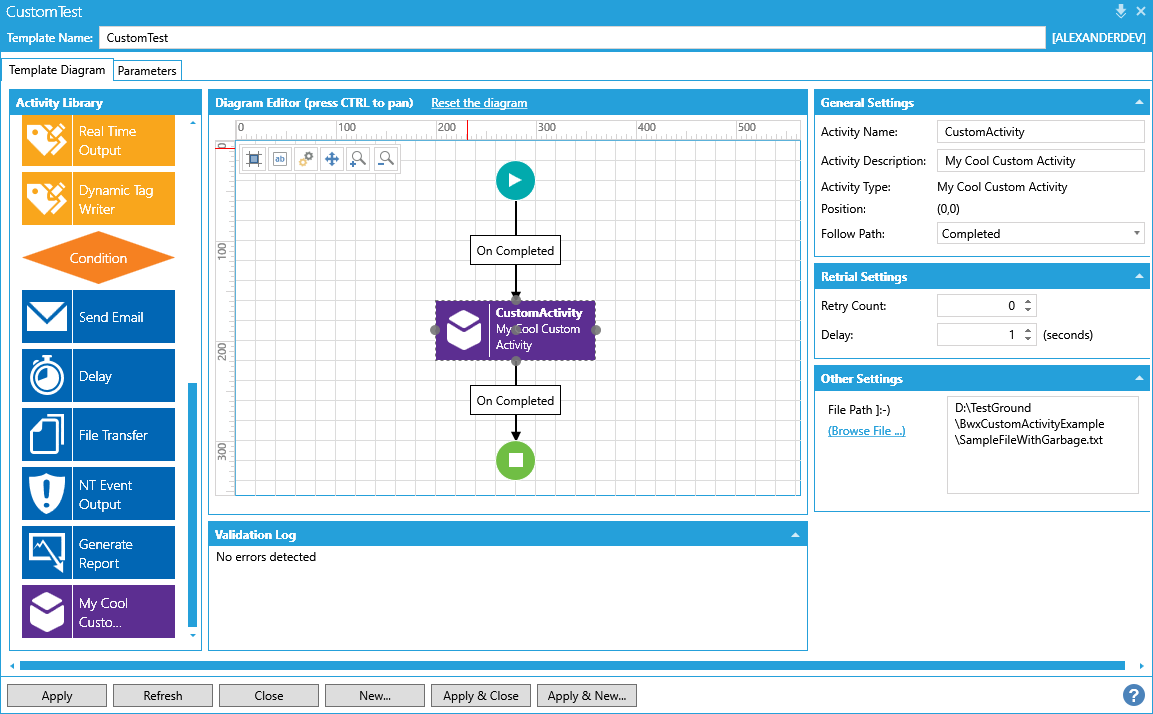
Now, restart IcoBwxService and the Workbench. You should now be able to see your custom activity in the Diagram Editor and BridgeWorX64 runtime will be able to run it.
Custom Activity Shown in the Diagram Editor
IMPORTANT NOTE: To debug your custom activity, place a breakpoint in the DoWork override and attach debugger to IcoBwxService.exe process. Then, trigger transaction execution. Your Visual Studio 2015 should be run “as administrator”.
See Also: