The asset tree that you build in AssetWorX can contain potentially hundreds or even thousands of nodes that represent campuses, buildings, tenants, production lines, power stations, machines and other equipment, and even utility sources and meters. Furthermore, each equipment node will need properties defined for it for the applications and providers you will be using in the Workbench in GENESIS64. These properties include: defining the runtime right-click menus for any given equipment node; defining Energy AnalytiX configurations and calculations; and defining FDDWorX configurations. The task of defining each individual node to an asset tree, and then configuring each node to correspond to the equipment it represents can be daunting and time-consuming.
There are shortcuts you can exploit to expedite the process by using equipment classes, which are forms that behave like templates. But better than templates, equipment classes can also be build into prefabricated structures that you can drag and drop into your asset tree. You can preload equipment classes with information that is typically shared by the types of equipment the equipment class is intended to create.
Defining individual nodes will require a significant time commitment from you, but you can offset this time commitment by using equipment classes. Equipment classes act like templates. In them you can define properties that might typically exist for the floor of any building, a type of equipment, or a corporate enterprise. You can use equipment classes as templates for adding and configuring equipment nodes for floors, equipment, and corporate enterprises, etc., in the asset tree.
With equipment classes, you can do the following:
Configure properties and/or default values for a type of equipment or asset to be added to the asset tree.
Configure aliases that prompt you for properties at the time the equipment or asset is added to the asset tree.
Use folders for categorizing your equipment classes to make them easier to find.
Create multi-tiered equipment classes so that entire structures can be created and configured.
Using an equipment class to add equipment nodes to the asset tree is quick and easy:
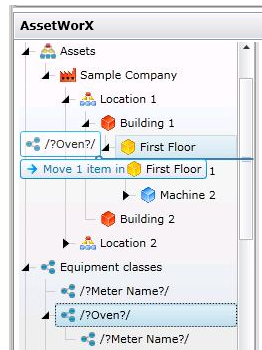
You simply drag-and-drop the equipment class from the Equipment Class node into the asset tree where you want the new equipment to be added. This process is shown in the illustration below in which an equipment class for an oven is being added to the First Floor node in the asset tree.
If the equipment class is made up of multiple tiers, all tiers are dragged and dropped into the asset tree. In the illustration below, it is a two-tiered equipment class that is being added for the oven.
If there are aliases defined as properties of the equipment class(es), you are prompted at this time to provide actual properties for the equipment you are adding to the asset tree. In the illustration below, the name of the equipment class is actually an alias. Aliases are simply placeholders that are bounded by /? and ?/.
Dragging and Dropping a Two-Tiered Equipment Class into the Asset Tree

Equipment classes are powerful template tools, but you have to know how to use them and must take time to plan ahead before using them. For a closer look at how you can exploit their power, refer to the Strategies for Building the Asset Tree topic.
Follow the steps below to build equipment classes for use as templates; click on a step to go to its topic.
See also:
Steps to Building an Asset Tree