Commands Tab for Equipment
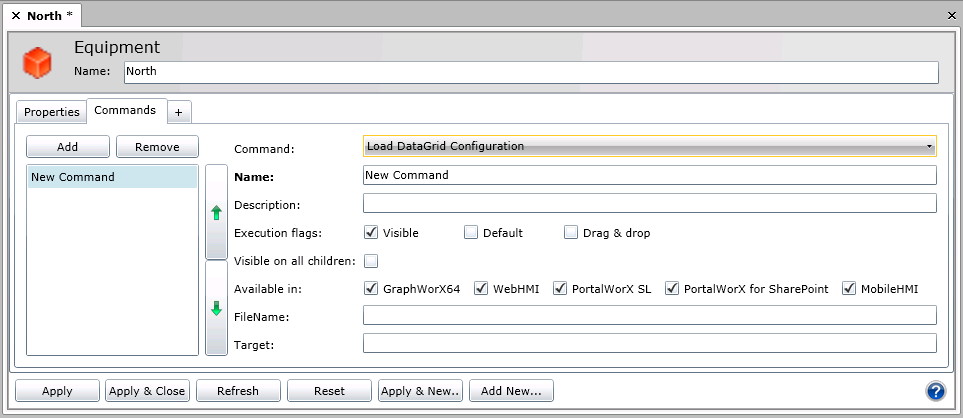
On the Commands tab for equipment (shown below) in AssetWorX, you can configure menu items for runtime menus available to users when they right-click an equipment node at runtime. Menu items can open displays, run reports, open reports, and more.
|

|
Tip: An equipment node's information may be preconfigured if it was created using an equipment class. Equipment classes can contain template information, including aliases that are identified as being surrounded by /? and ?/. For more information about equipment classes, refer to the Creating Equipment Classes for Use as Templates topic.
|
Commands Sub-tab for Equipment

To open the Commands sub-tab, in the Project Explorer, click the AssetWorX provider button to open AssetWorX. Then in the navigation tree expand localhost > [the name of your AssetWorX database. In our examples, we've named it 'AssetWorX'] > Assets to access the asset tree. Expand the asset tree and click on the equipment you are defining runtime menu commands for. This displays the Equipment tab, with the Properties tab on top. Click the Commands sub-tab, which is shown below. Use this tab to define runtime menu options for the equipment. Each prompt on this sub-tab is described below. For more information, refer to the Setting up Runtime Menus for Equipment topic.
Options on the Commands sub-tab are described below:
-
Add button: Click to add a command to the list below the button. When you click this button, a form for the Load Display command appears at the right, where you can choose the command you want used in the equipment's right-click menu at runtime.
-
Remove button: Click to delete the selected command from the list below the button. You cannot undo this action.
-
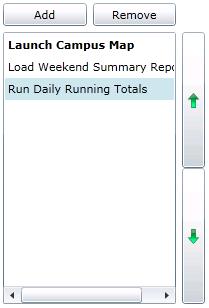
Menu Item List area: A list of the menu items (shown below) that are currently defined for the equipment's runtime menu. You can add any number of menu items. To modify a command, double-click it. You can change the sequence using the arrow buttons. Any item in bold is a default command. Note that some menu items may not be available on all platforms.
Sample Menu Items on the Commands Sub-tab
Commands that you can choose include (listed alphabetically):
Acknowledge
Call Method
Create Pen
Custom Command
Delete Pen
Edit Pen
Execute Commands
Expand Collapse
Export Image
Export Statistic
Go To Location
Group
Load Alarm Configuration
Load Data Grid Configuration
Load Energy Data
Load Executed Reports
Load Facility Data
Load Graphics Display
Load Mobile Layout
Load Report
Load Schedule Control Configuration
Load Trend Configuration
Load Url
Login Dialog
Navigate
Open Url
Phone Call
Print
Recipe: Copy
Recipe: Delete
Recipe: Download
Recipe: Load
Recipe: New
Recipe: Save
Recipe: Upload
Refresh
Run Report
Run Transaction
Save Configuration
Schedule Clear Override
Schedule Override
Select Asset
Select Element
Send Mail
Send Sms
Set Filter
Set Freeze Mode
Set Global Alias
Set Global Color Theme
Set Language
Set Period
Set Time Range
Set Visibility
Sort
Switch Layout
Write Value
Zoom
Each command and its parameter prompts are described below, in this topic. You can quickly scroll to the command's parameters by clicking the command's hyper link provided here in this paragraph. For a description of the variety of tasks you can do using these commands, refer to the Setting up Runtime Menus for Equipment topic.
Drop-Down List of Commands

The following parameters are available for all commands:
-
Command: Use the pulldown menu to select your desired command. The remaining parameters will change automatically once you have made your selection.
-
Name: The text to be listed in the equipment's right-click menu at runtime.
-
Description*: A description that explains what happens when a runtime user clicks this command. This description is used for informational purposes.
-
Execution Flags: Multiple commands on a single asset can be default. All the default commands get executed when the user left-clicks the asset and show in bold in the popup menu. Select from Visible, Default or Drag & Drop.
-
Visible on all children: Select this option if the command is to be made available in the right-click popup menu of all child equipment nodes. This option applies only if the equipment node has child nodes.
-
Available in: The ICONICS products on which this command will be available to runtime users, such as GraphWorX64, WebHMI, PortalWorX-SL, PortalWorX for SharePoint and MobileHMI. Select all that apply. Note that options may vary depending on the command.
* If the equipment node was created using an equipment class, and this or other fields contain aliases (that is, variables that are surrounded by /? and ?/), you can replace the aliases with values that are appropriate for this equipment node by instantiating the aliases. For more information, refer to the Instantiating an Equipment Node's Aliases topic.
The remainder of this topic describes each command and its parameters.
Acknowledge Command
The Acknowledge command allows a user to acknowledge alarms in an associated AlarmWorX64 Viewer.
When an alarm requires acknowledgement, the typical steps for acknowledging the alarm are:
-
An alarm is triggered and is added to the alarm grid on which it is used. (Only enabled alarms are triggered. An alarm that is not enabled is considered to be an alarm that is not ready for use or an alarm that is being decommissioned. Alarms are enabled when they are added to the alarm server, using the General tab of the AlarmWorX64 Server tag form.)
-
A runtime operator acknowledges the alarm; this puts the alarm into an Acknowledged state.
-
When the alarm condition no longer exists, the alarm leaves the grid as long as its acknowledgement requirements have been met.
Acknowledge Command
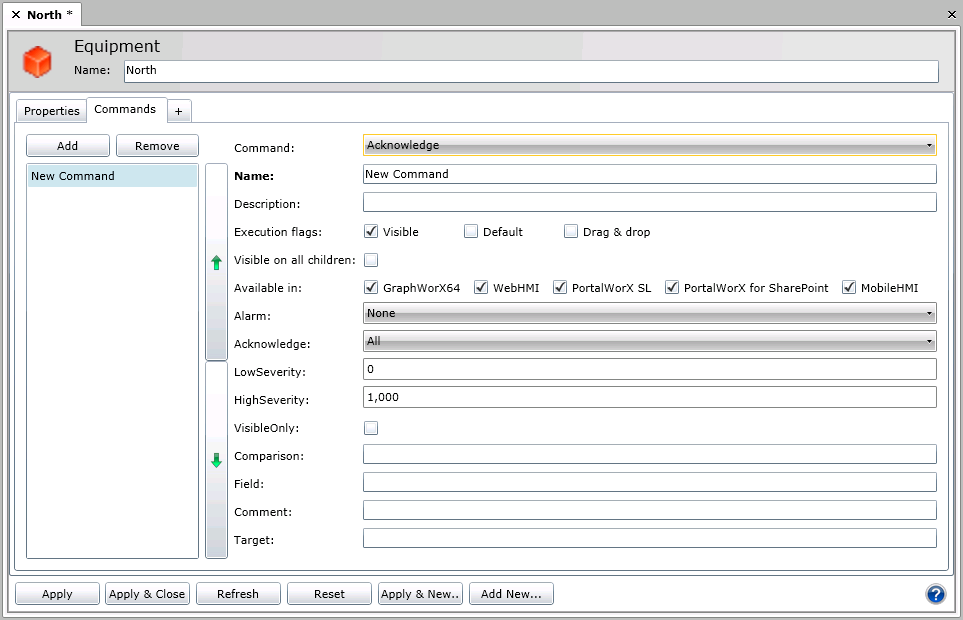
Parameters for the Acknowledge command are:
-
The Command, Name, Description*, Execution Flags, Visible on all children, and 'Available in' prompts are described above under Commands Tab for Equipment.
-
Alarm Type - This can be Condition, Tracking, Simple or None.
-
Acknowledge Type - This can be All, Comparison, Filter, Selection or Inactive. When you are acknowledging alarms, you can use filters to choose a broad or limited range of alarms which you can acknowledge all at once. You can create a condition or comparison that is used to select the alarms to be acknowledged. You can specify the range of severity of the alarms (between 0 and 1000) you are acknowledging within the Low Severity and High Severity sections. You can also decide to acknowledge "Visible Only" by clicking on the checkbox.
-
LowSeverity - You can enter the low level of severity (between 0 and 1000) here.
-
HighSeverity - You can enter the high level of severity (between 0 and 1000) here.
-
VisibleOnly - Check if you wish to acknowledge visible alarms only.
-
Comparison - Click here for how to use Acknowledge by Comparison.
-
Field -Fields that can be used in comparison include AckRequired, Time/Date, ConditionName, NewState, Tag, Quality, Type, EventClass, EventId, EventType, Description. Priority, SourceName or Category.
-
Comment - Enter any comments here.
-
Target - Enter the registered name of the target control.
Return to the Commands Tab topic
Call Method Command
The Call Method command calls a method or task from within Platform Services. These methods can be parameterized or not and range from simple data writing to complex calculations or actions. Due to this, the parameters field can be filled with whatever is necessary to pass to the custom method. Methods must be coded in C# and can be used in combination with the Jscript.NET scripting engine of GraphWorX64. The ICONICS Application Note "GENESIS64 - Custom Server Methods in Platform Services" includes two examples and instructions to begin creating a custom command.
Call Method Command
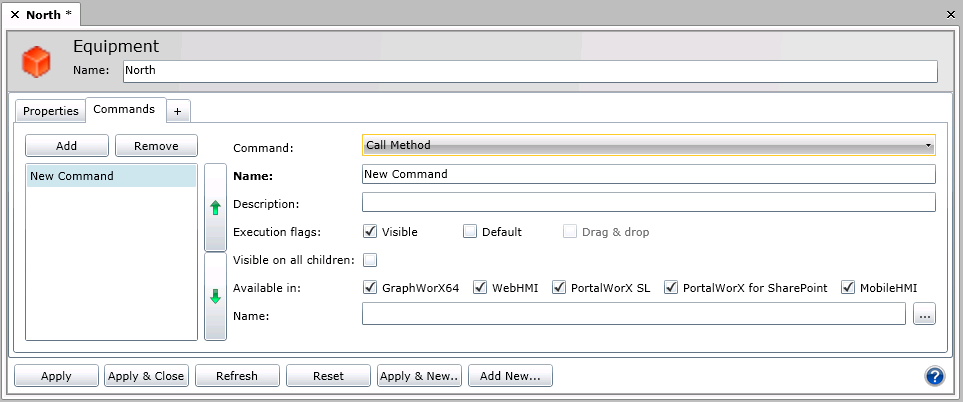
Parameters for the Call Method command are:
-
The Command, Name, Description*, Execution Flags, Visible on all children, and 'Available in' prompts are described above under Commands Tab for Equipment.
-
Name -This second Name field (separate from the top Name field for the command name) allows you to enter the full name of the call method, including the point path.
Return to the Commands Tab topic
Create Pen Command
The Create Pen command adds a new pen into a target TrendWorX Viewer using the following parameters.
Create Pen Command
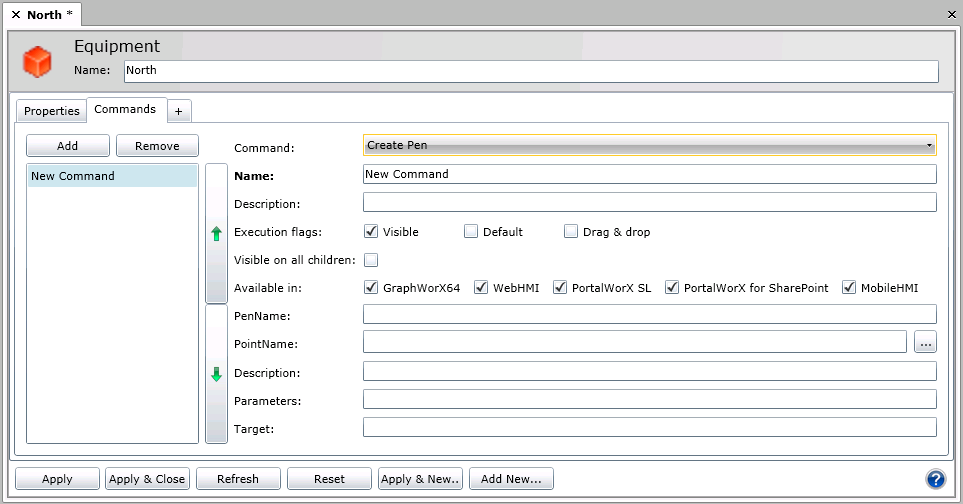
Parameters for the Create Pen command are:
-
The Command, Name, Description*, Execution Flags, Visible on all children, and 'Available in' prompts are described above under Commands Tab for Equipment.
-
PenName - This is the value assigned to TwxChartPen.Name and used in XAML/WPF namescope for identifying display elements
-
PointName - The data source (i.e localsim:sine).
-
Description - The description for the pen, typically displayed in the viewer’s legend, tooltips and other GUI elements. Can contain an alias.
-
Parameters - Typically empty, this string can optionally specify a sequence of custom settings related to aggregate in use, buffer size, and so on. The syntax has to be the same as the DataConnectorConfiguration.RawData property serialized in TrendWorX64 displays, for example:
"accesslevel=13;usagetype=2;usedatachangefilter=False;deadbandtype=0;deadbandvalue=0;aggregatetype=Interpolative;rawreadmodified=False;maxsamplesforrawdata=1500;datasetvaluecolumn=1;datasettimestampcolumn=0;usedatasetstatuscode=False;datasetstatuscodecolumn=2;maxsamplesfordataset=1500;"
Return to the Commands Tab topic
Custom Command
The Custom Command was designed to allow future expansion to third-party integration and reference to the API. Custom Commands are virtually unlimited.
Custom Command Command
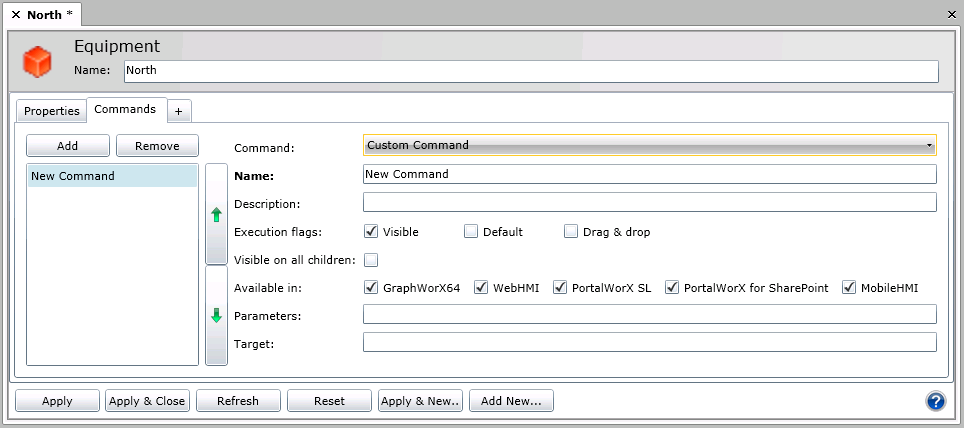
Parameters for the Custom Command command are:
-
The Command, Name, Description*, Execution Flags, Visible on all children, and 'Available in' prompts are described above under Commands Tab for Equipment.
-
Parameters - A string representing some input to the Custom Command representing details necessary to facilitate the desired outcome.
-
Target - Enter the registered name of the target control.
Return to the Commands Tab topic
Delete Pen Command
The Delete Pen command removes a pen from a TrendWorX64 Viewer. This command requires a target which can be a TrendWorX64 Viewer in GraphWorX64 or PortalWorX-SL. The name of the pen and the target viewer are the parameters for this command.
Delete Pen Command
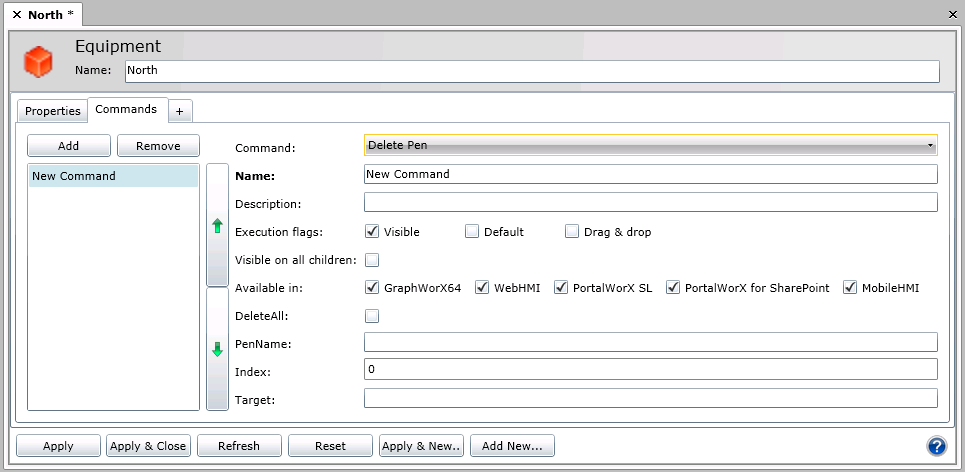
Parameters for the Delete Pen command are:
-
The Command, Name, Description*, Execution Flags, Visible on all children, and 'Available in' prompts are described above under Commands Tab for Equipment.
-
DeleteAll - This checkbox will enable the command to delete all currently configured Pens when the command is executed on a TrendWorX64 Viewer.
-
PenName - Name of the Pen to be removed. Named Pens will be bold in the TrendWorX64 Configuration.
-
Index -Valid if empty.
-
Target - Registered name of the target control.
Return to the Commands Tab topic
Edit Pen Command
The Edit Pen command will edit a pen within a TrendWorX64 Viewer. This command requires a target which can be a TrendWorX64 Viewer in GraphWorX64 or PortalWorX_SL. The name of the pen and the target viewer are the parameters for this command. You can create this command within the GraphWorX64 Viewer and Asset Navigator controls. You can apply this command to the TrendWorX64 Viewer control.
Edit Pen Command
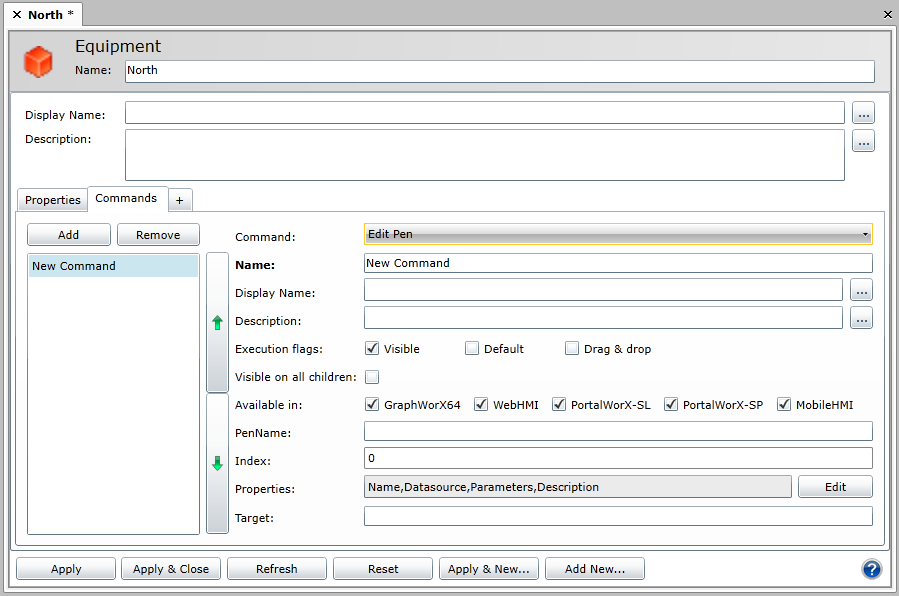
Parameters for the Edit Pen command are:
-
The Command, Name, Description*, Execution Flags, Visible on all children, and 'Available in' prompts are described above under Commands Tab for Equipment.
-
PenName - Name of the Pen to be edited. Named Pens will be bold in the TrendWorX64 Configuration.
-
Index -Valid if empty.
-
Properties - Properties to edit. Click the ellipsis button [...] to open the ChartPen Configuration window.
-
Target - Registered name of the target control.
Return to the Commands Tab topic
Execute Commands Command
The Execute Commands command executes commands that already exist on that particular Equipment. The added commands can be specified in the Commands text entry field, each separated by a semicolon (with no spaces). The Execute Commands command can be made visible while the executed commands are invisible. This command is only available for AssetWorX, because GraphWorX64 has its own support for aggregating pick actions.
Execute Commands Command

Parameters for the Execute Commands command are:
-
The Command, Name, Description*, Execution Flags, Visible on all children, and 'Available in' prompts are described above under Commands Tab for Equipment.
-
Commands - Enter the names of the commands to be executed, separated by a semicolon (no spaces).
Return to the Commands Tab topic
Expand Collapse Command
The Expand Collapse command will allow users to change the levels shown in the Asset Navigator by expanding or collapsing the assets to a desired level.
Expand Collapse Command
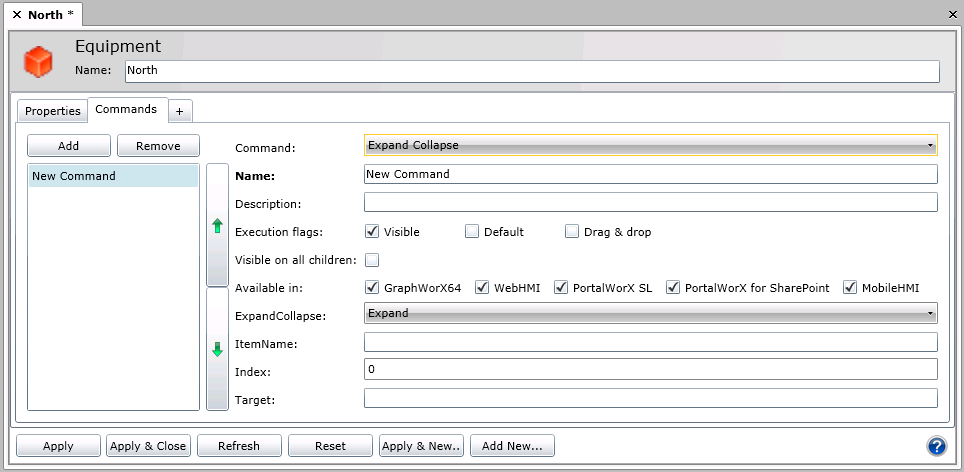
Parameters for the Expand Collapse command are:
-
The Command, Name, Description*, Execution Flags, Visible on all children, and 'Available in' prompts are described above under Commands Tab for Equipment.
-
ExpandCollapseType: Use the pulldown menu to select from Expand, Collapse, Expand All or Collapse All.
-
ItemName - Name of the parent item to Expand or Collapse within the AssetWorX Navigator tree.
-
Index -Valid if empty.
-
Target - Registered name of the target control.
Return to the Commands Tab topic
Export Image Command
The Export Image command is a GraphWorX64-Only Command that allows users to export an image of a GraphWorX64 file based on the current view or the entire display.
Export Image Command
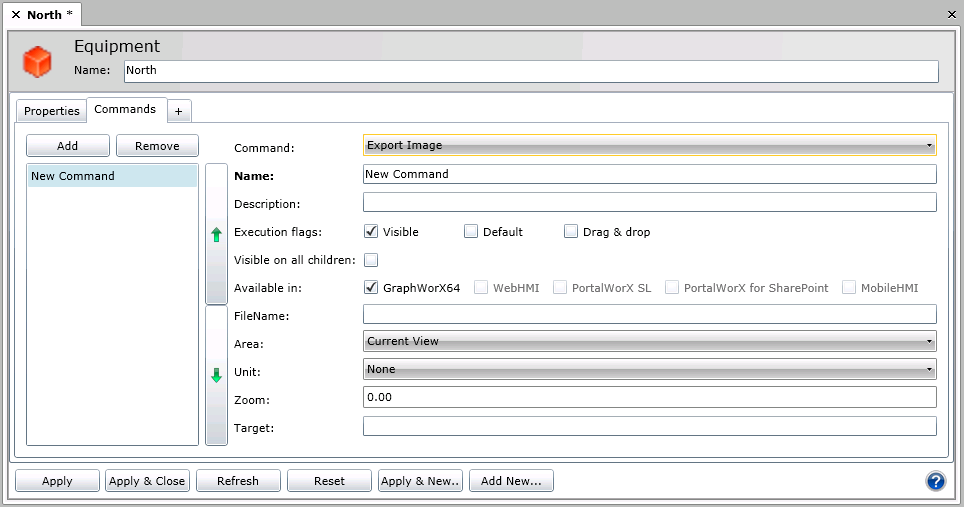
Parameters for the Export Image command are:
-
The Command, Name, Description*, Execution Flags, Visible on all children, and 'Available in' prompts are described above under Commands Tab for Equipment.
-
FileName - Enter the file name or a URL.
-
Area - Use the pulldown menu to select either the EntireControl or CurrentView.
-
Unit -Use the pulldown to select from None, Percentage, Scale or Level.
-
Zoom - Enter the preferred zoom level (by percentage).
-
Target - Registered name of the target control.
Return to the Commands Tab topic
Export Statistic Command
The Export Statistic command shows the Export Statistics dialog using default options (no intermediate dialog is displayed). The parameter ReportName is currently unused as the report doesn’t provide a dedicated field.
Export Statistic Command
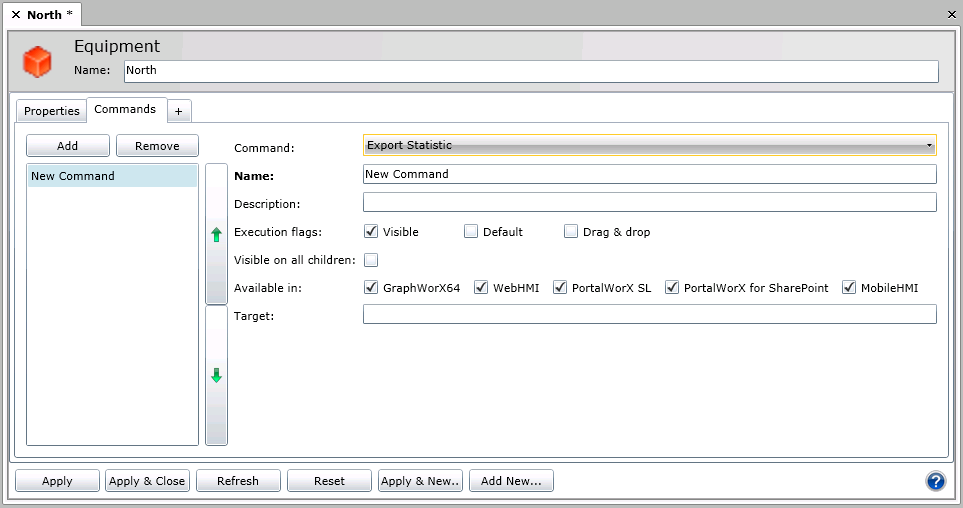
Parameters for the Export Statistic command are:
-
The Command, Name, Description*, Execution Flags, Visible on all children, and 'Available in' prompts are described above under Commands Tab for Equipment.
-
Target - Registered name of the target control.
Return to the Commands Tab topic
Go To Location Command
The Go To Location Command is used with EarthWorX targets and works similar to the Ribbon menu option in the EarthWorX contextual Ribbon in GraphWorX64 by allowing users to input a Latitude, Longitude and Zoom (based on the Unit pulldown). Executing this command will zoom or otherwise change the view of the target EarthWorX window.
Go to Location Command
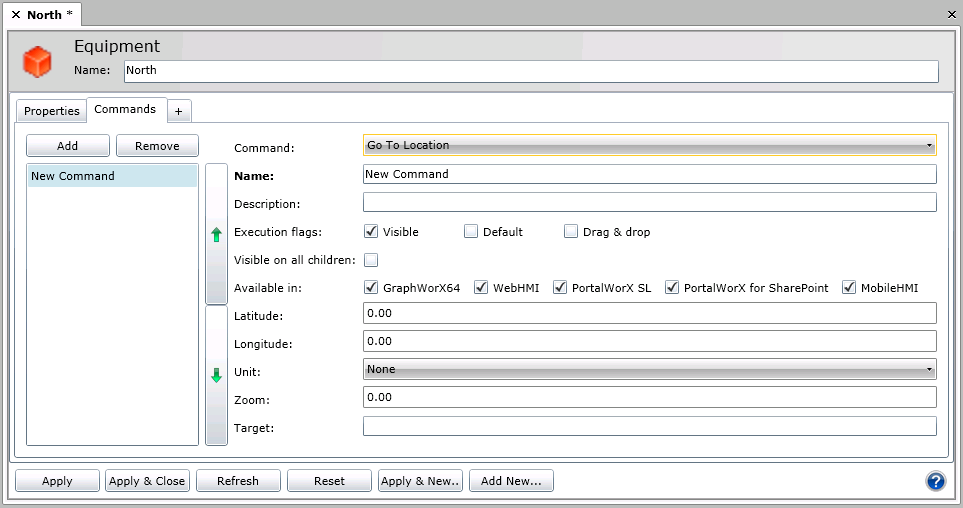
Parameters for the Go To Location command are:
-
The Command, Name, Description*, Execution Flags, Visible on all children, and 'Available in' prompts are described above under Commands Tab for Equipment.
-
Latitude - The floating point number ranging from -90.0 (South Pole) to +90.0 (North Pole) from the Equator (0.0).
-
Longitude -The floating point number ranging from -180.0 (South Pole) to +180.0 (North Pole) from the Prime Meridian (0.0) in Greenwich, England.
-
Unit. -Use the pulldown to select from None, Percentage, Scale or Level.
-
Zoom - Enter the preferred zoom level (by percentage).
-
Target - Registered name of the target control.
Return to the Commands Tab topic
Group Command
The Group Command, used to target AlarmWorX64 or GridWorX Viewers, will allow pre-configured or dynamic grouping of data grids using the parameters offered. Grouping can encompass one or more levels by using the Add Action or be removed entirely using the Reset Action.
Group Command
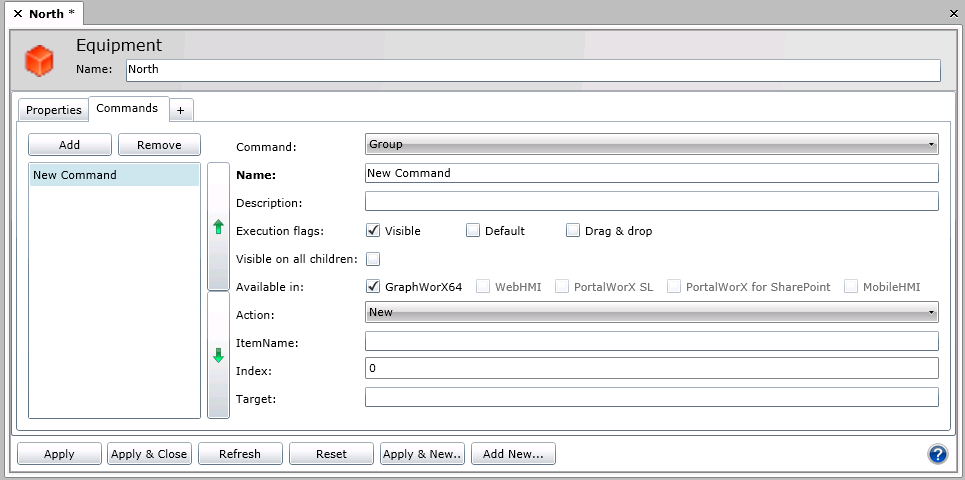
Parameters for the Group Location command are:
-
The Command, Name, Description*, Execution Flags, Visible on all children, and 'Available in' prompts are described above under Commands Tab for Equipment.
-
Action - Choosing between New, Add or Reset users can create a new grouping order, add a level of grouping or remove the current grouping.
-
ItemName - Specify the name of the item that should be grouped. This should match a value in one or more rows of the data grid. This may take advanced knowledge of the database or Alarm Server being visualized by the Viewer. If this is left blank, the Index can be used.
-
Index -Valid if empty.
-
Target - Registered name of the target control.
Return to the Commands Tab topic
Load Alarm Configuration Command
The Load Alarm Configuration command opens an AlarmWorX file of alarms inside an AlarmWorX Viewer when a runtime user selects the menu option. The prompts you must provide for a Load Alarm Display command look like this:
Load Alarm Configuration Command

Parameters for the Load Alarm Configuration command are:
-
The Command, Name, Description*, Execution Flags, Visible on all children, and 'Available in' prompts are described above under Commands Tab for Equipment.
-
File Name*: The AlarmWorX64 Viewer display file to open when a runtime user selects this menu item. Enter a valid, correct URL path for the AlarmWorX64 Viewer Silverlight file (an .awxxs file) to be loaded. For example, the URL for a display file might be: http://MachineName/GENESIS64/WebSites/PubDisplay/Alarm1.awxxs
-
Target - Registered name of the target control.
* If the equipment node was created using an equipment class, and this or other fields contain aliases (that is, variables that are surrounded by /? and ?/), you can replace the aliases with values that are appropriate for this equipment node by instantiating the aliases. For more information, refer to the Instantiating an Equipment Node's Aliases topic.
Return to the Commands Tab topic
Load Data Grid Configuration Command
The Load Data Grid Configuration command, used with GridWorX, will locate and load a GDXX (WPF-based) or GDXXS (Silverlight-based) file format that contain GridWorX Configurations. Users can specify the file name and path of the file as well as any desired target.
Load Data Grid Configuration Command
Parameters for the Load Data Grid Configuration command are:
-
The Command, Name, Description*, Execution Flags, Visible on all children, and 'Available in' prompts are described above under Commands Tab for Equipment.
-
FileName - Enter a file name or URL.
-
Target - Registered name of the target control.
Return to the Commands Tab topic
Load Energy Data Command
The Load Energy Data command opens an Energy AnalytiX Configuration (.eav) file created using the Energy AnalytiX Web part. For more information, review the topics for Energy AnalytiX Silverlight Web Part Configuration.
The prompts you must provide for a Load Energy Data command look like this:
Load Energy AnalytiX Data Command

Parameters for the Load Energy Data command are:
-
The Command, Name, Description*, Execution Flags, Visible on all children, and 'Available in' prompts are described above under Commands Tab for Equipment.
-
Configuration Name*: The name of the Energy AnalytiX configuration file to be loaded for this runtime menu item. This field becomes enabled only if you uncheck the Use Default Configuration check box. To specify a configuration name, click the ellipsis button [...] to display all available Energy AnalytiX Configuration (.eav) files and choose one.
-
StartTime - The Start Time will indicate, in long format, the date and time to begin the range of energy data that is loaded. This value can be typed or selected via the Date/Time Picker located at the right of the field.
-
EndTime - The End Time will indicate in long format the date and time to end the range of energy data that is loaded. This value can be typed or selected via the Date/Time Picker located at the right of the field.
-
Target - Registered name of the target control.
* If the equipment node was created using an equipment class, and this or other fields contain aliases (that is, variables that are surrounded by /? and ?/), you can replace the aliases with values that are appropriate for this equipment node by instantiating the aliases. For more information, refer to the Instantiating an Equipment Node's Aliases topic.
Return to the Commands Tab topic
Load Executed Reports Command
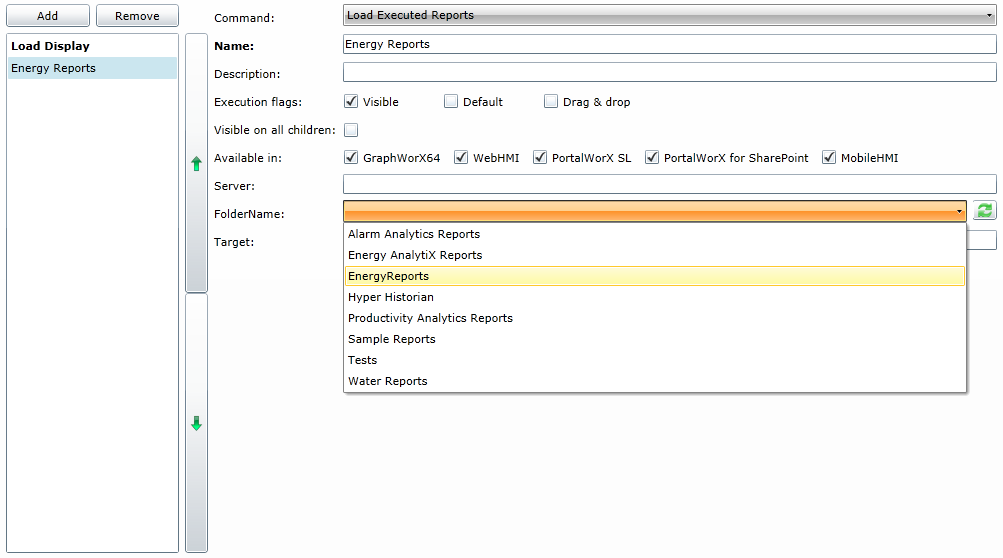
The Load Executed Reports loads a folder of reports for viewing. Note that this command does not execute the reports, it simply displays executed reports that reside in a folder. For example, you can store energy reports in one folder and use this command to open the folder of reports for display when a runtime user selects it from the equipment's right-click menu. (Alternatively, you can use the Load Report command to open one report that has been executed.) The prompts you must provide for a Load Executed Reports command look like this:
Load Executed Reports Command
Parameters for the Load Executed Reports command are:
-
The Command, Name, Description*, Execution Flags, Visible on all children, and 'Available in' prompts are described above under Commands Tab for Equipment.
-
Server*: Click the ellipsis button [...] to choose the server where the folder or executed reports resides.
-
FolderName*: Select one of the available folder names or refresh to see an updated list.
-
Target - Registered name of the target control.
* If the equipment node was created using an equipment class, and this or other fields contain aliases (that is, variables that are surrounded by /? and ?/), you can replace the aliases with values that are appropriate for this equipment node by instantiating the aliases. For more information, refer to the Instantiating an Equipment Node's Aliases topic.
Return to the Commands Tab topic
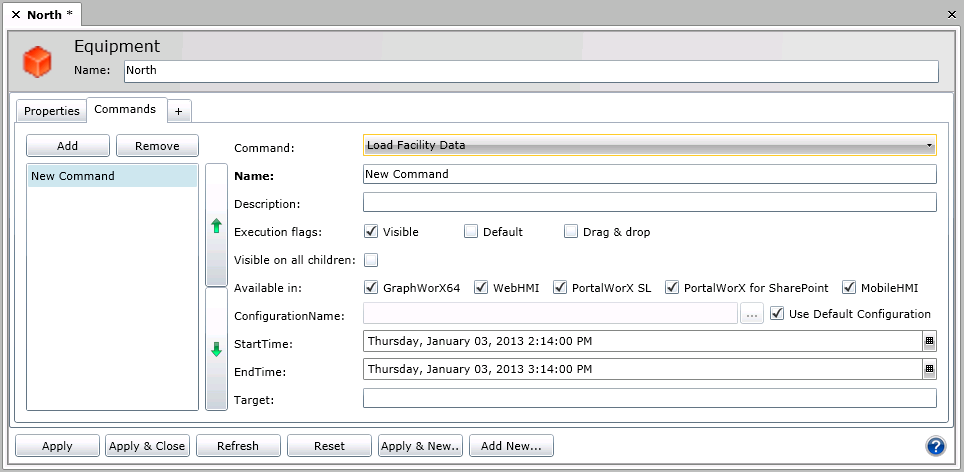
Load Facility Data Command
The Load Facility Data command opens an FDDWorX Configuration (.fav) file created using the FDDWorX Web part. For more information, review the topics for FDDWorX Silverlight Web Part Configuration.
The prompts you must provide for a Load FDDWorX Data command look like this:
Load Facility Data Command
Parameters for the Load Facility Data command are:
-
The Command, Name, Description*, Execution Flags, Visible on all children, and 'Available in' prompts are described above under Commands Tab for Equipment.
-
Configuration Name*: The name of the FDDWorX configuration file to be loaded for this runtime menu item. This field becomes enabled only if you uncheck the Use Default Configuration check box. To specify a configuration name, click the ellipsis button [...] to display all available Facility AnalytiX Configuration (.fav) files and choose one.
-
Start Time - The Start Time will indicate in long format the date and time to begin the range of energy data that is loaded. This value can be typed or selected via the Date/Time Picker located at the right of the field.
-
End Time - The End Time will indicate in long format the date and time to end the range of energy data that is loaded. This value can be typed or selected via the Date/Time Picker located at the right of the field.
-
Target - Registered name of the target control.
* If the equipment node was created using an equipment class, and this or other fields contain aliases (that is, variables that are surrounded by /? and ?/), you can replace the aliases with values that are appropriate for this equipment node by instantiating the aliases. For more information, refer to the Instantiating an Equipment Node's Aliases topic.
Return to the Commands Tab topic
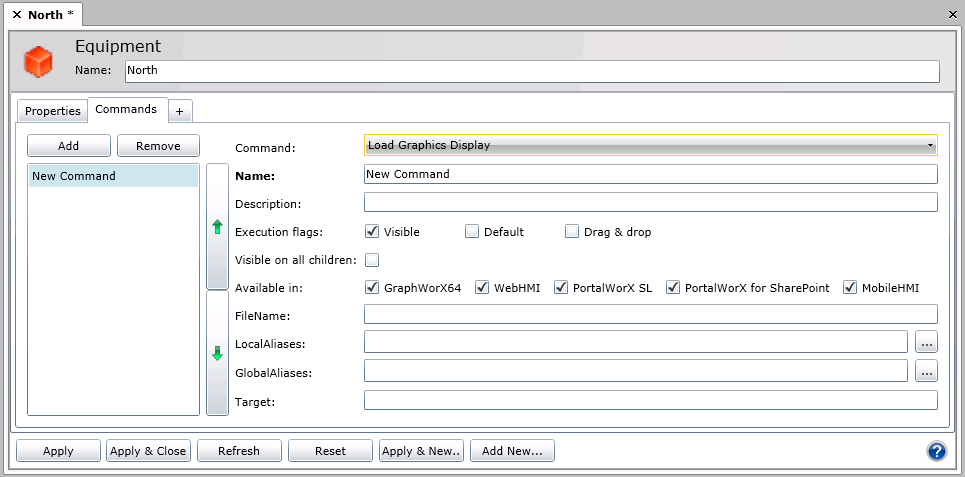
Load Graphics Display Command
The Load Graphics Display command opens a GraphWorX display file inside a GraphWorX Viewer when a runtime user selects the menu option. The prompts you must provide for a Load Display command look like this:
Load Display Command
Parameters for the Load Graphics Display command are:
-
The Command, Name, Description*, Execution Flags, Visible on all children, and 'Available in' prompts are described above under Commands Tab for Equipment.
-
File Name* - The GraphWorX display file to open when a runtime user selects this menu item. Enter a valid, correct URL path for the GraphWorX64 Silverlight file (a .gdfxs file) to be loaded. For example, the URL for a display file might be: http://MachineName/GENESIS64/WebSites/PubDisplay/Display1.gdfxs
-
Local Aliases* - The local alias settings (if any) that are used for the GraphWorX display. Click the ellipsis button [...] to select the theme and global aliases.
-
Global Aliases*: The global alias settings (if any) that are used in the GraphWorX display. Click the ellipsis button [...] to select the theme and global aliases.
-
Target - Registered name of the target control.
* If the equipment node was created using an equipment class, and this or other fields contain aliases (that is, variables that are surrounded by /? and ?/), you can replace the aliases with values that are appropriate for this equipment node by instantiating the aliases. For more information, refer to the Instantiating an Equipment Node's Aliases topic.
Return to the Commands Tab topic
Load Mobile Layout Command
The Load Mobile Layout command
Load Mobile Layout Command

Parameters for the Load Mobile Layout command are:
-
The Command, Name, Description*, Execution Flags, Visible on all children, and 'Available in' prompts are described above under Commands Tab for Equipment.
-
Display Name -
-
Layout Path - The path to the mobile layout to load (separate using backslashes).
-
Target - Registered name of the target control.
Return to the Commands Tab topic
Load Report Command
The Load Report command displays a report for viewing. Note that this command does not execute the report, it simply displays a report that has already been executed. For example, if a report ran over the weekend, this command can open it for display when a runtime user selects it from the equipment's right-click menu. (Alternatively, you can use the Load Executed Reports command to open an entire folder of reports.) The prompts you must provide for a Load Report command look like this:
Load Report Command
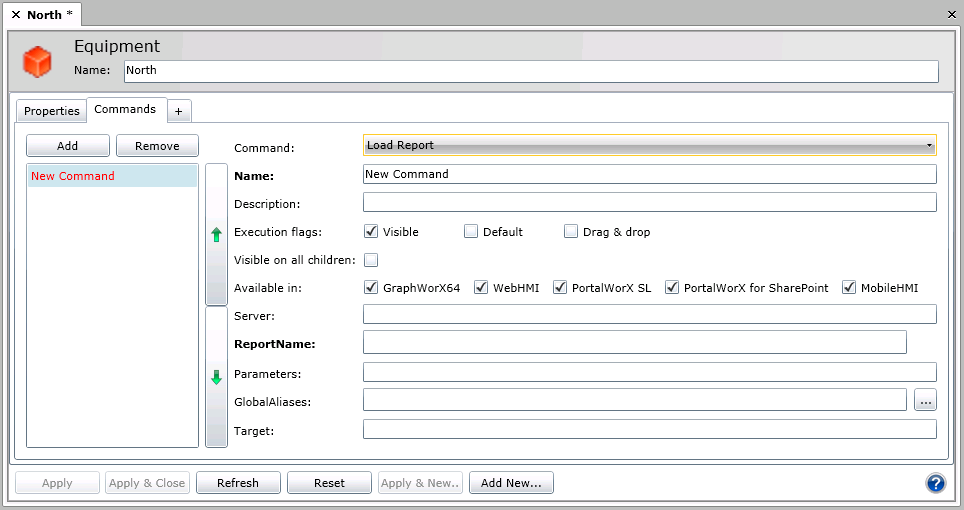
Parameters for the Load Report command are:
-
The Command, Name, Description*, Execution Flags, Visible on all children, and 'Available in' prompts are described above under Commands Tab for Equipment.
-
Server*: Click the ellipsis button [...] to choose the server where the executed report resides.
-
Report Name*: Specify the executed report to be opened. After you have chosen a server, click the ellipsis button [...] to select the executed report. In the Choose a Report dialog box that opens, select the report and click OK.
-
Parameters*: This optional field allows users to specify parameters to be sent to ReportWorX for use in identifying required parameters. Each parameter needs to be separated by a | (Shift+\). For example: @param1=Line1 | @param2=MachineB.
* If the equipment node was created using an equipment class, and this or other fields contain aliases (that is, variables that are surrounded by /? and ?/), you can replace the aliases with values that are appropriate for this equipment node by instantiating the aliases. For more information, refer to the Instantiating an Equipment Node's Aliases topic.
Return to the Commands Tab topic
Load Schedule Control Configuration
The Load Schedule Control Configuration command opens a calendar inside a Schedule Control when a runtime user selects the menu option. You can create this command within the GraphWorX64 Viewer and Asset Navigator controls. You can apply this command to the Schedule Control. The prompts you must provide for a Load Schedule Control command look like this:
Load Schedule Control Configuration Command
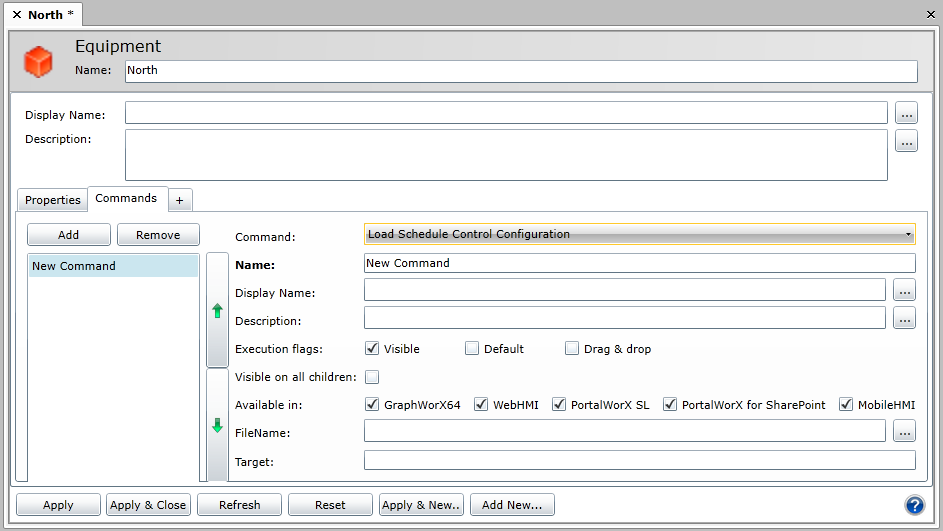
Parameters for the Load Schedule Control Configuration command are:
* If the equipment node was created using an equipment class, and this or other fields contain aliases (that is, variables that are surrounded by /? and ?/), you can replace the aliases with values that are appropriate for this equipment node by instantiating the aliases. For more information, refer to the Instantiating an Equipment Node's Aliases topic.
Return to the Commands Tab topic
Load Trend Configuration Command
The Load Trend Configuration command opens a TrendWorX trend file inside a TrendWorX Viewer when a runtime user selects the menu option. The prompts you must provide for a Load Trend Display command look like this:
Load Trend Configuration Command
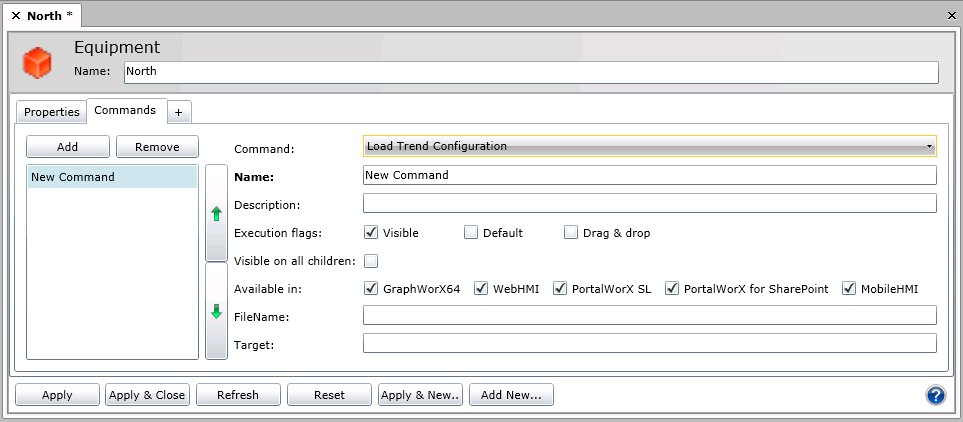
Parameters for the Load Trend Configuration command are:
-
The Command, Name, Description*, Execution Flags, Visible on all children, and 'Available in' prompts are described above under Commands Tab for Equipment.
-
File Name*: The TrendWorX Viewer display file to open when a runtime user selects this menu item. Enter a valid, correct URL path for the TrendWorX64 Viewer Silverlight file (a .twxxs file) to be loaded. For example, the URL for a display file might be: http://MachineName/GENESIS64/WebSites/PubDisplay/Trend1.twxxs
-
Target - Registered name of the target control.
* If the equipment node was created using an equipment class, and this or other fields contain aliases (that is, variables that are surrounded by /? and ?/), you can replace the aliases with values that are appropriate for this equipment node by instantiating the aliases. For more information, refer to the Instantiating an Equipment Node's Aliases topic.
Return to the Commands Tab topic
Load URL Command
The Load URL command loads a URL when a runtime user selects the menu option. You can use this command to load a frequently-used online tool, a corporate Web site, a vendor's page for placing an order, or an interactive page for requesting service.
Load URL Command
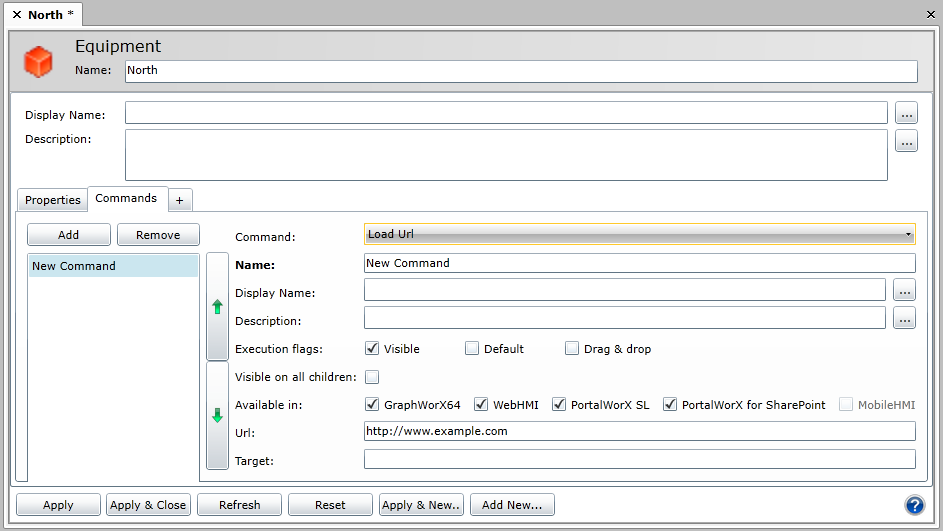
Parameters for the Load URL Command are:
-
The Command, Name, Description*, Execution Flags, Visible on all children, and 'Available in' prompts are described above under Commands Tab for Equipment.
-
URL - The URL address to be opened.
-
Target - Registered name of the target control.
* If the equipment node was created using an equipment class, and this or other fields contain aliases (that is, variables that are surrounded by /? and ?/), you can replace the aliases with values that are appropriate for this equipment node by instantiating the aliases. For more information, refer to the Instantiating an Equipment Node's Aliases topic.
Return to the Commands Tab topic
Login Dialog Command
The Login Dialog command will pop up the Security Login Dialog when triggered. Similar to the original Pick Action in GraphWorX64, this command will function similarly in PortalWorX-SL and other client types by allowing access to the dialog via command execution.
Login Dialog Command
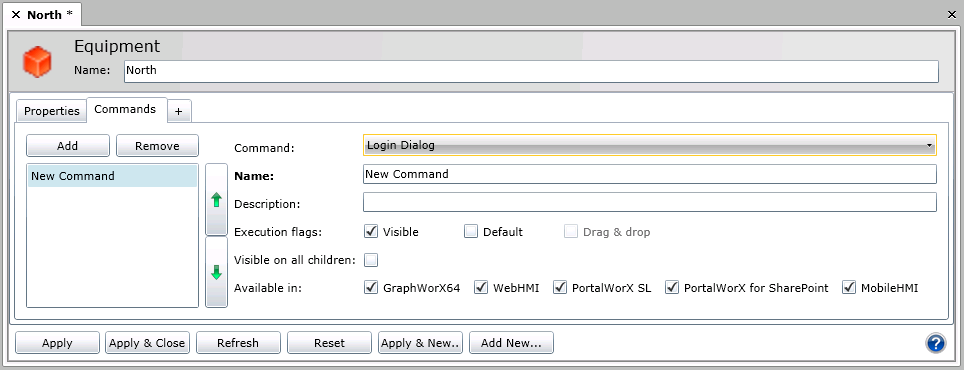
Parameters for the Login Dialog Configuration command are:
-
The Command, Name, Description*, Execution Flags, Visible on all children, and 'Available in' prompts are described above under Commands Tab for Equipment.
Return to the Commands Tab topic
Navigate Command
The Navigate command allows users to supplement web navigation buttons with GraphWorX64 buttons or Asset commands to provide alternative navigation schemes. The Steps option allows users to determine how far the navigation goes while the Navigation option allows movement backward and forward. Home, End and Now refer to the TrendWorX64 Freeze mode where they can be used to Navigate the Summary View and manipulate trend data.
Navigate Command
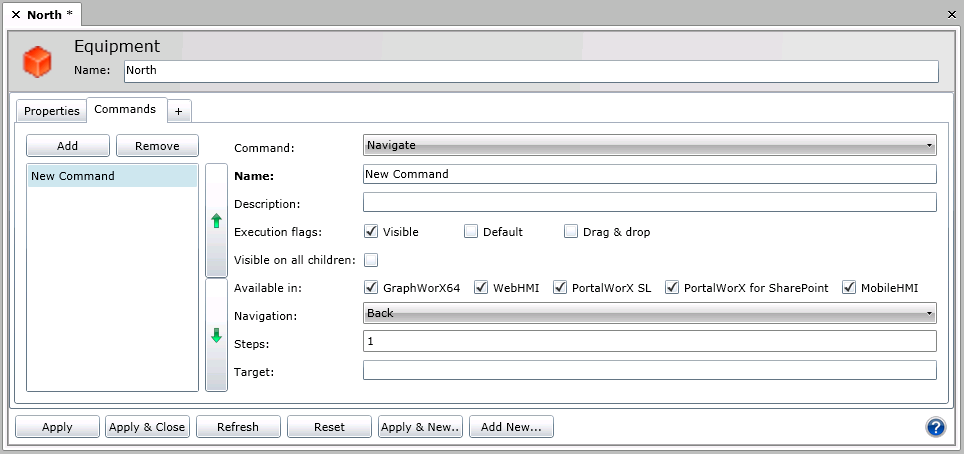
Parameters for the Navigate command are:
-
The Command, Name, Description*, Execution Flags, Visible on all children, and 'Available in' prompts are described above under Commands Tab for Equipment.
-
Navigation Type -Use the pulldown menu to select from Back, Forward, Home, End or Now.
-
Steps - Enter the number of iterations.
-
Target - Registered name of the target control.
Return to the Commands Tab topic
Open URL Command
The Open URL command opens a URL when a runtime user selects the menu option. You can use this command to go to a frequently-used online tool, a corporate web site, an vendor's page for placing an order, or an interactive page for requesting service.
The prompts you must provide for an Open URL command look like this:
Open URL Command
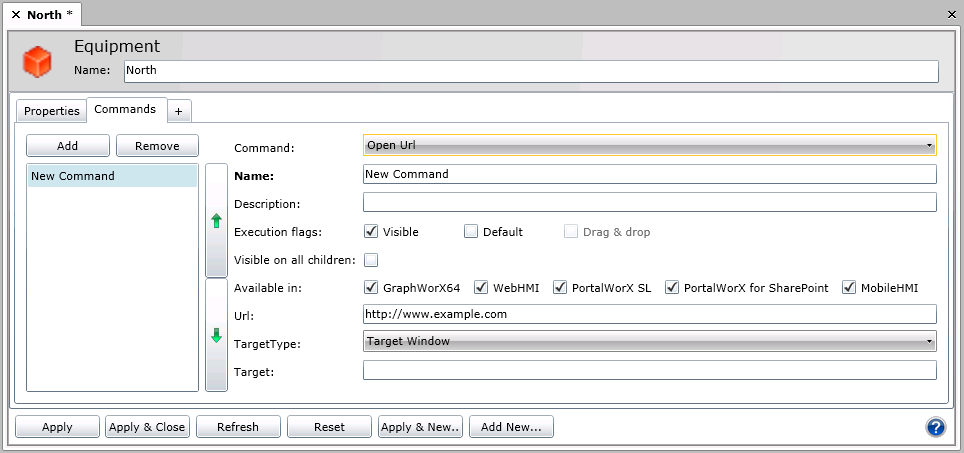
Parameters for the Open URL command are:
-
The Command, Name, Description*, Execution Flags, Visible on all children, and 'Available in' prompts are described above under Commands Tab for Equipment.
-
URL* - The URL address to be opened.
-
TargetType* - Use the pulldown to specify whether the URL is to open in a specific Target Window (and then specify the window name in the Target field) or simply a New Window.
-
Target* - If Target Window is selected in the Open In field, type the name of the target window in which the URL is to be opened.
* If the equipment node was created using an equipment class, and this or other fields contain aliases (that is, variables that are surrounded by /? and ?/), you can replace the aliases with values that are appropriate for this equipment node by instantiating the aliases. For more information, refer to the Instantiating an Equipment Node's Aliases topic.
Return to the Commands Tab topic
Phone Call Command
The Phone Call command lets a runtime user make a phone call from a Windows phone (using MobileHMI) to a pager. Refer to the MobileHMI documentation for requirements.
The prompts you must provide for a Phone Call command look like this:
Phone Call Command
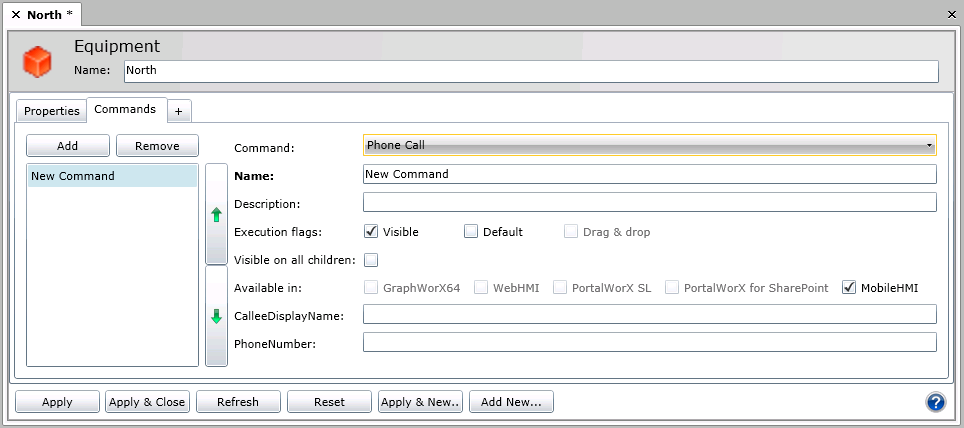
Parameters for the Phone Call command are:
-
The Command, Name, Description*, Execution Flags, Visible on all children, and 'Available in' prompts are described above under Commands Tab for Equipment.
-
CallerDisplayName* - The name of the recipient to display on the phone so that the caller knows who to ask for.
-
PhoneNumber* - The phone number of the recipient to receive the call. Include the country code if the call will be international. Spaces are allowed, in any format, but don't use punctuation in the phone number.
* If the equipment node was created using an equipment class, and this or other fields contain aliases (that is, variables that are surrounded by /? and ?/), you can replace the aliases with values that are appropriate for this equipment node by instantiating the aliases. For more information, refer to the Instantiating an Equipment Node's Aliases topic.
Return to the Commands Tab topic
Print Command
The Print command allows users to print the current view or entire control in GraphWorX64. An option to use a White Background can be selected, but users should be careful of white text as it may not show up with this option selected. Targeting can be used to print embedded GraphWorX64 displays.
Print Command
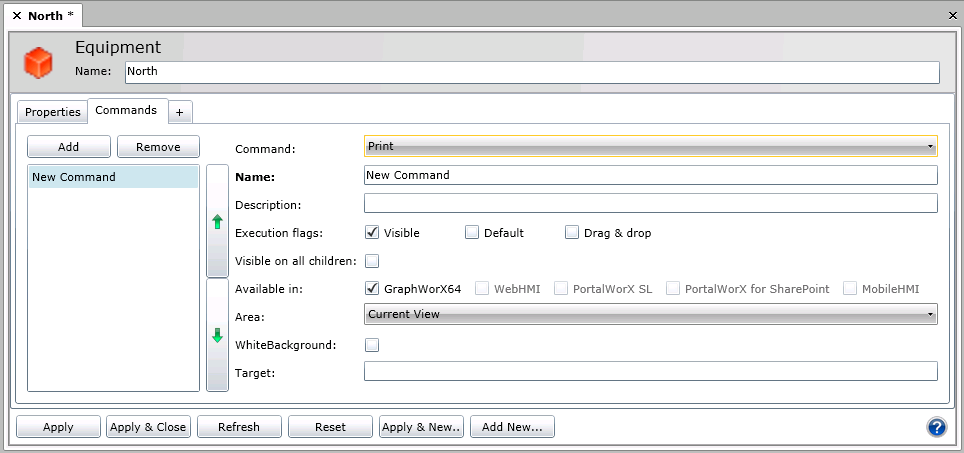
Parameters for the Print command are:
-
The Command, Name, Description*, Execution Flags, Visible on all children, and 'Available in' prompts are described above under Commands Tab for Equipment.
-
Area -Use the pulldown menu to select whether the Entire Control or Current View is to be printed.
-
WhiteBackground - Click this checkbox to ensure a white background for the printed material.
-
Target - Registered name of the target control.
Return to the Commands Tab topic
Recipe: Copy Command
This command can be invoked by right-clicking on a recipe item in the Recipe Navigator and choosing “Copy Recipe Item” from the context menu. It can also be configured as a Pick action command in GraphWorX64. The command copies a selected recipe item from the Tree Explorer.
Recipe: Copy Command

Parameters for the Recipe: Copy command are:
-
The Command, Name, Description*, Execution Flags, Visible on all children, and 'Available in' prompts are described above under Commands Tab for Equipment.
-
RecipeId -
-
Target - Registered name of the target Recipe Navigator control.
Return to the Commands Tab topic
Recipe: Delete Command
This command can be invoked by right-clicking on a recipe item in the Recipe Navigator and choosing “Delete Recipe Item” from the context menu. It can also be configured as a Pick action command in GraphWorX64. It deletes the selected recipe item from the Tree Explorer.
Recipe: Delete Command
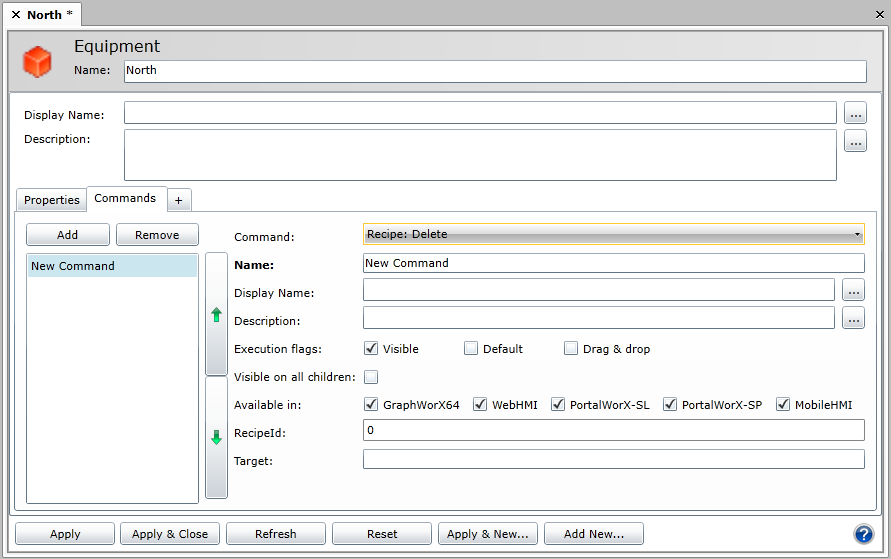
Parameters for the Recipe: Delete command are:
-
The Command, Name, Description*, Execution Flags, Visible on all children, and 'Available in' prompts are described above under Commands Tab for Equipment.
-
RecipeId -
-
Target - Registered name of the target Recipe Navigator control.
Return to the Commands Tab topic
Recipe: Download Command
This command can be invoked by right-clicking on a recipe item in the Recipe Navigator and choosing “Download Recipe” from the context menu. It can also be configured as a Pick action command in GraphWorX64. It downloads the values of the selected recipe item to the OPC tags.
Recipe: Download Command
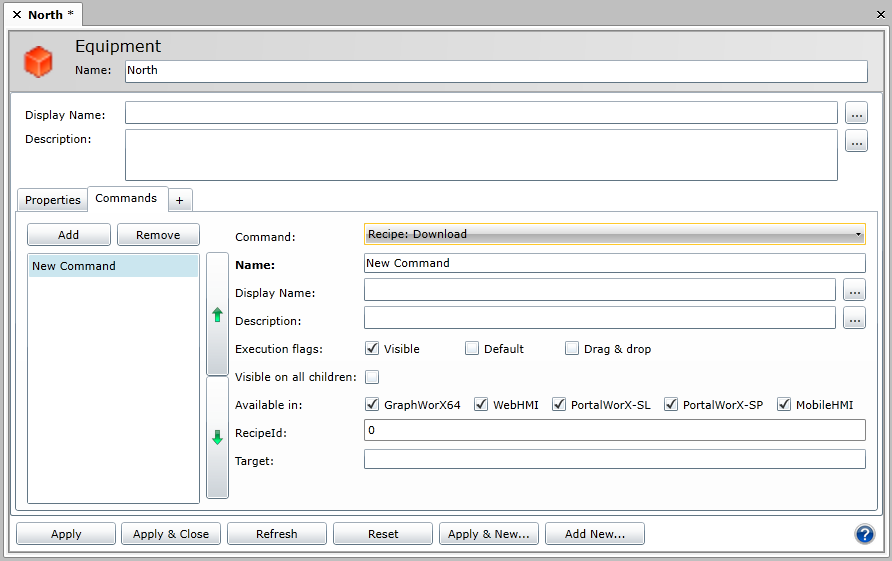
Parameters for the Recipe: Download command are:
-
The Command, Name, Description*, Execution Flags, Visible on all children, and 'Available in' prompts are described above under Commands Tab for Equipment.
-
RecipeId -
-
Target - Registered name of the target Recipe Navigator control.
Return to the Commands Tab topic
Recipe: Load Command
This command can be invoked by right-clicking on a recipe item in the Recipe Navigator and choosing “Load Recipe” from the context menu. It can also be configured as a Pick action command in GraphWorX64. It loads the recipe item selected in the Recipe Navigator into the Recipe Grid control.
Recipe: Load Command
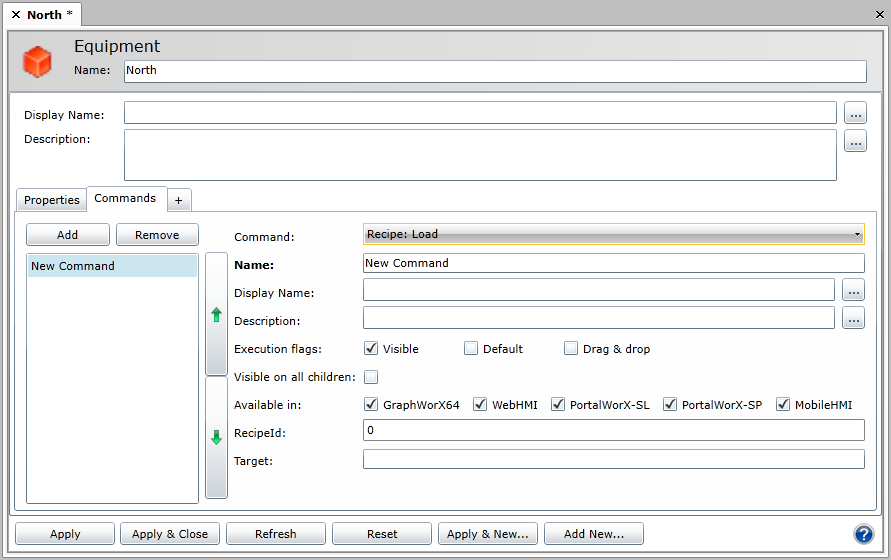
Parameters for the Recipe: Load command are:
-
The Command, Name, Description*, Execution Flags, Visible on all children, and 'Available in' prompts are described above under Commands Tab for Equipment.
-
RecipeId -
-
Target - Registered name of the target Recipe Navigator control.
Return to the Commands Tab topic
Recipe: New Command
This command can be invoked by right-clicking on a recipe in the Recipe Navigator and choosing “New Recipe Item” from the context menu. It can also be configured as a Pick action command in GraphWorX64. It creates a new child recipe item under the selected recipe in the Tree Explorer.
Recipe: New Command
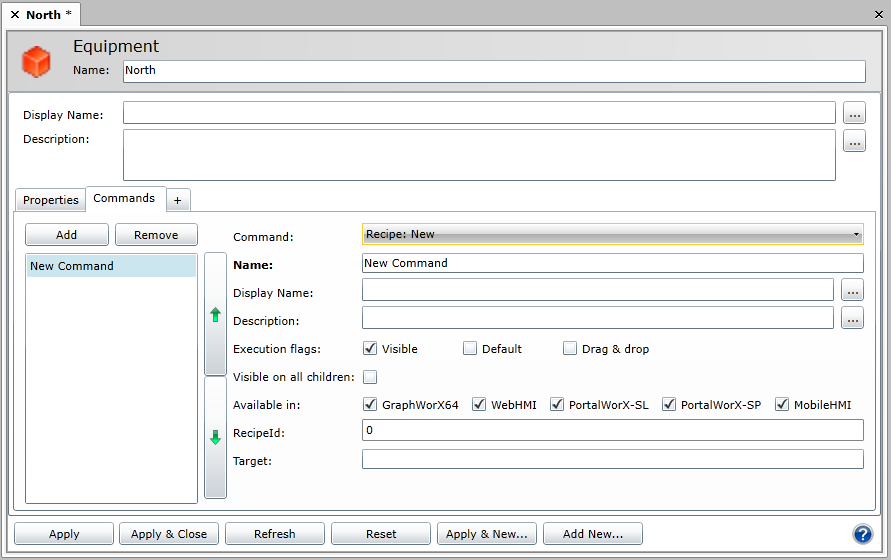
Parameters for the Recipe: New command are:
-
The Command, Name, Description*, Execution Flags, Visible on all children, and 'Available in' prompts are described above under Commands Tab for Equipment.
-
RecipeId -
-
Target - Registered name of the target Recipe Navigator control.
Return to the Commands Tab topic
Recipe: Save Command
This command can be invoked by right-clicking on a recipe item in the Recipe Navigator and choosing “Save Recipe” from the context menu. It can also be configured as a Pick action command in GraphWorX64. It applies changes to the dataset that is loaded into the Recipe Grid control.
Recipe: Save Command
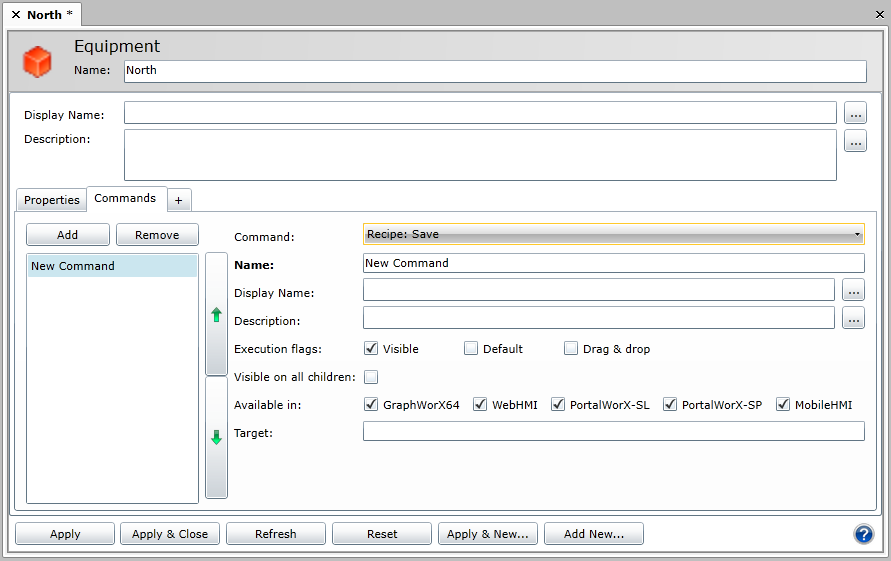
Parameters for the Recipe: Save command are:
-
The Command, Name, Description*, Execution Flags, Visible on all children, and 'Available in' prompts are described above under Commands Tab for Equipment.
-
Target - Registered name of the target Recipe Navigator control.
Return to the Commands Tab topic
Recipe: Upload Command
This command can be invoked by right-clicking on a recipe item in the Recipe Navigator and choosing “Upload Recipe” from the context menu. It can also be configured as a Pick action command in GraphWorX64. It uploads the values from the OPC tags and updates those values in the database for the selected recipe item.
Recipe: Upload Command

Parameters for the Recipe: Upload command are:
-
The Command, Name, Description*, Execution Flags, Visible on all children, and 'Available in' prompts are described above under Commands Tab for Equipment.
-
RecipeId -
-
Target - Registered name of the target Recipe Navigator control.
Return to the Commands Tab topic
Refresh Command
You can use this command to refresh a display requiring an updated view.
Refresh Command
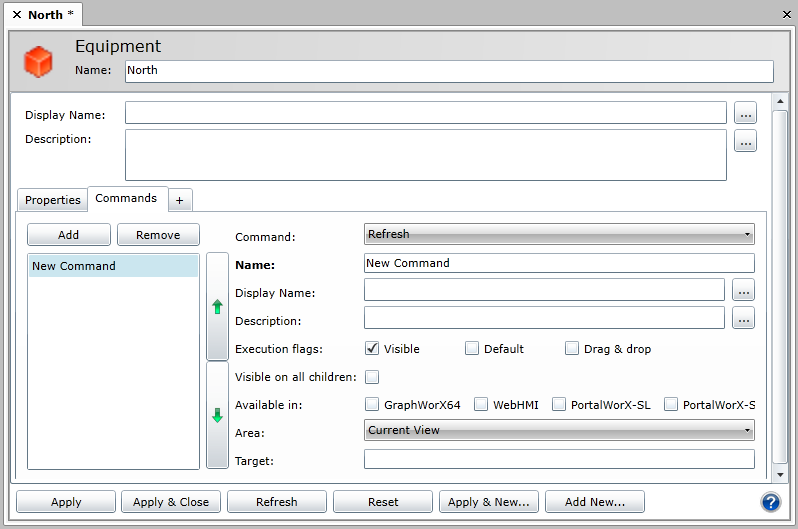
Parameters for the Refresh command are:
Return to the Commands Tab topic
Run Report Command
The Run Report command executes a report using ICONICS ReportWorX when a runtime user selects the menu option.
For more information about ReportWorX, refer to the ReportWorX documentation on the ICONICS BizViz product CD.
The prompts you must provide for a Run Report command look like this:
Run Report Command
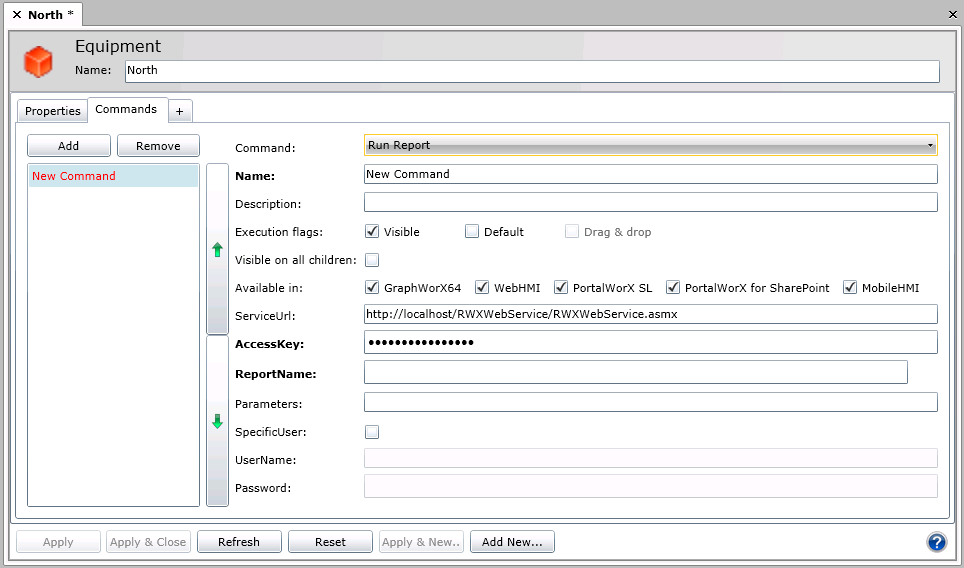
Parameters for the Run Report command are:
-
The Command, Name, Description*, Execution Flags, Visible on all children, and 'Available in' prompts are described above under Commands Tab for Equipment.
-
ServiceUrl* - Enter the URL where the report to execute resides.
-
AccessKey - Enter the password needed to access the service.
-
Report Name* - Specify the report to be executed. After you have chosen a server, click the ellipsis button [...] to select the report to execute. In the Choose a Report dialog box that opens, select the report and click OK.
-
Parameters* - Reports often require parameters like a start and end time or date. These parameters can be entered in the web interface normally, but when using commands must be pre-populated. Dynamic data sources like Unified Data Manager Registers or GraphWorX64 Local Simulations can be used to store this data temporarily if users are prompted to enter it elsewhere in order to run the report. Each report is different, but using string concatenation in GraphWorX64 can allow the parameters to be generated from user input.
-
SpecificUser - Selecting Specific User will allow the command to run under different credentials than the logged in user triggering the command. This is useful when the credentials are different on a ReportWorX Server, but the reporting functionality is available to the operator. Alternatively this command can be hidden based on Security to further limit the number of operators eligible to run reports without having to create multiple commands.
-
UserName: If the Identity is This User, specify the ID for gaining access to the server. The ID is case sensitive.
-
Password: If the Identity is This User, specify the password for gaining access to the server. Passwords are case sensitive.
* If the equipment node was created using an equipment class, and this or other fields contain aliases (that is, variables that are surrounded by /? and ?/), you can replace the aliases with values that are appropriate for this equipment node by instantiating the aliases. For more information, refer to the Instantiating an Equipment Node's Aliases topic.
Return to the Commands Tab topic
Run Transaction Command
The Run Transaction command executes an ICONICS BridgeWorX transaction when a runtime user selects the menu option. For example, if you use BridgeWorX to populate a database table for us in reports, you can use this command to launch that service.
For more information about BridgeWorX, please refer to the BridgeWorX documentation on the ICONICS BizViz product CD.
The prompts you must provide for a Run Transaction command look like this:
Run Transaction Command
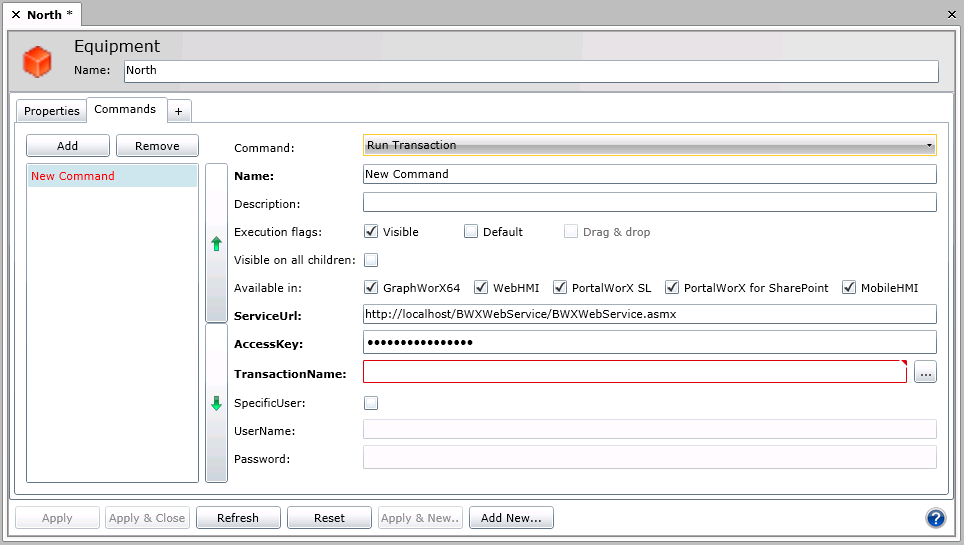
Parameters for the Run Transaction command are:
-
The Command, Name, Description*, Execution Flags, Visible on all children, and 'Available in' prompts are described above under Commands Tab for Equipment.
-
ServiceURL* - The URL address of the BridgeWorX Web Service.
-
AccessKey - The password needed to access the BridgeWorX Web Service.
-
TransactionName* - Click the ellipsis button [...] to select the transaction to be activated when a runtime user clicks this command. In the Transaction Name dialog box that opens, refresh the list by the clicking the Get Transactions button. Then select the transaction and click OK.
-
SpecificUser - Selecting Specific User will allow the command to run under different credentials than the logged in user triggering the command. This is useful when the credentials are different on a BridgeWorX Server, but the transaction functionality is available to the operator. Alternatively this command can be hidden based on Security to further limit the number of operators eligible to run transactions without having to create multiple commands.
-
UserName: If the Identity is This User, specify the ID for gaining access to the BridgeWorX server. The ID is case sensitive.
-
Password: If the Identity is This User, specify the password for gaining access to the BridgeWorX server. Passwords are case sensitive.
* If the equipment node was created using an equipment class, and this or other fields contain aliases (that is, variables that are surrounded by /? and ?/), you can replace the aliases with values that are appropriate for this equipment node by instantiating the aliases. For more information, refer to the Instantiating an Equipment Node's Aliases topic.
Return to the Commands Tab topic
Save Configuration Command
The Save Configuration command can be used for any of the .NET Controls (e.g., AlarmWorX64 AWXX and AWXXS files). The file type used to save the configuration is entered at the end of the file path and name in the FileName field. Select the Overwrite checkbox to allow for changing the configuration of an existing one when saving.
Save Configuration Command
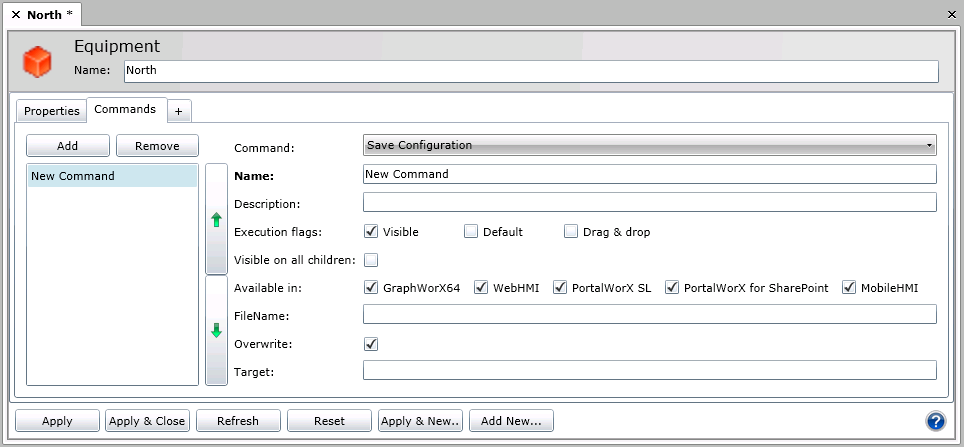
Parameters for the Save Configuration command are:
-
The Command, Name, Description*, Execution Flags, Visible on all children, and 'Available in' prompts are described above under Commands Tab for Equipment.
-
FileName - Enter the URL or file name here.
-
Overwrite - Click this checkbox to allow any existing file with the same file name to be overwritten.
-
Target - Registered name of the target control.
Return to the Commands Tab topic
Schedule Clear Override Command
The Schedule Clear Override command allows you to Clear an Override to an existing Schedule, similar to that set via Runtime Tab in the Schedule Control in GraphWorX64.
Schedule Clear Override Command
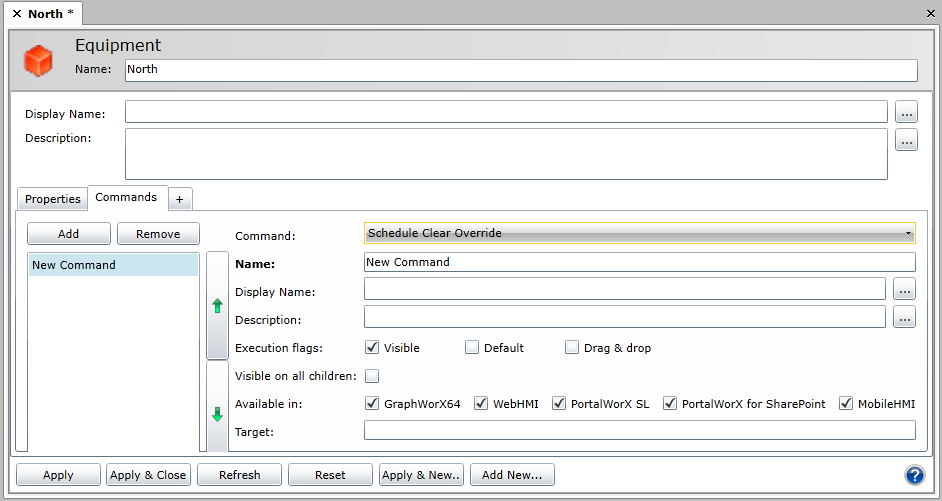
Parameters for the Schedule Clear Override command are:
-
The Command, Name, Description*, Execution Flags, Visible on all children, and 'Available in' prompts are described above under Commands Tab for Equipment.
-
DragDrop - Set to whether or not drag/drop behavior is applicable to this command.
-
Target - Registered name of the target control.
* If the equipment node was created using an equipment class, and this or other fields contain aliases (that is, variables that are surrounded by /? and ?/), you can replace the aliases with values that are appropriate for this equipment node by instantiating the aliases. For more information, refer to the Instantiating an Equipment Node's Aliases topic.
Return to the Commands Tab topic
Schedule Override Command
The Schedule Override command allows you to activate an Override for an existing Schedule, similar to that set via the Runtime Tab in the Schedule Control in GraphWorX64.
Schedule Override Command
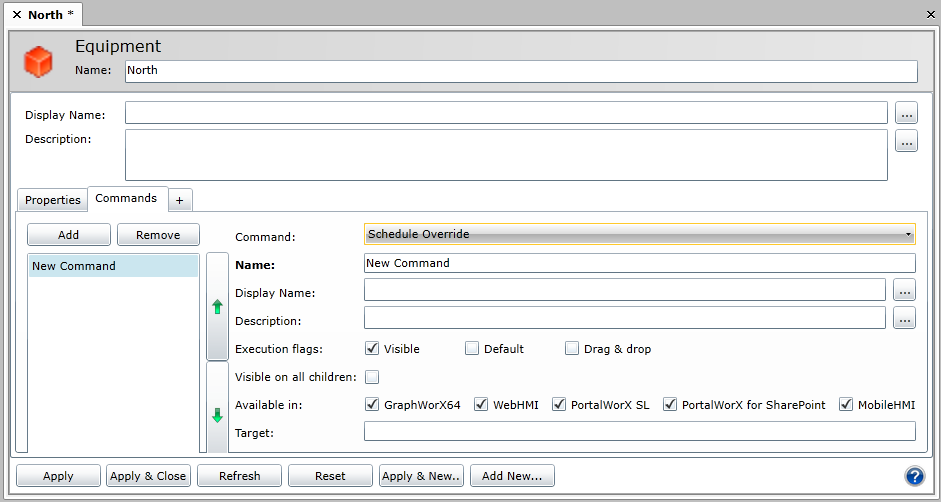
Parameters for the Schedule Override command are:
-
The Command, Name, Description*, Execution Flags, Visible on all children, and 'Available in' prompts are described above under Commands Tab for Equipment.
-
DragDrop - Set to whether or not drag/drop behavior is applicable to this command.
-
Target - Registered name of the target control.
* If the equipment node was created using an equipment class, and this or other fields contain aliases (that is, variables that are surrounded by /? and ?/), you can replace the aliases with values that are appropriate for this equipment node by instantiating the aliases. For more information, refer to the Instantiating an Equipment Node's Aliases topic.
Return to the Commands Tab topic
Select Asset Command
The Select Asset Command allows users to do a few things. First, it can target the Asset Navigator and tell the control to select an asset (more commonly triggered from GraphWorX64). Second, it can target TrendWorX64 Viewers to parse the asset’s equipment properties to trend the values. No configuration is necessary for the points, as they will automatically be added as pens to the targeted viewer. Finally, the Select Asset command can allow users to dynamically switch Pivot Pages in GraphWorX64 by using the "tab" option dropdown and typing in the name of the Pivot Page (or index of the page).
Select Asset Command
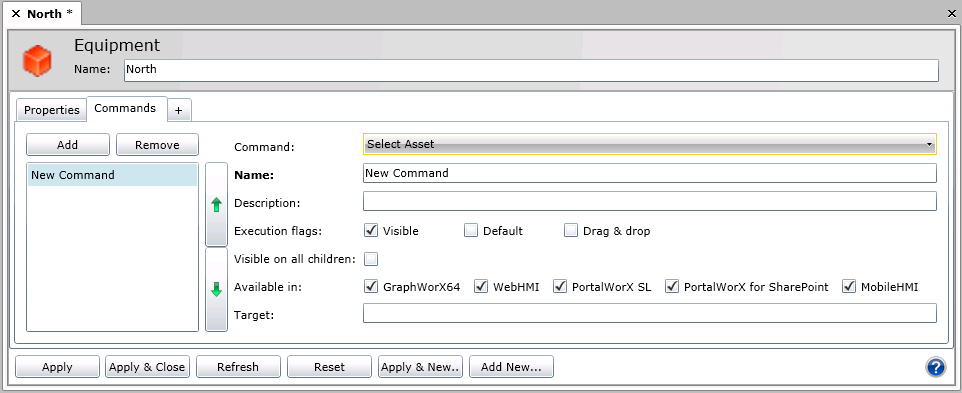
Parameters for the Select Asset command are:
-
The Command, Name, Description*, Execution Flags, Visible on all children, and 'Available in' prompts are described above under Commands Tab for Equipment.
-
Target - Registered name of the target control.
Return to the Commands Tab topic
Select Element Command
The Select Element Command allows users to provide secondary navigation for tabs, views, rows or objects separate from what is available in the .NET Viewers. Each Element must be named uniquely for Select Element to find them (this is enforced by GraphWorX and PortalWorX-SL already).
Select Element Command
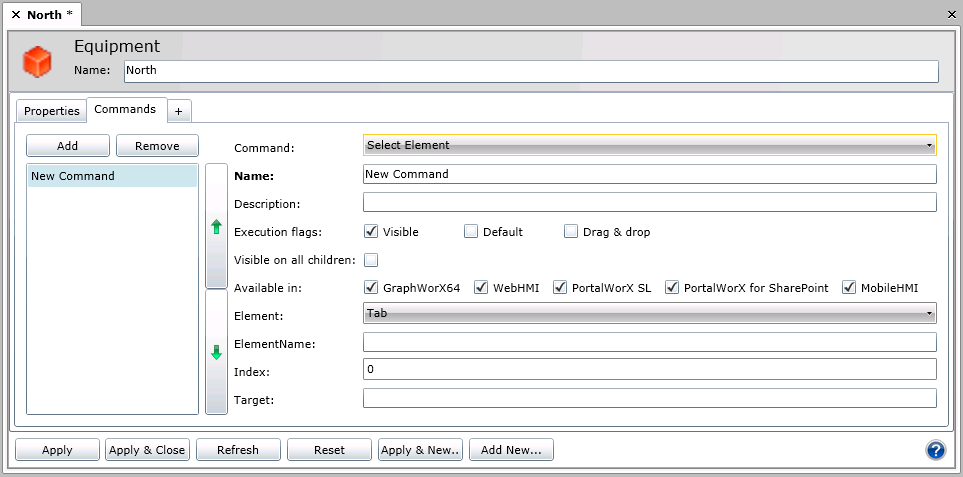
Parameters for the Select Asset command are:
-
The Command, Name, Description*, Execution Flags, Visible on all children, and 'Available in' prompts are described above under Commands Tab for Equipment.
-
Element - Use the pulldown menu to select from Tab, View, Row or Object.
-
ElementName - The ElementName refers to the selection of what Element Type is desired. Enter the name of the Tab, View, Row or Object.
-
Index -Valid if empty.
-
Target - Registered name of the target control.
Return to the Commands Tab topic
Send Mail Command
The Send Mail command lets runtime users send an e-mail from a Windows phone (using MobileHMI). Refer to the MobileHMI documentation for requirements.
The prompts you must provide for a Send Mail command look like this:
Send Mail Command
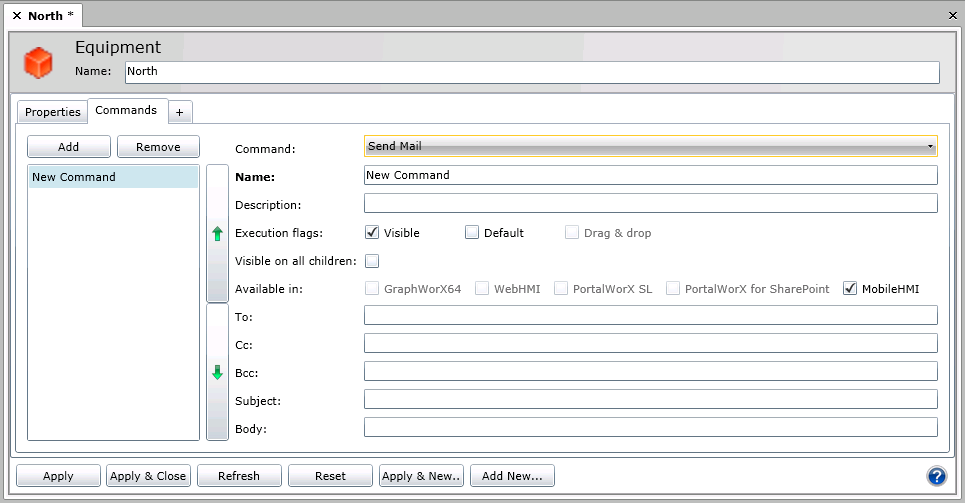
Parameters for the Send Mail command are:
-
The Command, Name, Description*, Execution Flags, Visible on all children, and 'Available in' prompts are described above under Commands Tab for Equipment.
-
To*: The e-mail address(es) to receive the e-mail. Separate multiple e-mail addresses with a semi-colon (;), for example:
DeptHead@GovernmentAgency.com; Auditor@CPAFirm.com
-
Cc*: The e-mail address(es) to receive the e-mail as a CC'ed recipient. Separate multiple e-mail addresses with a semi-colon (;).
-
Bcc*: The e-mail address(es) to receive the e-mail as a BCC'ed recipient. Separate multiple e-mail addresses with a semi-colon (;).
-
Subject*: The text to appear in the Subject line of the e-mail by default. This text can be edited by the sender.
-
Body*: The text to appear in the body of the e-mail by default. This text can be edited by the sender.
* If the equipment node was created using an equipment class, and this or other fields contain aliases (that is, variables that are surrounded by /? and ?/), you can replace the aliases with values that are appropriate for this equipment node by instantiating the aliases. For more information, refer to the Instantiating an Equipment Node's Aliases topic.
Return to the Commands Tab topic
Send SMS Command
The Send SMS command lets the runtime user send a message from a Windows phone (using MobileHMI) to a pager. Refer to the MobileHMI documentation for requirements.
The prompts you must provide for a Send SMS command look like this:
Send SMS Command

Parameters for the Send SMS command are:
-
The Command, Name, Description*, Execution Flags, Visible on all children, and 'Available in' prompts are described above under Commands Tab for Equipment.
-
Body*: The default text of the message to be sent when the sender uses this menu command. This text can be edited by the person sending the page.
-
To*: The phone number of the pager to which the message will be sent. Include the country code if the call will be international. Spaces are allowed, in any format, but don't use punctuation in the phone number.
* If the equipment node was created using an equipment class, and this or other fields contain aliases (that is, variables that are surrounded by /? and ?/), you can replace the aliases with values that are appropriate for this equipment node by instantiating the aliases. For more information, refer to the Instantiating an Equipment Node's Aliases topic.
Return to the Commands Tab topic
Set Filter Command
The Set Filter Command is most commonly used with AlarmWorX64 Viewers to apply or remove filters from Viewers dynamically, but can also be applied to GridWorX Viewers, allowing users to configure a filter name or create a new filter (specifying a new previously unused filter name) based on the Filter Name and Expression. The Filters are Server Side for Historical Alarms and Client Side for Real Time Alarms.
Set Filter Command
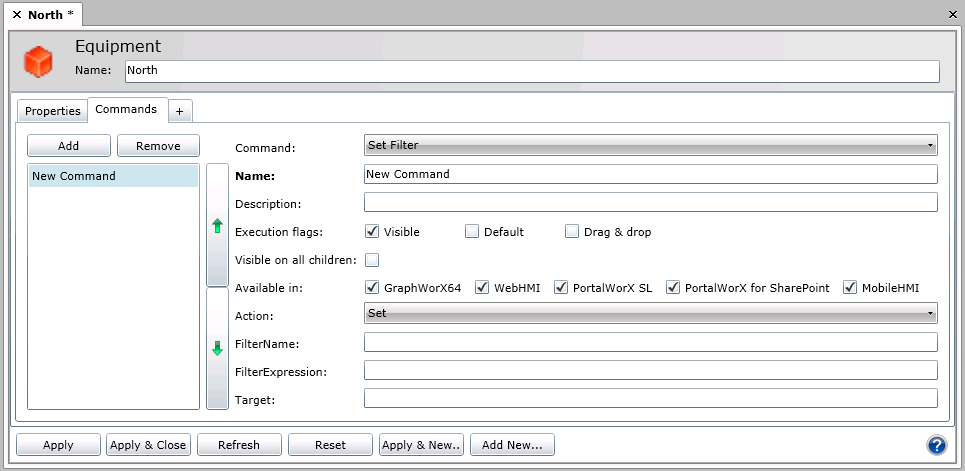
Parameters for the Set Filter command are:
-
The Command, Name, Description*, Execution Flags, Visible on all children, and 'Available in' prompts are described above under Commands Tab for Equipment.
-
Action - Set or Unset can be selected to allow users to apply or remove a configured Filter.
-
FilterName -The name of the filter to execute the action on. This should match configured filters in the AlarmWorX64 Viewer for example.
-
FilterExpression -Similar to the option available in the Filter creation dialog, the filter Expression can be a complex combination of dynamic and static values. To better understand and easily build an expression try using the dialog and click the Expression Editor button on the right of the Expression option in the Filter dialog to create a sample.
-
Target - Registered name of the target control (normally in bold or capital letters). Once the control is named in PortalWorX-SL or GraphWorX64 it can be used as a target.
Return to the Commands Tab topic
Set Freeze Mode Command
The Set Freeze Mode command, used with TrendWorX64, toggles Freeze Mode in a TrendWorX64 Viewer.
Set Freeze Mode Command
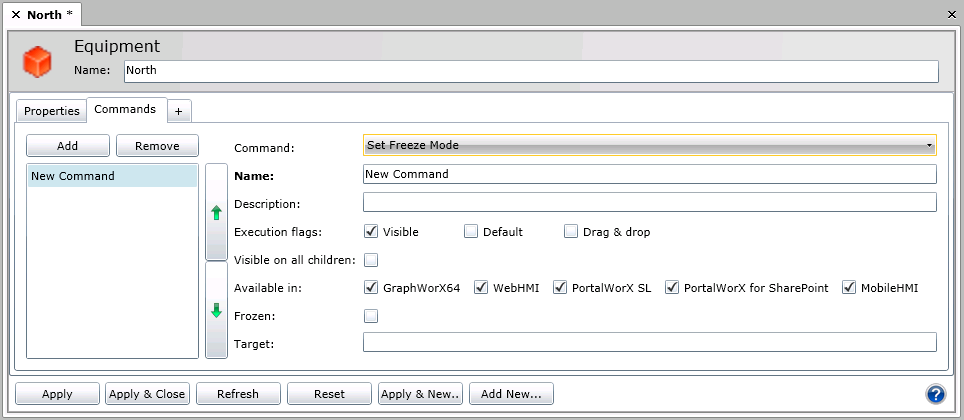
Parameters for the Set Freeze Mode command are:
-
The Command, Name, Description*, Execution Flags, Visible on all children, and 'Available in' prompts are described above under Commands Tab for Equipment.
-
Frozen - Use this option to freeze or unfreeze the TrendWorX64 Viewer.
-
Target - Registered name of the target control.
Return to the Commands Tab topic
Set Global Aliases Command
The Set Global Aliases command sets a global alias theme when a runtime user selects the menu option. This is helpful for runtime users who must review GENESIS64 displays or reports for different locations for which unique global aliases are set. Refer to Global Aliasing for more information.
The prompts you must provide for a Set Global Aliases command look like this:
Set Global Aliases Command

Parameters for the Set Global Aliases command are:
-
The Command, Name, Description*, Execution Flags, Visible on all children, and 'Available in' prompts are described above under Commands Tab for Equipment.
-
Global Aliases*: The global alias settings to be used. Click the ellipsis button [...] to select the theme and global aliases.
-
Target - Registered name of the target control.
* If the equipment node was created using an equipment class, and this or other fields contain aliases (that is, variables that are surrounded by /? and ?/), you can replace the aliases with values that are appropriate for this equipment node by instantiating the aliases. For more information, refer to the Instantiating an Equipment Node's Aliases topic.
Return to the Commands Tab topic
Set Global Color Theme Command
The Set Global Color Theme command
Global Color Theme Command
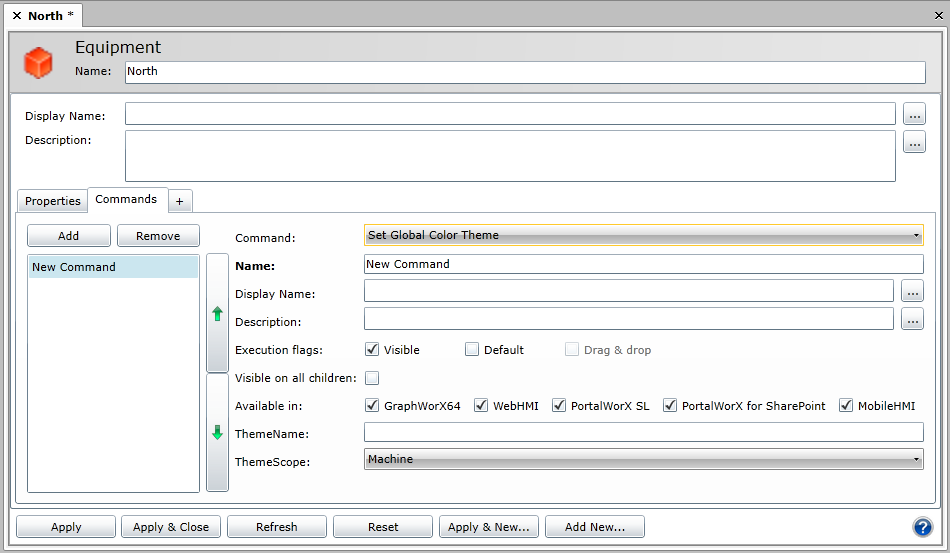
Parameters for the Set Global Color Theme are:
-
The Command, Name, Description*, Execution Flags, Visible on all children, and 'Available in' prompts are described above under Commands Tab for Equipment.
-
Display Name -
-
Theme Name - The name of the global color theme to set as active.
- Theme Scope - The scope for which to set the active global color theme (Machine or Process).
Return to the Commands Tab topic
Set Language Command
The Set Language command allows operators to trigger a change in language by entering in the Culture name listed in the Language Aliasing Engine. This name must match the Language Aliasing Configuration on the server in order to trigger the change. Any asset or GraphWorX64 button can be used to trigger the change.
Set Language Command
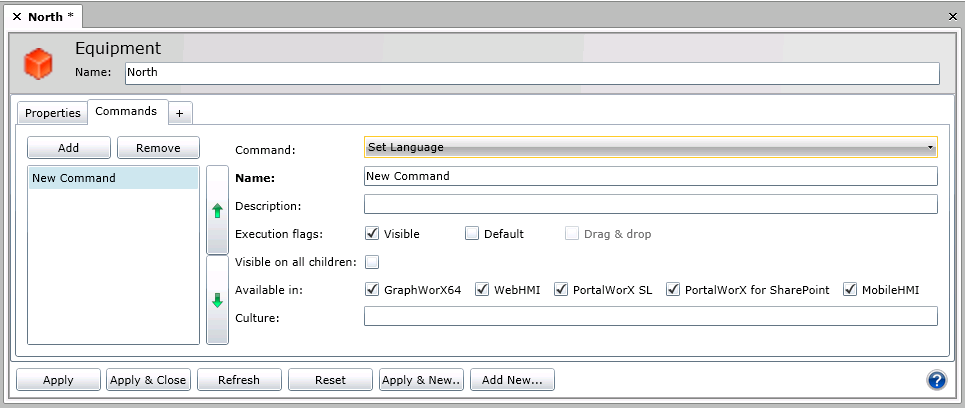
Parameters for the Set Language command are:
-
The Command, Name, Description*, Execution Flags, Visible on all children, and 'Available in' prompts are described above under Commands Tab for Equipment.
-
Culture - Enter the language (culture) here.
Return to the Commands Tab topic
Set Period Command
The Set Period command, used with TrendWorX64, allows the Period to be changed from AssetWorX Assets and GraphWorX64 Pick Actions. Targeting a viewer (or enabling Drag & Drop) will allow operators to use an alternative method to changing the Period (existing methods are the Trend Period Toolbar in the TrendWorX64 Viewer and the GraphWorX64 Contextual Ribbon menu).
Set Period Command
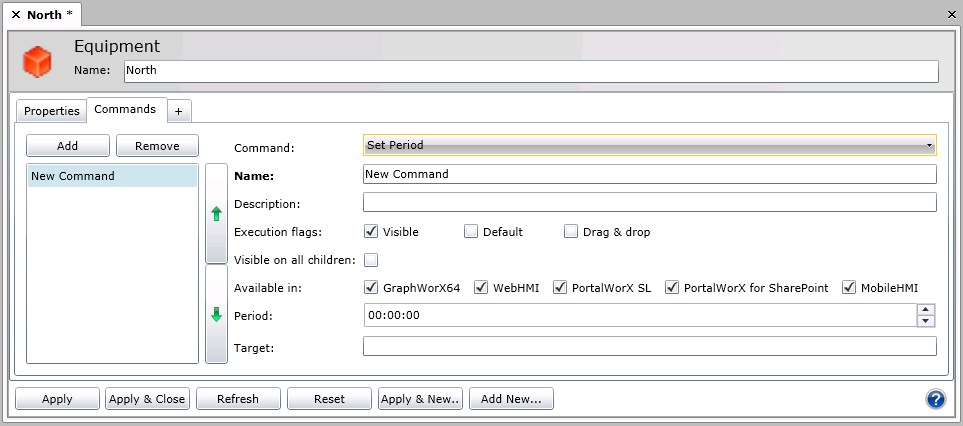
Parameters for the Set Period command are:
-
The Command, Name, Description*, Execution Flags, Visible on all children, and 'Available in' prompts are described above under Commands Tab for Equipment.
-
Period -Enter in the desired time period to view in the TrendWorX64 Viewer.
-
Target - Registered name of the target control.
Return to the Commands Tab topic
Set Time Range Command
The Set Time Range command, used with TrendWorX64, allows the time range to be changed from AssetWorX Assets and GraphWorX64 Pick Actions. Targeting a viewer (or enabling Drag & Drop) will allow operators to use an alternative method to changing the Time Range (existing methods are the options available in the GraphWorX64 Contextual Ribbon menu).
Set Time Range Command
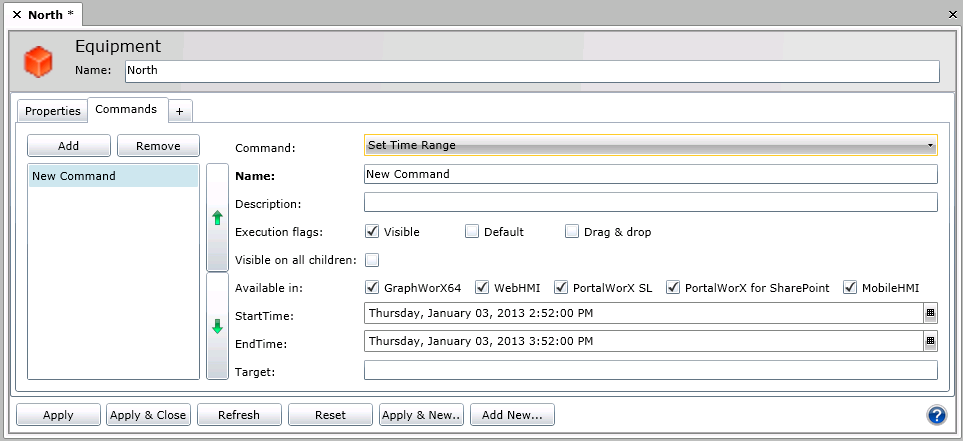
Parameters for the Set Time Range command are:
-
The Command, Name, Description*, Execution Flags, Visible on all children, and 'Available in' prompts are described above under Commands Tab for Equipment.
-
StartTime - Enter in the desired Start Time to the Time Range.
-
EndTime - Enter in the desired End Time to the Time Range.
-
Target - Registered name of the target control.
Return to the Commands Tab topic
Set Visibility Command
The Set Visibility Command is a flexible command used to target GraphWorX64 Objects (Visual ObjectType), TrendWorX64 Pens (Pen ObjectType), and any grid-based layout like AlarmWorX64 and GridWorX (Column ObjectType). The command allows operators to Show, Hide or Toggle the visibility of any one of these object types by issuing the command from an AssetWorX asset or GraphWorX64 Pick Action.
Set Visibility Command
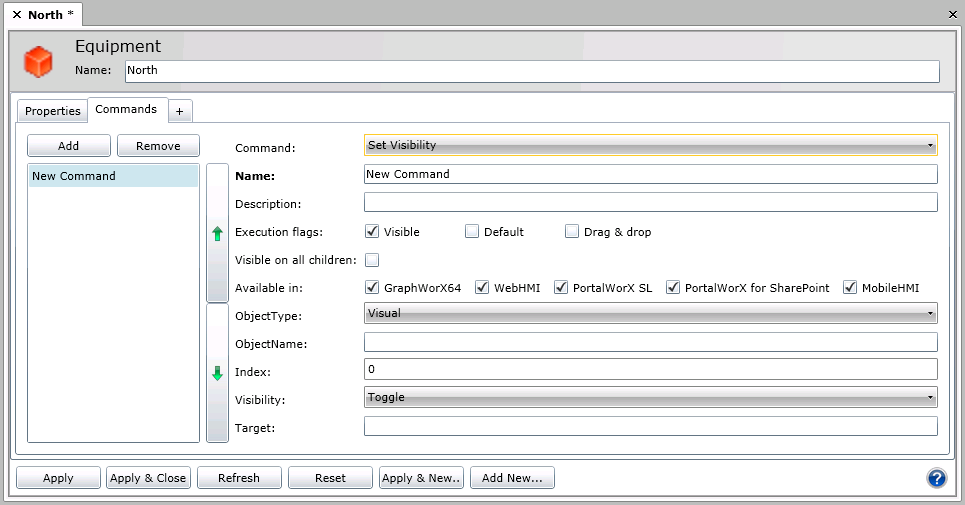
Parameters for the Set Visibility command are:
-
The Command, Name, Description*, Execution Flags, Visible on all children, and 'Available in' prompts are described above under Commands Tab for Equipment.
-
ObjectType -Use the pulldown menu to select from Visual, Pen or Column.
-
ObjectName - The name of the Object, Pen or Column to Show, Hide or Toggle the visibility of.
-
Index -Valid if empty.
-
Visibility -Use the pulldown menu to select from Show, Hide or Toggle.
-
Target - Registered name of the target control.
Return to the Commands Tab topic
Sort Command
The Sort Command, used to target AlarmWorX64 or GridWorX Viewers, will allow pre-configured or dynamic sorting of data grids using the parameters offered. Sorting can encompass one or more levels by using the Add Action or be removed entirely using the Reset Action.
Sort Command

Parameters for the Sort command are:
-
The Command, Name, Description*, Execution Flags, Visible on all children, and 'Available in' prompts are described above under Commands Tab for Equipment.
-
Action - Choosing between New, Add or Reset, users can create a new sort order, add a level of sorting or remove the current sort order.
-
ColumName -The name of the Column to sort. This can be seen in the header of each data grid or this can be a dynamic value by using the […] to select a value.
-
Index -Valid if empty.
-
Direction - Use the pulldown to select from either Ascending or Descending.
-
Target - Registered name of the target control.
Return to the Commands Tab topic
Switch Layout Command
The Switch Layout command, used with PortalWorX-SL, will take a new Layout Name that is already configured and apply it to the current window. Multiple commands can be used in tandem to allow dynamic switching between more than two layouts.
Switch Layout Command
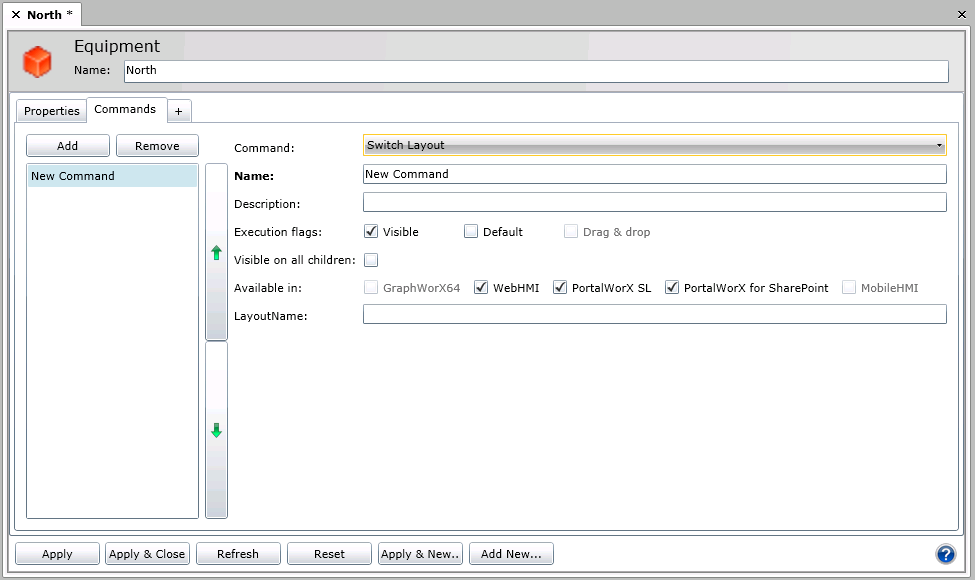
Parameters for the Switch Layout command are:
-
The Command, Name, Description*, Execution Flags, Visible on all children, and 'Available in' prompts are described above under Commands Tab for Equipment.
-
LayoutName -The name of the layout to switch to.
Return to the Commands Tab topic
Write Value Command
The Write Value command writes a value to another tag, a global alias, a language alias, or a conversion value, when a runtime user selects the menu option. For example, you might use this command to give runtime users the ability to switch a machine "off" or to set a thermostat to a specified temperature.
The prompts you must provide for a Write Value command look like this:
Write Value Command
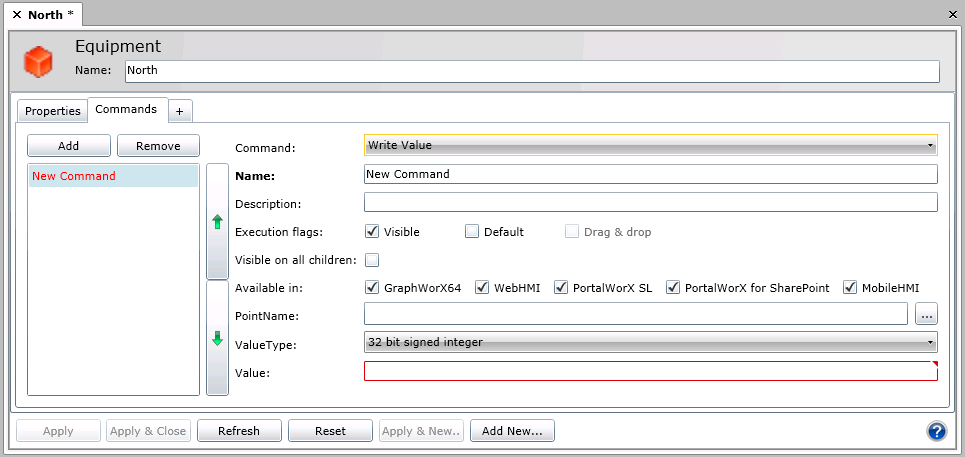
Parameters for the Write Value command are:
-
The Command, Name, Description*, Execution Flags, Visible on all children, and 'Available In' prompts are described above under Commands Tab for Equipment.
-
Point Name*: The path of the OPC tag point to be written to. Click the ellipsis button [...] to open the Data Browser, the navigate to the OPC tag, global alias, language alias, or conversion value to be written to.
-
Value Type: The value type of the data point to be written to. Your choices are:
-
- Void
- String
- 8-, 16-, 32- or 64-bit integer (signed or unsigned)
- 32- or 64-bit floating point number (single or double precision)
- Boolean value
-
Value*: The value to be written to the data point when the user clicks this menu option. Make sure the value type is suitable for the value in this field.
* If the equipment node was created using an equipment class, and this or other fields contain aliases (that is, variables that are surrounded by /? and ?/), you can replace the aliases with values that are appropriate for this equipment node by instantiating the aliases. For more information, refer to the Instantiating an Equipment Node's Aliases topic.
Return to the Commands Tab topic
Zoom Command
Zoom Command
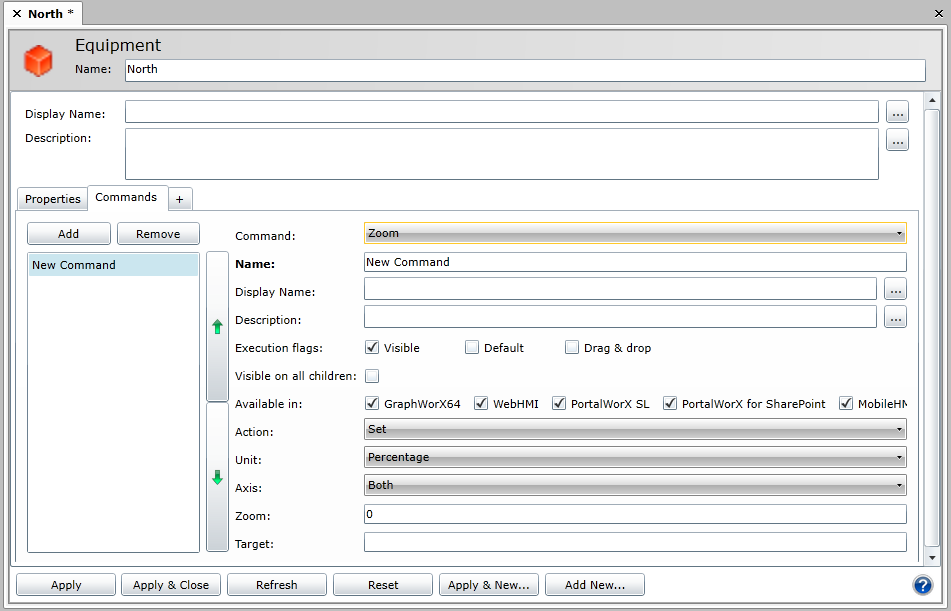
Parameters for the Zoom command are:
- The Command, Name, Description*, Execution Flags, Visible on all children, and 'Available in' prompts are described above.
- DragDrop - Set to whether or not drag/drop behavior is applicable to this command.
- Action - Set a new zoom level or Reset to default. The Action parameter should typically contain the "Set" value. Using "Reset" instead causes the viewer to revert to its original zoom level.
- Unit - Set to Percentage, Scale, Level or None.
- Axis - Set to Time, Value or Both.
- Zoom - Zoom value.
- Target - Registered name of the target control.
The TrendWorX Viewer is the only type of control that currently supports this command. In order for a TrendWorX Viewer to "accept" the command properly in GraphWorX64, you need to:
- Give the TrendWorX Viewer a Name within the Properties panel and set the Target parameter of the "Zoom" command to match the TrendWorX viewer's new name.
- Enable "zoom mode" within the TrendWorX Viewer (accomplished in runtime by double-clicking on the trend to show the "TrendWorX runtime menu," then clicking the magnifying glass button within this menu).
The Unit and Zoom parameters work in tandem to set a desired zoom level. To zoom to a desired percentage relative to the original zoom level, set Unit to "Percentage" and "Zoom" to the desired zoom level percentage (e.g. "100" reverts the viewer to its original zoom level, "50" causes the viewer to zoom in by a factor of 2). To zoom to a desired scale factor relative to the original zoom level, set Unit to "Scale" and "Zoom" to a positive number (e.g. "1" reverts the viewer to its original zoom level, "2" causes the viewer to zoom out by a factor of 2). The "None" and "Level" values of the Unit parameter currently have no effect on the target TrendWorX Viewer.
It's possible to scale only the time (horizontal) or value (vertical) axis of the TrendWorX Viewer by setting the Axis parameter to "Time" or "Value," respectively. To scale both axes by the same amount, leave the parameter at its default value of "Both." Note that it is currently not possible to scale the two axes by different scale factors at the same time with only one pick action (though strategic use of two pick actions should allow you to accomplish this task when needed).
Return to the Commands Tab topic
See also:
Tabs on the Equipment Node in the Asset Tree