ICONICS has developed increased functionality between its Hyper Historian data historian and AssetWorX asset-based management tool to allow integrators to configure Hyper Historian tags directly from within AssetWorX inside the Workbench. Other Hyper Historian settings, like Loggers & Groups are not configured from within AssetWorX, but remain to be configured from the Hyper Historian in the Workbench.
The AssetWorX and Hyper Historian configuration database tables need to be inside the same SQL database. Additionally, it is also necessary to install the “Asset AnalytiX” tables into the same SQL database, after AssetWorX and Hyper Historian have already been installed.
Both the AssetWorX and Hyper Historian servers need to run on the same machine, although this limitation may be removed in the future.
It is possible to configure regular Hyper Historian Tags. Calculated tags and Calculated Conditions/Events are not yet available for configuration. Also, although it is possible to configure Aggregates on the Hyper Historian Tags, they will not yet work in Runtime.
Hyper Historian is only able to log the source of Equipment Properties that have the Source type set to Dynamic tag.
To get the AssetWorX, Hyper Historian and Asset AnalytiX tables into the same database, you could initially choose the “Unified Database” during GENESIS64 installation. Alternatively, follow these steps:
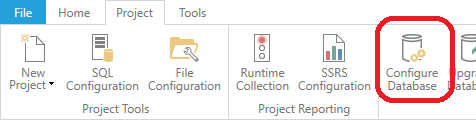
Open the Workbench, then click on Configure Database, as shown below.
Configure Database Button in the Workbench
On the first page of the wizard, select the AssetWorX database.
On the second page, check the Hyper Historian checkbox and the Sample Data checkbox.
Selecting Checkboxes

Click on Install.
Open the Configure Database wizard again. This time, install “Asset AnalytiX” into the AssetWorX database.
Refresh the Assets branch in the Workbench Project Explorer.
Note 1: Currently, it is not possible to install both the Hyper Historian and Asset AnalytiX at the same time. It is necessary to open the wizard two times.
Note 2: Instead of adding Hyper Historian and Asset AnalytiX into an existing AssetWorX database, it is also possible to add AssetWorX and Asset AnalytiX into an existing Hyper Historian database.
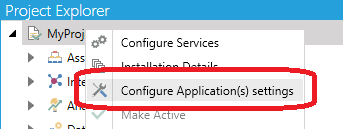
In the Workbench Project Explorer, right-click on MyProject and select Configure Application(s) settings.
Configure Application(s) settings in Workbench Project Explorer
Select AssetWorX as the active database for Hyper Historian.
Selecting AssetWorX as the Active Database for Hyper Historian

Click Apply.
As usual, Hyper Historian does not auto-start. Go to Hyper Historian in the Workbench and start the service.
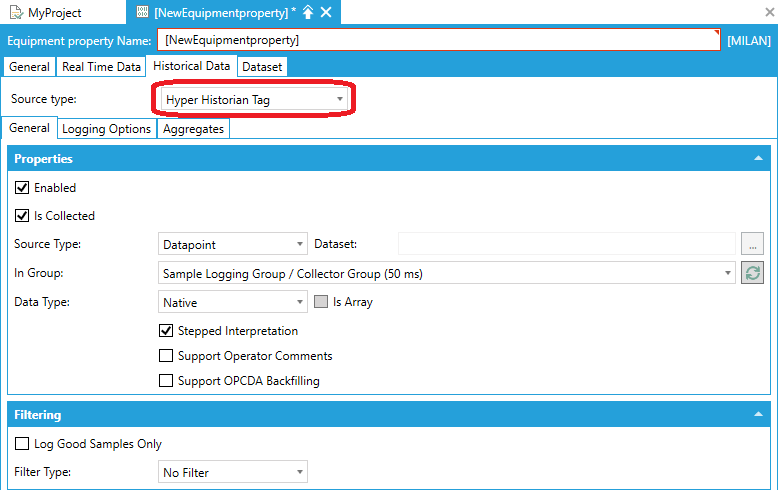
Now, all AssetWorX properties in Workbench have an additional option on the Historical Data tab, which configures Hyper Historian, as shown below.
Added Option on the Historical Data Tab
To Make Use of This:
On the Real Time Data tab, select Dynamic tag as Source type and select some tag as input (e.g. @sim64:Double.Sine(10,-5.0,5.0,163).Value).
On the Historical Data tab, select Hyper Historian Tag as the Source type.
Click on Apply.
Note: The order of actions before Apply does not matter.
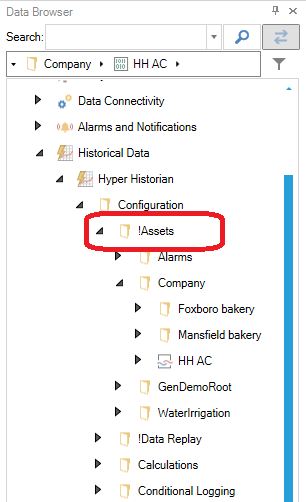
In GraphWorX64, expand Assets in the Data Browser, browse to the newly configured AssetWorX property and drag it onto the GraphWorX64 display. This should create a TrendWorX64 Viewer, automatically set up to show historical data. Go to Runtime to see the logged data.
It is also possible to see the AssetWorX structure in Hyper Historian. It should look similar to the following image.
Assets Shown in a Hyper Historian Project Explorer
See Also: