The primary element for the grouping of tags is the Logger. For each Logger that is created, the Hyper Historian creates a series of similarly named binary files to hold the Plant Historical data. The file creation and automatic archiving functions are based on the Logger. You may create multiple Loggers.
Before you begin, you should analyze what data you want to collect and how long you want the data to be kept online in the Hyper Historian. Data that is kept online for longer periods of time should be grouped together in one Logger. Data that is to be kept online for shorter periods of time should be grouped in a second Logger, and so on. For example, if you desire to have some data kept online for a year, some data for three months, and some for one month, you should create at least three Loggers, one for each of the desired time ranges.
As illustrated below, a Logger is made up of one or more Logging Groups. Each Logging Group may contain one or more Collector Groups; collector groups are made up of Tags, whose data is to be logged, or Tag Folders that contain Tags (also called Hyper Historian tags) and Calculated Tags. Each Logging Group also contains a folder called Aggregate, which Hyper Historian adds automatically to each logging group that you create; you can add any number of Aggregate Groups to this folder. Each Hyper Historian tag can reference the Logging Group's aggregates. Note that you can enable or disable Logging Groups using their respective configuration dialogs in the Workbench.
Organizing Your Tags in Hyper Historian
A Hyper Historian logger can be defined to be either File Based or Memory Persistent. If the logger is File Based, all of its collected plant data is committed to the hard disk. If the logger is Memory Persistent, the collected plant data is stored in RAM memory and discarded after a pre-configured amount of time. The Memory Persistent Logger can be configured to store a portion of its collected data to the hard disk upon a condition (occurring in real time). An example of each type of Logger is included in the default Hyper Historian configuration (under the Loggers & Groups tree node in the navigation tree).
|
|
Note: If you chose to include examples when you created your configuration database, several sample Logging Groups appear in the logging group. If you see a Logging Group in the list that suits your needs, you can simply drill into the Collector Group (make sure the settings work for you) and add your tags. Otherwise, add your own persistent Logger as described below.
Note: You can import collector node configuration information from an Excel spreadsheet, an XML file, or a CSV file. Once imported, you can edit imported information as needed. |
Hyper Historian loggers can be either File Based or Memory Persistent. One of each type is already listed under the Loggers & Groups tree node upon installation and first use.
To Add a Logger:
Start the Workbench, then expand your project. Next, expand the Historical Data node to show the Hyper Historian node. Expand the Hyper Historian node to show the Data Collections node.
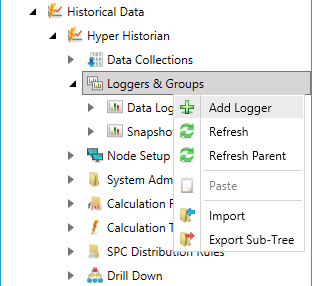
Right-click the Loggers & Groups node in the navigation tree and select Add Logger, as shown in the figure below.
Add Logger from the Project Explorer
-OR-
Select the Loggers & Groups node in the Project Explorer then click on the Add Logger button, shown below, in the Edit section of the Home ribbon in the Workbench.
Add Logger Button

This opens the Hyper Historian Logger properties window, shown below, beneath the Project Details section in the Workbench. Enter a name in the Hyper Historian Logger Name text entry field.
Hyper Historian Logger Properties
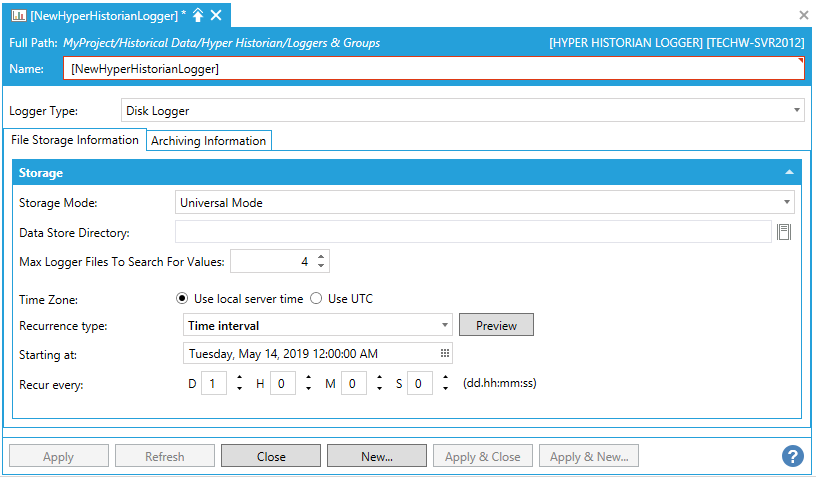
Select a Logger Type from the drop-down list. (Each type is described below in Disk Logger and Memory Persistent Logger.) Each Logger creates a data file on the hard drive to store the collected plant data. The data file is created for Memory Persistent Loggers as well as for File Based loggers because Memory Persistent logged data can be stored on disk when a specified condition occurs.
Complete the sections in the dialog (keeping in mind that Disk Logger configurations span two tabs). Refer to the discussions below for Disk Logger and Memory Persistent Logger for more information.
Note that you can configure automatic archiving by setting the Minimum Time Extent and/or Maximum Total Size parameters for File Based (Disk) loggers (on the Archiving Information tab of the dialog) or by setting the Max File Time Extent duration (in days and/or hours) of the file event/trigger and the Max File Size parameters for Memory Persistent loggers. All of these settings appear on the Archiving Information tab of the dialog.
To specify the conditions that the Hyper Historian Logger should use, close the Logging file and start a new one. The conditions can be based on a time period, file size, or a triggered event.
If you choose to create a Disk Logger, you will need to specify the conditions for when the Hyper Historian should create a new data file and close the current, existing file. This is used to control the amount of plant data or the time frame for the plant data that should be logged to each file. The conditions can be based on a time period, a file size, or a Unified Data Manager triggered event.
To Create an Optional File-based Logger:
Specify the Name of the logger and select "Disk Logger" for the Logger Type.
Select a Storage Mode, either Universal Mode or Non-Redundant Mode. It is recommended that you use Universal Mode since data log files created in this mode contain values from a predictable and predefined range of time.
Define the Data Store Directory, or the location where the files will be stored. You can enter a folder location into the provided textbox or click on the  button [...] to open the "Browse files or folders" window, where you can choose a folder location.
The Max Logger Files To Search For Values setting limits the number of files to search for a value. For example, if any update was received for “4x time domain of hhd file”, then it stops searching for a value. If you are creating log files every two weeks, this lets Hyper Historian search back through 26 weeks of data. This isn’t a limitation for the TrendWorX Viewer pulling data. Rather, it’s used by points requesting real-time Hyper Historian data (like in a process point) or by functions that search past Hyper Historian data, like tagprevgood().
Example for both the “tagprevgood” and “tagnextgood2” functions:
“Max Logger Files to Search” limits the number of files to search for past data, but it stops within that limit if it finds no samples logged for a tag. If there are bad quality values logged for that tag, it will keep searching.
If you choose to log data using the Universal storage mode:
Select the Time Zone (either the local server time or UTC) that the logger should use to determine when to create a new data log file.
In Recurrence type, select whether to create a new data log file One time only, after a constant time interval has elapsed, or at Specific dates and times.
If you select One time only as the recurrence type for the logger, enter the Trigger at time and date when you would like Hyper Historian to create a new data log file. Note that this is the only time a new file will be created for this logger configuration.
If you select time interval or specific dates and times instead, in Starting at, select a date and time during which the logger should create the first data log file. Use the provided calendar to select a date and time. Note that time is entered in the format hh:mm:ss tt, where hh = an hour between 1 and 12, mm = minutes, ss = seconds, and tt is either AM or PM. The default date and time is today at the time that you opened the configuration dialog.
If you select time interval as the recurrence type for the logger, enter the amount of time that should elapse before the logger creates a new data log file. Enter an amount of time in the textbox using the format dd.HH:mm:ss, where dd = days, HH = an hour between 0 and 23, mm = minutes, and ss = seconds. You can also click a time element (such as hours) in the textbox and use the arrow buttons to make small adjustments to that element. The default value is 1 day.
If you select specific dates and times as the recurrence type for the logger, enter the amount of time that should elapse before the logger creates a new data log file. Enter a value in the textbox and select a unit of time in the pulldown menu (either second(s), minute(s), hour(s), day(s), week(s), month(s), or year(s)). The default value is 1 second.
If you select specific dates and times as the recurrence type for the logger, you can fine-tune the amount of time that should elapse before the logger creates a new data log file in Recurrence details. For example, if you selected 1 month in "Recur every" and The first, third Monday in "Recurrence details," the logger would create a new data file almost every other Monday (except for Mondays on the 29th, 30th, or 31st day of each month).
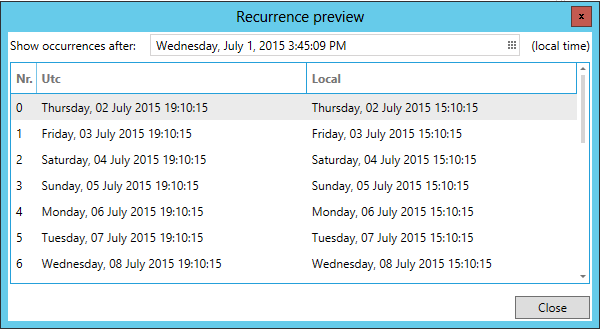
Once you have configured your recurrence settings, you can select the Preview button to open the Recurrence preview window. This dialog shows the times at which the logger creates a new data log file according to the configuration options you have selected.
If you have chosen to log data using the Non-Redundant storage mode, in the Storage section, you can define the Max Time Extent that should pass before the logger creates a new data log file, the Max Size that the current log file can become before the logger creates a new file, or a Create File Event, which is a trigger from the Unified Data Manager that determines when the logger should create a new file. If you set more than one of these options, a new file is created when any of the specified conditions are met.
Click the Archiving Information tab to open this second tab of options for File Based loggers, as shown below:
"Archiving Information" Tab in the Hyper Historian Logger Dialog (File Based Loggers only)

|
|
Note: For loggers using non-redundant mode, you can combine the maximum size of a file with the maximum total size of all files to set the number of files that will appear in the folder where you have chosen to store the files. For example, if you set Max Size to 100 MB and Max Total Size to 1 GB, Hyper Historian creates 10 files, each 100 MB in size. |
Once a data file is closed, it can remain on the system and be a data source for the runtime trend display and for SQL queries. Eventually, the collected data will have to be detached from the system and moved to external storage to make room for new incoming plant data. The process of detaching the older data and moving it is called archiving.
Automatic archiving can be based on the age of the data, the size of the data files, or on a Unified Data Manager event. The Unified Data Manager can be used to schedule the archiving of files based on a calendar event (date and time of day). In addition, the Unified Data Manager can be used to trigger file closure based on an external event. To use a Unified Data Manager trigger to schedule or trigger the file archive, browse for the trigger using the ellipsis button [...] on the right side or type in the specific trigger name.
The Max Files Total Size can also be used to trigger an archive. When the total size of the online (un-archived) data files reach the maximum, archiving will be triggered. The Min Storage Time is used to specify the minimum amount of time that should pass before the data is archived. Once you have set your desired File Based Logger parameters, you need to click the Apply button to enforce your settings.
Hyper Historian is a high performance data logger that captures information for your plant floor. However, you may need to collect data only when a certain events occur, or you just need data to be accessible for long enough of a period so that when you go in and out of runtime in the Trend Viewer, you can still see data for the past minute. The Memory Persistent Logger offers this ability. The Memory Persistent Logger gives your operators the information they need and also logs information when a certain event occurs.
If you choose to create a Memory Persistent Based Logger, you will need to specify:
The time period the collected data is to be kept in RAM memory.
The amount of time before and after a condition that data should be saved to disk when a condition occurs, if the Store data while condition is set feature is enabled.
The conditions under which the Hyper Historian is to create a new data file and close the current, existing file. The conditions can be based on a time period, file size, or a Unified Data Manager triggered event.
To set up a memory-persistent logger, use the following parameters on the Memory Persistent Logger Configuration Form:
Hyper Historian Logger Memory Persistent Logger
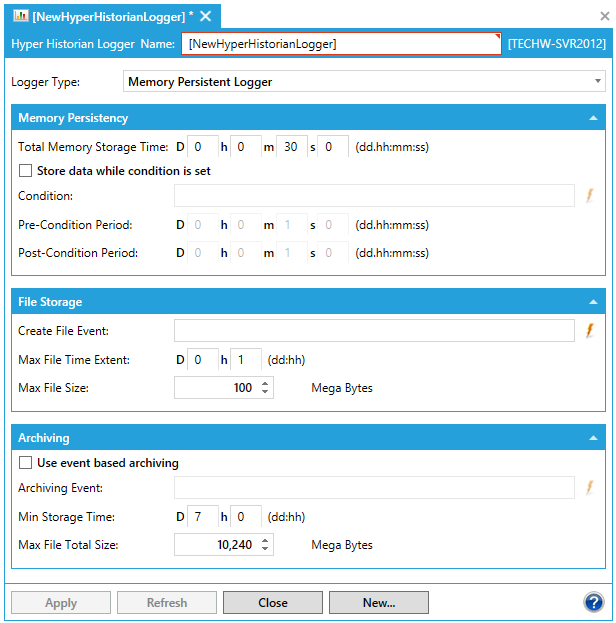
Total Memory Storage Time. Enter an amount of time in the format dd.HH:mm:ss, where dd = days, HH = an hour between 0 and 23, mm = minutes, and ss = seconds. This is the amount of time that the logged data is kept in memory. Note that once this time expires, the data is discarded.
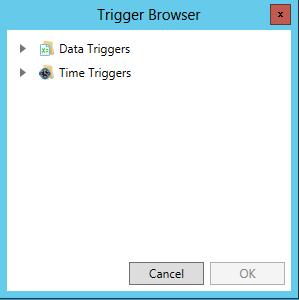
Store data while condition is set. This feature is optional for Memory Persistent Loggers. If enabled, it stores a pre-defined portion of the collected data to the disk upon a condition. The Condition can be based on a Unified Data Manager Trigger. To select a Unified Data Manager trigger, enter the name of the trigger or click the  button to the right of the text area to open the Trigger Browser window and choose a condition trigger.
In addition to specifying the Unified Data Manager Conditional trigger, you must set the Pre-Condition Period and Post-Condition Period. These settings specify the amount of time before and after a condition occurs, respectively, and together form a time interval. All data from the logger during this time interval is saved to disk when the conditional trigger occurs.
Specify the conditions for when the Hyper Historian should create a new data file and close the current, existing file. The conditions can be based on a Unified Data Manager triggered event, a time extent, or a file size. If you specify more than one set of conditions, the logger creates a new data file whenever any of the conditions are met.
To create a new data file upon an event from a Unified Data Manager tag, enter a tag for the Create File Event text area or select the ellipsis button [...] to the right of the text area to open the Trigger Browser window.
You can also specify a Max File Time Extent to set the largest amount of time that should pass before the logger creates a new data file. To set this time extent, use the provided text boxes to enter a number of Days and a number of Hours to set the maximum time interval.
Finally, you can specify a Max File Size; once the data file reaches or exceeds this size, the logger creates a new file. Use the provided textbox to specify the size (in MB) that a data file can grow to before the logger creates a new file.
Once a data file is closed, it can remain on the system and be a data source for the runtime trend display and for SQL queries. Eventually, the collected data may have to be detached from the system and moved to external storage - to make room for new incoming plant data. The process of detaching the older data and moving it is called archiving.
Automatic Archiving can be based on a Unified Data Manger event, the age of the data, or the size of the data files. The Unified Data Manager can be used to schedule the archiving of files based on a calendar event (date and time of day). In addition, the Unified Data Manager can be used to trigger file closure based on an external event.
To use a Unified Data Manager trigger to schedule a trigger that saves the file archive:
Enable the Use event based archiving check box.
Browse for the trigger by clicking the ellipsis button [...] on the right side of the Archiving Event text area and choosing a trigger in the Trigger Browser window, or type in the specific trigger name and enter that trigger into the Archiving Event text area.
You can use the Min Storage Time to specify the minimum amount of time that should pass before an archiving event occurs.
You can use the Max Files Total Size to trigger an archive. When the total size of the online (un-archived) data files reaches the specified maximum, archiving will occur.
When you are satisfied with the settings you have configured on this dialog, click the Apply button to save your changes, click the Close button to save your changes and close the dialog, or click the New... button to save your changes and create a new logger.
You can also discard the changes you have made on this dialog since you last saved by clicking the Refresh button.
If you wish to create a new logger without saving or discarding the changes to this logger, click the New... button.
Before deleting a Hyper Historian Logger, you should first verify that there are no Logger Groups using the Logger that is to be deleted. If any Logger Groups are assigned to the Logger, they need to be deleted or assigned to another Logger first.
|
|
Warning: Once you delete a Logger, the data that was previously logged as part of the group will no longer be available for playback to the trend display nor available in the SQL Query Interface. |
To Delete a Logger:
Right-click the desired item, then select the Delete command from the context menu. You can also select the Delete button in the Edit group on the Home ribbon.
Confirm the deletion in the dialog box that appears.
See Also: