![]()
Important! When you include an object in collision testing, its name changes to CollisionBody#. Each object is given its own number. Do not change the names of included objects; doing so removes them from collision testing.
You can set up and run a collision detection test in a 3D GraphWorX64 display. In setting up a collision test, you identify objects to test, then identify pairs of objects you suspect may collide. Follow the steps below. For more information, refer to How Collision Detection Works.
Identify the 3D objects to be included in the test by selecting the object(s) in the 3D viewport, then clicking the Advanced ribbon's Include button. Repeat this step until all of the objects you want to include have been selected. (If you include an object by mistake, select it and click the Exclude button.)
|
|
Important! When you include an object in collision testing, its name changes to CollisionBody#. Each object is given its own number. Do not change the names of included objects; doing so removes them from collision testing. |
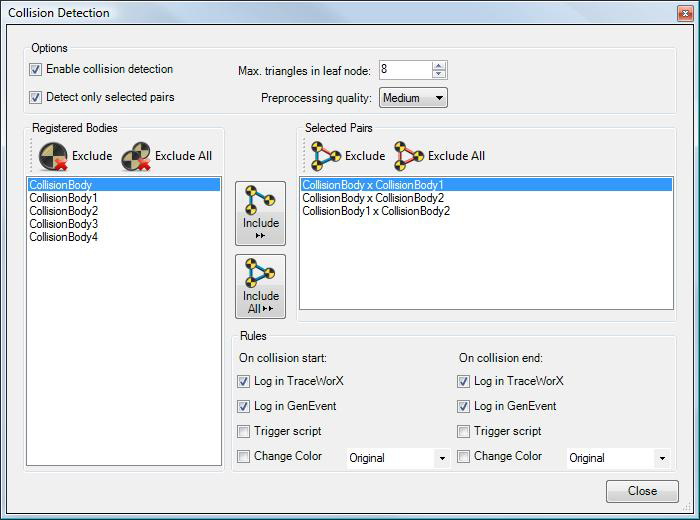
Click the Settings button on the Advanced ribbon. This opens the Collision Detection dialog box. The objects you have selected appear in the Registered Bodies box on the left. For more about the options on this dialog box, refer to the Collision Detection Section of the 3D Advanced Ribbon topic.
|
|
Note: To remove an object from the Registered Bodies box, select the object then click the box's Exclude button. (If you click the box's Exclude All button, all objects are removed and you must close the dialog box to start over.) |
To enabled fields in the dialog box, put a checkmark in the Enable Collision Detection checkbox.
To test every possible pair of objects for collision detection, make sure the Detect Only Selected Pairs checkbox is empty ![]() . Or select
. Or select ![]() the Detect Only Selected Pairs checkbox then click the Include All button.
the Detect Only Selected Pairs checkbox then click the Include All button.
Alternatively, to test selected objects for collision, select the objects and click the Include button. The included objects appear as pairs in the Selected Pairs box on the right.
In the Rules box, specify the how you want collisions to be reported.
When you are done, click Close.
When you enter Runtime mode, the test will begin.
At the end of the test period, review any logs you have kept. If you kept a trace log or recorded events, refer to Collision Detection TraceWorX Trace Log or Collision Detection GenEvents.
|
|
Tip. A large GraphWorX64 display that tests most, all, or a large number of objects will lengthen the amount of time it takes to enter Runtime mode. You may want to wait to set off the test overnight. For this reason, you can click the Settings button to open the Collision Detection dialog box, and deselect |
See also:
Collision Detection in 3D - Quick Start