Adding a Glow, Shadow, Blur, or Opacity Effect
You can make a GraphWorX shape or control more interesting or vibrant by adding an effect to it. You can give an object or a SmartPin an opaqueness (using the opacity feature), make the object glow, give it a shadow, or make it blurry. There are several types of GraphWorX objects -- listed below -- that you can apply an effect to.
In this topic, the word "object" refers to any of the objects in the following list:
NOTE: Combining effects is no longer possible in Microsoft .NET4. The ICONICS configuration GUI has been updated accordingly to accommodate one effect per object.
This topic describes steps for:
Creating a Shadow or Blur Effect that Can Be Re-used
You can create shadow and blur effects that can be reused among objects.
-
In the object Explorer, select an object you are applying the effect to; this selects it in the GraphWorX display, too.
-
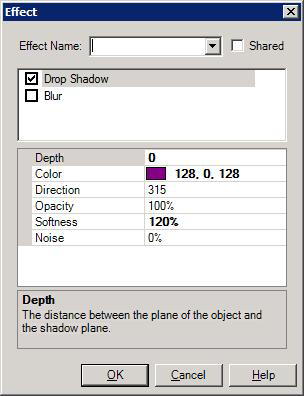
Go to the object's Properties tab and click the Effect property's ellipsis [...] button. This opens the Effect dialog box.
-
Type the name for the effect into the Effect Name field. For example, you might call it "Green Blur for Background Objects".
-
Put a check mark in the Shared check box so that the effect can be used for other objects.
-
Select Drop Shadow or Blur by clicking a check mark into the check box of the desired effect.
-
Define each property of the effect. For a shadow effect, specify the depth, color, direction, opacity, softness, and noise; these are described in the Shadow section below. For a blur effect, specify the size and type; these are described in the Blur section below.
-
Click OK to save the effect and apply it to the object. You can now apply this effect to any other object in the GraphWorX64 display.
|

|
Note: There is a handy Effects button on the GraphWorX 2D Home ribbon's Style and Colors section. This button provides predefined effects at your fingertips, but its does not give you the same control to define the effect you want.
|
Applying a Glow Effect
You can create a halo effect around an object by using the Glow effect. To apply a glow effect:
- Select the object you are applying the glow effect to.
- From the ribbon's Home tab, drop down the Effects icon (in the Style and Colors section) and hold your cursor over the Glow selection. It looks like this:
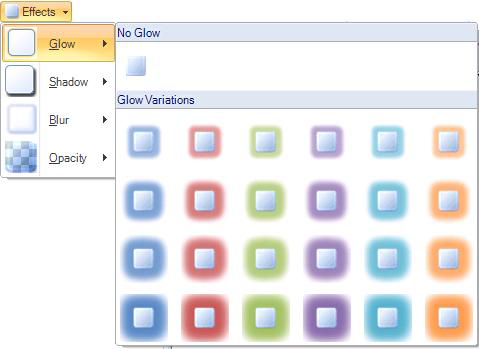
- Select the glow effect you want to apply. The drop-down closes and the effect appears on the object in the display.
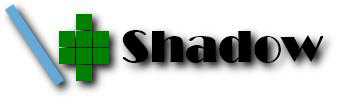
Applying a Shadow Effect
You can add a shadow behind an object by using the Shadow effect. To apply a shadow effect you can select a gray-colored shadow from the ribbon's Home tab, select a customized drop shadow from the object's properties, or create you own custom shadow effect using the object's properties. These options are described below.
To apply a gray-colored shadow effect from the Home tab:
- Select the object you are applying the shadow effect to.
- From the ribbon's Home tab, drop down the Effects icon (in the Style and Colors section) and hold your cursor over the Shadow selection. It looks like this:
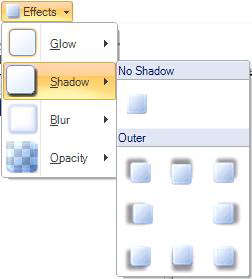
- Select the shadow effect you want to apply. The drop-down closes and the effect appears on the object in the display.
To apply a custom shadow effect:
- Select the object you are applying the shadow effect to.
-
Go to the object's Properties tab and click the Effect property's ellipsis [...] button. This opens the Effect dialog box.
- You have two options:
Applying a Blur Effect
You can add a blurring effect to an object by using the Blur effect. To apply a blur effect you can select a gray-colored blurring effect from the ribbon's Home tab, select a customized blurring effect from the object's properties, or create you own custom blurring effect using the object's properties. These options are described below.
To apply a gray-colored blurring effect from the Home tab:
- Select the object you are applying the blurring effect to.
- From the ribbon's Home tab, drop down the Effects icon (in the Style and Colors section) and hold your cursor over the Blur selection. It looks like this:
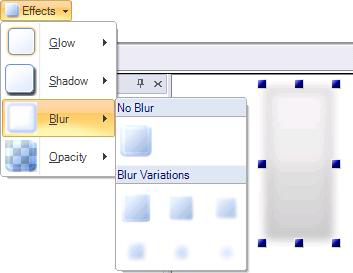
- Select the blur effect you want to apply. The drop-down closes and the effect appears on the object in the display.
To apply a custom blur effect:
- Select the object you are applying the blur effect to.
-
Go to the object's Properties tab and click the Effect property's ellipsis [...] button. This opens the Effect dialog box.
- You have two options:
Applying an Opaque Effect
You can add an opaque quality to an object by using the Opacity effect. To apply an opacity effect:
- Select the object you are applying the opacity effect to.
- From the ribbon's Home tab, drop down the Effects icon (in the Style and Colors section) and hold your cursor over the Opacity selection. It looks like this:
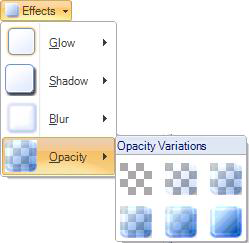
- Select the opacity variation you want to apply. The drop-down closes and the effect appears on the object in the display.
See also:
SmartPins
Objects