|
|
The features on this page require a GENESIS64 Advanced license and are not available with GENESIS64 Basic SCADA . |
|
|
The features on this page require a GENESIS64 Advanced license and are not available with GENESIS64 Basic SCADA . |
In past versions of ICONICS' GENESIS64 suite (in particular the Workbench components), the Provider applications generally required separate database connections, specific to each Provider. For instance, the AlarmWorX64 Logger provider would initially use the 'AwxLogger' database. The GridWorX Server provider would initially use the 'GridWorX' database.
The latest version of GENESIS64 now provides an option for users to utilize a 'unified' database, if they so require. One possible benefit includes the ability to associate a single database with its use with ICONICS applications. Increased ease of database maintenance could be an additional benefit to using a unified database. Ultimately, ICONICS provides this option as an additional choice for users, who may find their own specific benefits to its adoption.
Unified Database Creation in the Workbench
Make the Unified Database Active
Disconnect the Unified Database
Users are presented with the option to configure a unified database during the initial installation of GENESIS64, specifically at the stage of database configuration within the Database and Services Setup window, as shown below.
Database and Services Setup
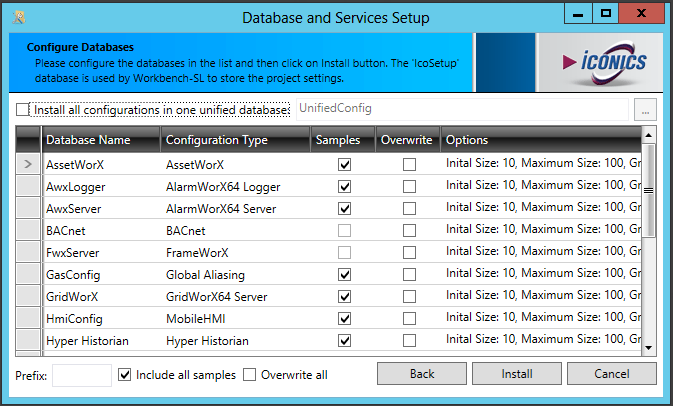
Note: The Database and Services Setup settings are also available, post-installation, via the Configure System utility accessible from C:\ProgramData\Microsoft\Windows\Start Menu\Programs\ICONICS\Tools.
Clicking the Install all configurations in one unified database checkbox activates the text entry field, where you can enter a name for your intended unified database. You can also click on the ellipsis [...] button to edit advanced properties for your unified database, allowing you to set file and log file sizes and restrictions.
Selection of a unified database will update the Database and Services Setup window, as shown below.
Database and Services Setup Settings with a Unified Database Selected
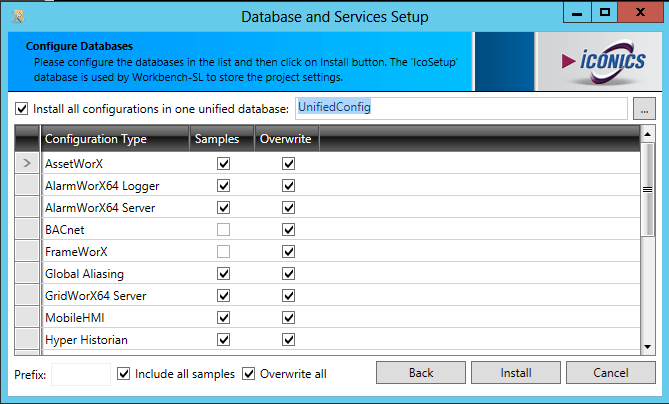
The Database Name column will disappear, no longer showing the multiple individual databases that were to be created for each separate the Workbench provider. It will now be assumed that you intend to proceed with the one unified database for use in each provider (or 'Configuration Type' as described in the Database and Services Setup window). You will have the same options to include Samples (which will appear differently within each provider, contextually) or to Overwrite any existing database. This can be done individually for each provider (Configuration Type) or you can elect to Include all samples and/or Overwrite all.
Once you have made your selections, you can click Install to either proceed with your initial product installation or existing product configuration.
If you haven't created a unified database in either the initial product installation or within the Configure System tool, you can still utilize a unified database for use within your the Workbench project.
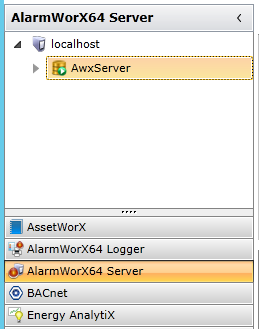
If you had not created a unified database during product installation (or via the Configure System tool), when you first launch the Workbench (unless you previously changed any database settings such as names, etc.), the default connected databases would be specific to each provider. For example, in the following image, you see that the 'AwxServer' database (within the server 'localhost') is being used within the AlarmWorX64 Server provider.
Default Existing Database Connected to the AlarmWorX64 Server Provider in the Workbench
Creating a unified database allows you to use one single database across all the Workbench providers. Instead of re-installing the product or using the Configure System tool, you can make this change via the Unified Database section of the ProjectWorX ribbon in the Workbench, as shown below.
Unified Database Section of the ProjectWorX Ribbon in the Workbench

To Create, Connect to or Update a Unified Database:
Click on the Create and Update button in the Unified Database section of the ProjectWorX Ribbon in the Workbench, as shown below.
Create and Update Button

This opens the first screen of the Unified Database wizard, as shown below.
First Screen of the Unified Database Wizard
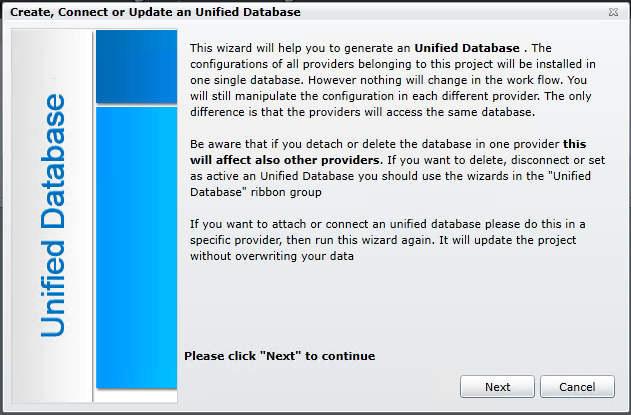
Read through the instructions, noting the creation and use of a single database and what happens should you detach or delete it. Click Next to continue.
The next screen involves the General, Connection, File Size and Log Size Settings.
General/Connection/File Size/Log Size Settings
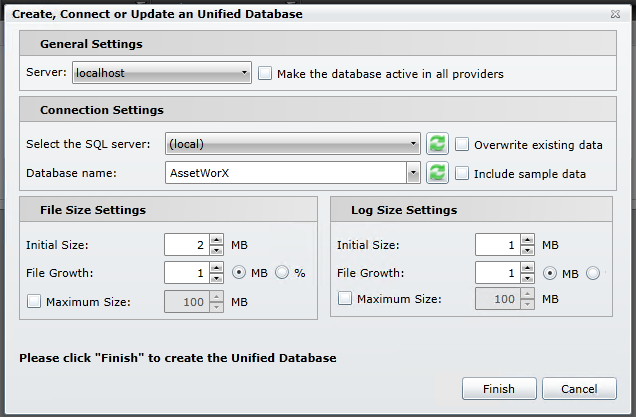
Server - Use the pulldown menu to select the server where the unified database will reside.
Make the database active in all providers - Click this checkbox in order to make your unified database active within all providers in the Workbench.
Select the SQL server - Use the pulldown menu to select the SQL server where the unified database will reside. Click on the refresh button [ ] to refresh the list of SQL servers to appear in the pulldown menu.
Database name - Enter a name for the unified database within the text entry field. You can also use this section as a pulldown menu to select an existing database name. Note that if you intend to use the selected database as you unified database, that it will appear in each the Workbench provider, including the provider that may share a similar name. Click on the refresh button [] to refresh the list of databases to appear in the pulldown menu.
Overwrite existing data - Click on this checkbox to use the data from your newly created unified database to overwrite data for any existing database. The existing data will be relative to each the Workbench provider.
Include sample data - Click on this checkbox to include pre-populated sample data with your newly created unified database. The sample data will be relative to each the Workbench provider.
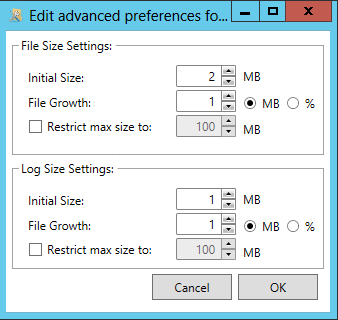
Initial Size - Use the text entry field or the up/down arrows to enter the initial file size for the unified database (in MB).
File Growth - Use the text entry field or the up/down arrows to enter the file growth size for the unified database (in MB or percentage of file size).
Maximum Size - Click this checkbox if you wish to set a maximum size for the unified database. Once this checkbox is selected, you will be able to set the maximum file size (in MB) in the text entry field or by using the up/down arrows.
Initial Size - Use the text entry field or the up/down arrows to enter the log file size for the unified database (in MB).
File Growth - Use the text entry field or the up/down arrows to enter the log file growth size for the unified database (in MB or percentage of log file size).
Maximum Size - Click this checkbox if you wish to set a maximum size for the log file for the unified database. Once this checkbox is selected, you will be able to set the maximum log file size (in MB) in the text entry field or by using the up/down arrows.
Once you have completed these settings, click Finish to create the unified database.
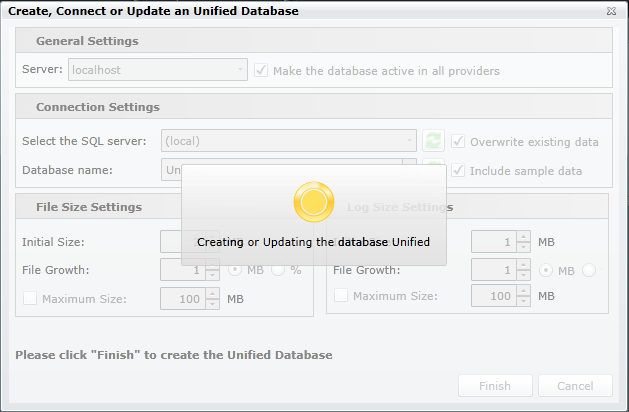
The creation or update of the unified database will proceed, as shown below.
Creating or Updating the database
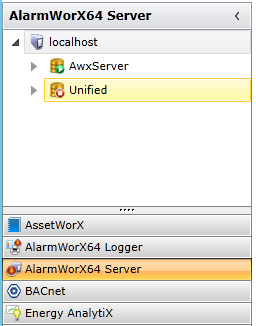
Once the unified database has been created, you can open a the Workbench provider and you will see it listed within its tree explorer, as shown below.
The Unified Database, Named 'Unified', Added to the AlarmWorX64 Server Provider in the Workbench
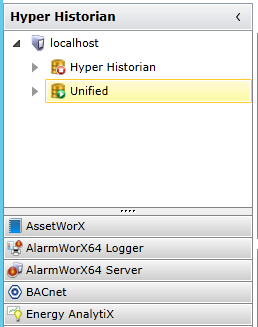
If you were to check a different provider, the added unified database would be included, as well, as shown below.
The Unified Database 'Unified' Shown in the Hyper Historian Provider
If you have added a unified database that is not the active database used within any individual provider within the Workbench, you can activate it by clicking on the Make Active button within the Unified Database section of the ProjectWorX ribbon in the Workbench, as shown below.
Make Active Button

Once you have clicked on this button, you'll see the Unified Database Wizard, where you can make your settings to activate your unified database throughout all the Workbench providers (ensuring that you have clicked on the checkbox for Make the database active in all providers).
To Disconnect, Delete or Detach a Unified Database from All Providers in the Workbench:
Disconnect Button

This opens the first screen of the Unified Database Wizard in Disconnect/Detach/Delete mode. Read the instructions, then click Next to continue.
Disconnted, Detach or Delete a Unified Database

3. This opens the General Settings window of the wizard, as shown below
General Settings
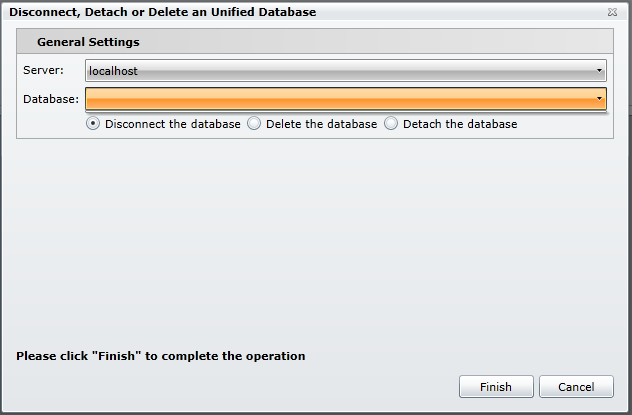
Server - Use the pulldown menu to select from which server the unified database should be disconnected/deleted/detached.
Database - Use the pulldown menu to select which unified database should be disconnected/deleted/detached.
Disconnect the database - Click this radio button to disconnect the selected unified database from the the Workbench providers.
Delete the database - Click this radio button to delete the selected unified database from the selected Server.
Detach the database - Click this radio button to detach the database from the selected Server.
Once you have made your settings, click Finish to complete your selected operation. Your selected unified database will now be disconnected/deleted/detached and will no longer appear within the tree explorers of the providers within the Workbench.
See Also: