|
|
The features on this page require an add-on to work with GENESIS64 Basic SCADA. |
|
|
The features on this page require an add-on to work with GENESIS64 Basic SCADA. |
Set Up FrameWorX Server On Premises
Cloud Connector is a FrameWorX Server version for Windows Azure, Microsoft's cloud computing platform and infrastructure (created by Microsoft for building, deploying and managing applications and services through a global network of Microsoft-managed datacenters).
The functionality of Cloud Connector is very similar to FrameWorX Server running in DMZ in Forwarding mode.
There are two major differences between Cloud Connector and the standard FrameWorX Server:
• Instead of connecting to other FrameWorX Servers, it allows other FrameWorX Servers to connect to itself. This reverses the direction in which the connection is created and solves the “inbound port 80” issue. The on premises firewall does not have to be open for inbound communication because the connection is initiated by the computers behind the firewall (thus, it goes outbound).
• The functionality of Cloud Connector is limited, partly because the features have not been fully implemented and partly because the features are not yet available on Azure (i.e., There are no OPC servers on the cloud. They are always on premises.). The requests that Cloud Connector cannot handle may be forwarded to a selected FrameWorX Server on premises.
Cloud Connector provides a connection between client computers and FrameWorX Servers on premises. These FrameWorX Servers can then expose any data available in GENESIS64.
Both clients and FrameWorX Servers can run behind firewalls (i.e. no firewall setup is needed).
The following set up assumes the user has an account on Azure. It describes the steps to install Cloud Connector on the Azure account.
Note: ICONICS is not responsible for Azure accounts. You need to contact Microsoft for detailed information and pricing.
Create a Cloud Service
In Windows Azure Management Portal, click NEW (in the bottom left corner), then select COMPUTE –> CLOUD SERVICE –> QUICK CREATE. Specify a URL for the service, select a region and hit OK.

The new cloud service will appear in the list of services:

Create a SQL Azure Database
You have to create a new SQL Azure database. It will store the configuration for the Cloud Connector. Click NEW, then select DATA SERVICES –> SQL DATABASE –> QUICK CREATE. Specify a database name, a preferred server, then the login name and password.
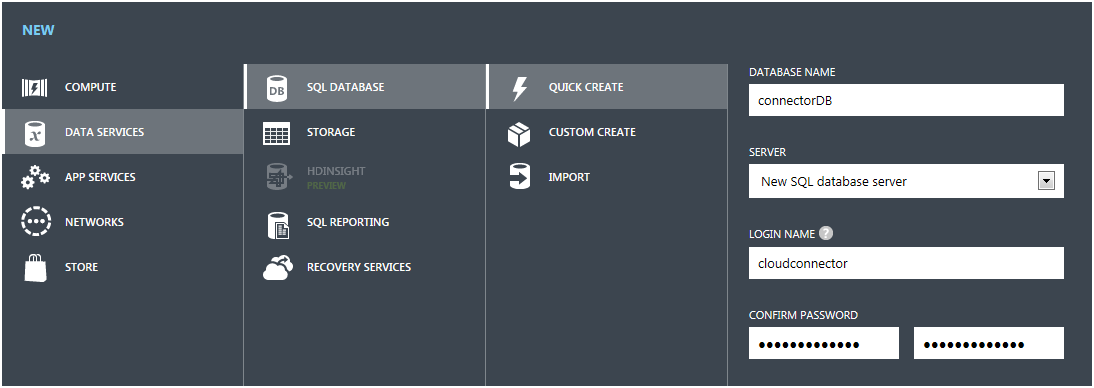
The QUICK CREATE option creates the SQL server in North Central US region. To change the region, use the CUSTOM CREATE option and specify the region.
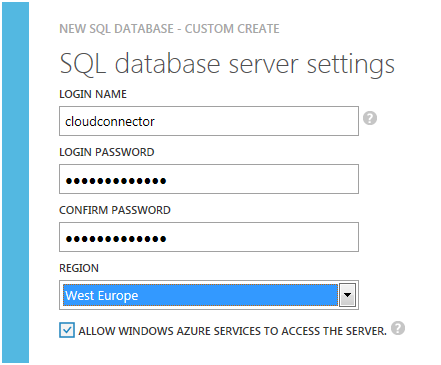
The new SQL database will appear in the list of databases.

Create an Azure Storage
The Azure storage will be used for Cloud Connector to exchange data with the FrameWorX Servers on premises. Create the storage with NEW –> DATA SERVICES –> STORAGE –> QUICK CREATE. Select a name for the storage and its location.

The new storage will appear in the list of storages.

Create Tables in the Configuration Database
Your newly created SQL Azure database is a SQL Server with limited functionality. You may connect to it from your computer with SQL Server Management Studio. However, the connection from the outside of Azure is disabled by default. To allow connection from your computer, select SQL DATABASES in Azure Portal, then select your database (connectorDB). Click on DASHBOARD and Manage allowed IP addresses.
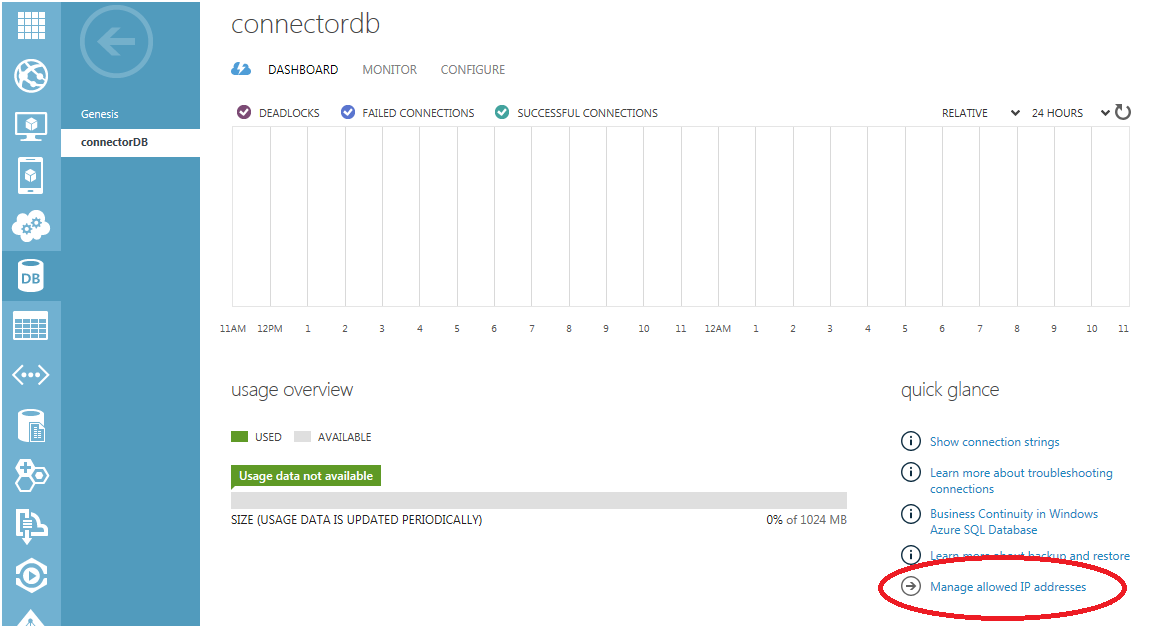
Add your client IP address to the list of allowed IP addresses. You may want to add more IP addresses if you plan to configure the database from other computers.

Click SAVE to store the configuration.
Now you are allowed to connect to your SQL Azure from your computer. Find the name of the SQL server (select SQL DATABASES – then select your database (connector DB)).

Now that you have set the server name, you should be able to connect to the SQL Azure server with the Cloud Connector installation to create the tables needed for the Cloud Connector.
Running the Azure Connector Setup
After creating your database in Azure, the next step would be to run the Azure Connector Installation, which will create the databases in Azure.
Start the installation and go to the screen that asks what database you are connecting to.
Azure Connector - Database Server

Make sure that the database server is the same as in the previous section, and enter in the database name and the SQL username and password. Then choose your database catalog, by clicking on the Browse button. Then click Next to continue the installation.
Once this is finished installing, your tables should be set up in your Azure cloud instance. A way to check this would be to connect to the Azure SQL server with SQL Server Management Studio. You can connect to this by entering in your server name in the SQL Management Studio window and confirming that ICONICS-related tables were created in your database.
Creating a Certificate for the Cloud Connector Service
Before uploading your package to Azure, you would need to edit the .CSCFG file with an appropriate thumbprint. For this example, you may use a self-signed certificate, but when using this with a real application, you should get a certificate from a certification authority.
Note: According to Microsoft, the certification authorities do not issue certificates for domains (*.cloudapp.net), so you would have to use a custom domain to redirect to the URL of your Azure Service. For more information, visit: http://azure.microsoft.com/en-us/documentation/articles/cloud-services-configure-ssl-certificate/
Open an instance of an elevated Command Prompt by right-clicking on Command Prompt and selecting, "Run as Administrator". Run the following command to create a self-signed certificate (and changing the URL of your Azure Service accordingly):
C:\Program Files\ICONICS\GENESIS64\InstCert makecert -n "CN=icocloudconnector.cloudapp.net" -sr LocalMachine -ss My -r -sky exchange -pe -sk MarkContainerName
This command will generate a certificate in the Local Machine\Personal Store. To export this, use the Microsoft Management Console (also called MMC) to access the new certificate. (In MMC, select Add Snap-In from File menu; choose Certificates and hit OK; then, under Local Computer -> Personal, select Certificates and locate your newly generated certificate to export.
Export the certificate with a private key to a .PFX file by right-clicking on the certificate and selecting All Tasks -> Export.
In the wizard, select "Yes, export the private key".
Use the CERTIFICATES menu in Azure to upload the certificate that has been exported into a .PFX file.
Upload the Cloud Connector Service
Before uploading your package, go to C:\Program Files\ICONICS\AzureConnector\FwxServer or where you installed the Azure Cloud Connector setup, and edit the .CSCFG file. The section we are changing is the <Certificates> section. Look for the section as shown in the image below. Update the thumbprint to be the same as the one uploaded for your cloud connector to Azure.

After changing the .CSCFG file to be the same, then you would upload your package to Azure.
In the Azure Portal, select CLOUD SERVICES and then your new service (mycloudconnector). Select DASHBOARD and UPLOAD A NEW PRODUCTION DEPLOYMENT. You will be prompted to upload an installation package.

Select the service package file (.CSPKG) on your computer and the service configuration file (.CSPKG).
The installation package will create the Cloud Connector service in your Azure account.
Configure the Cloud Connector Service
Once the Cloud Connector service has been created, you have to connect it with the SQL Azure database and the Azure Storage you created earlier. With the Cloud Connector service selected, click CONFIGURE.
Scroll a bit down to see the settings of fwxserverwebrole.
Update the DatabaseConnectionString and StorageConnectionString settings so that they refer to the database and storage created earlier, using the following steps.
To find the database connection string, select SQL DATABASES –> connectorDB –> View SQL Database connection string. A new window will pop up. Copy the first connection string for ADO.NET.

Paste the connection string into the ConfigDatabaseConnectionString setting. Don’t forget to type in the password to the database instead of {your_password_here}.
To get the storage connection string, select STORAGE – cloudconnectorstorage and click MANAGE ACCESS KEYS on the bottom of the window. Copy the STORAGE ACCOUNT NAME and PRIMARY ACCESS KEY. Paste them into the StorageConnectionString setting, so you get something like this:
DefaultEndpointsProtocol=http;AccountName=cloudconnectorstorage;AccountKey=dFGkjiK/yshGJSj34KljdsGp3bgjKLj87423HKkjsjIOuu93jHJrJQiGIC4SA==
Click SAVE.
After the Cloud Connector service restarts, it will be ready to use.
Verify that the Cloud Connector Service Works
Type the URL of your Cloud Connector service (e.g., http://mycloudconnector.cloudapp.net/) into a Web browser. You should see this:
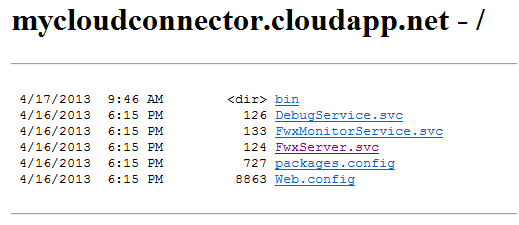
Click FwxServer.svc. You should get this:

You may get another message, but so long as it refers to the service being created or active, you can proceed.
Now you are ready to set up the GENESIS64 client and servers to take advantage of Cloud Connector.
Set up the client computer to use Cloud Connector as its default FrameWorX Server:
Open the Default Server Location dialog (either Workbench –> Tools –> Default FrameWorX Server Location.
Type the URL of the Cloud Connector service (http://mycloudconnector.cloudapp.net/FwxServer.svc) into the ‘Primary Default Server Node’ text box.
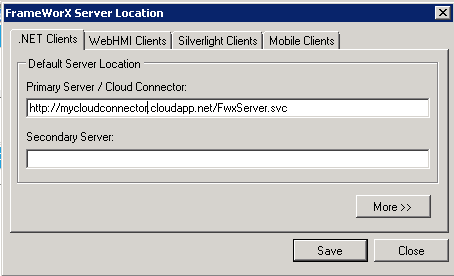
You may leave the protocol and port number settings as they are. The client app will get all that information from the URL.
Click OK or Save.
If Cloud Connector is running, you should be able to run the client applications, but you will not get any data from FrameWorX Servers. Also, you may get control and simulation data from the Cloud Connector.
You should still see the same data browser information, but if the Cloud Connector does not have any information for that provider, then it will not show anything there.
And, you should be able to get control and simulated data from Cloud Connector (points :ServerComputerName and svrsim:sine):
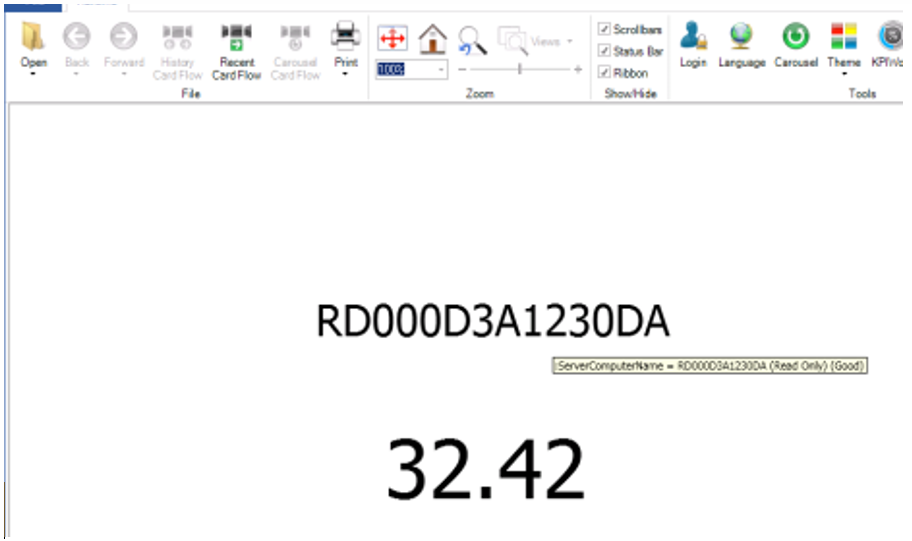
Note that ‘:ServerComputerName’ can be browsed under Home –> Control Information. Make sure these points work before proceeding.
If they do not work, check the TraceWorX log for GraphWorX64.
The following article explains how to setup FrameWorX Server on premises. FrameWorX Server will connect to the Cloud Connector and send data to it. Cloud Connector will make the data available to its clients.
Open Platform Services configuration in Workbench (Tools –> Platform Services) or run FwxServerConfigApp.exe (located in the Components folder).
Select ‘Enable Reporting to Server(s) in Azure or DMZ’ on the Advanced tab.
Type the URL of the FwxMonitorService (http://mycloudconnector.cloudapp.net/FwxMonitorService.svc) into the ‘Server URL’ text box and click ‘+’ to add the server to the list of servers.
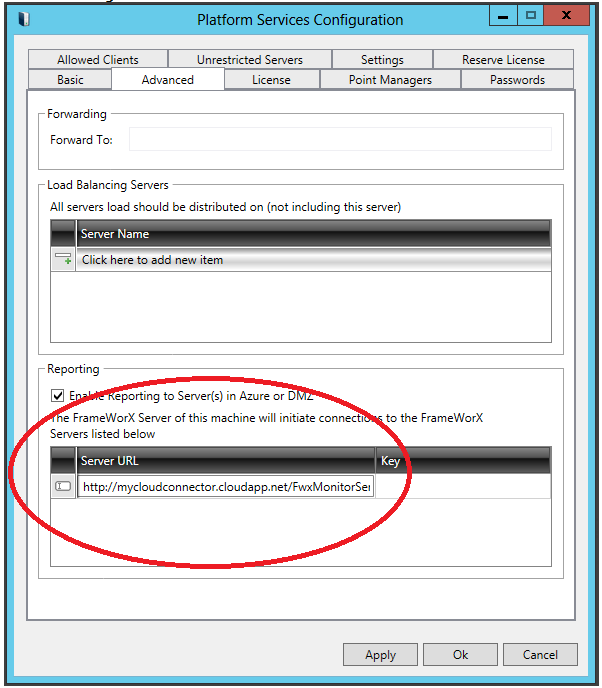
Click ‘Ok’
Restart FrameWorX Server.
Repeat this for each FrameWorX Server you want to expose via Cloud Connector.
When your FrameWorX Server connects to Cloud Connector, you will be able to browse it on the client computer under the FrameWorX network.
Now the FrameWorX Server on premises is available to clients connected to Cloud Connector.