![]()
![]()
This information is intended for users who want to upgrade their current version of Hyper Historian to version 10.97.2.
This will guide you through the process of upgrading a previous version of Hyper Historian to 10.97.2. It will also give detailed guidance on how to upgrade four-node and two-node redundancy setups with zero data loss.
Before proceeding with the upgrade, please note that previous versions of the license must be upgraded to version 10.97.2 using the Web Licensing Utility. This applies to both software and hardware licenses.
Please contact the ICONICS Orders Department to verify that your SupportWorX plan covers this upgrade and to receive instructions on how to perform the upgrade.
Check that your SupportWorX Plan is valid and covers the upgrade – you can contact the ICONICS Orders Department for this information.
Check that your hardware and software components meet the minimum requirements – see the DVD readme.
Obtain account credentials for an account with local administrator rights to the machine where you will be doing the upgrade.
Obtain account credentials for the Microsoft SQL Server you will be using for your configuration and logging databases.
Check the ICONICS website for any patches or known issues prior to the upgrade.
Follow these steps before running the 10.97.2 installation:
Back up all display files, configuration and logging databases, and HHD files. If you have made any manual updates to any INI or CONFIG files, back those up as well.
Kill your license, credit it to the ICONICS Web Licensing Utility site, then use the Upgrade License action on the web to upgrade your license to 10.97.2.
NOTE: For more details on how to kill, credit, and reauthorize your license, see one of these Help topics or app notes, depending on your license type:
Licensing – Using the ICONICS Web Licensing Utility for Software Key Licenses
Licensing – Using the ICONICS Web Licensing Utility for Hardware Key Licenses
Stop any running ICONICS processes and services.
When installing Hyper Historian onto a system that already has prior ICONICS products, those products will be automatically uninstalled. If the previous version was version 10.96 or later, the upgrade process will save any customizations made outside configuration databases (such as settings saved in INI or CONFIG files) to help provide customers with a more seamless upgrade process.
The following products will be uninstalled automatically if you select the upgrade option, or should be uninstalled manually before installing Hyper Historian version 10.97.2:
AlarmWorX64 Multimedia
AssetWorX
CFSWorX
Energy AnalytiX
Facility AnalytiX
GENESIS64
Hyper Historian
Hyper Historian Collector
ICONICS Client
ICONICS Suite
IoTWorX
MobileHMI
ReportWorX Express
SQL Query Engines
Quality AnalytiX
ICONICS Technical Support recommends that previous versions be uninstalled manually if the user wants to completely remove all files and clean up the system. In this case, the user should follow the next section on manual uninstallation.
Follow the steps in this section before running the new product installation to ensure that all previous version files are removed.
Note: System customizations saved to INI or CONFIG files that were not backed up may be lost when doing a manual uninstallation.
Open Windows Settings. 
Select Apps.
Select the existing ICONICS installation.
Select Uninstall.
Follow the uninstall steps.
Repeat for other ICONICS products.
After everything is uninstalled, go to the installation location (the default is C:\Program Files) and delete the ICONICS folder if it still exists.
Go to C:\ProgramData and delete the ICONICS folder if it still exists.
Go to folder C:\Program Files\Common Files and delete the ICONICS folder if it still exists.
Optional: If you will not be reusing them, delete any configuration or supporting files created using the previous version.
This section describes how to upgrade a non-redundant Hyper Historian system.
If you have Hyper Historian installed along with other ICONICS Suite products, you may run the setup file from any product to upgrade all ICONICS products in one step.
NOTE: For more details about upgrading GENESIS64 or ICONICS Suite version to 10.97.2, please see GENESIS64 Upgrade to New Version
If you only have a Hyper Historian installation with no ICONICS Suite products, you may run the setup file from the Hyper Historian installation media.
Some users prefer to use the default Hyper Historian database for their configurations. In this case, it is extremely important not to overwrite any databases during the Hyper Historian database installation, or else the existing default configuration will be permanently overwritten. When the option is shown, make sure that the checkbox for “Overwrite all Databases” is unchecked as in Figure 1. You can check the other boxes as you see fit for your installation.
Users with an existing unified configuration database should check the Use Unified Database field. Users whose existing configuration is split into multiple databases should leave this option unchecked.
Users with a more complicated or unusual setup may want to check “Advanced Configuration” and configure the advanced settings according to your existing system.
ICONICS recommends that all configuration databases be backed up before upgrading the software to the new version.
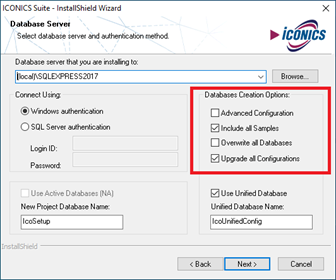
Figure 1 - Do not overwrite default databases if they are being used in the configuration.
When "Advanced Configuration" is selected, the Configure local system dialog will appear at the end of the installation. (See Figure 2.) During this step you also have the option to “Automatically upgrade all configurations”. You can also choose to upgrade the databases individually.
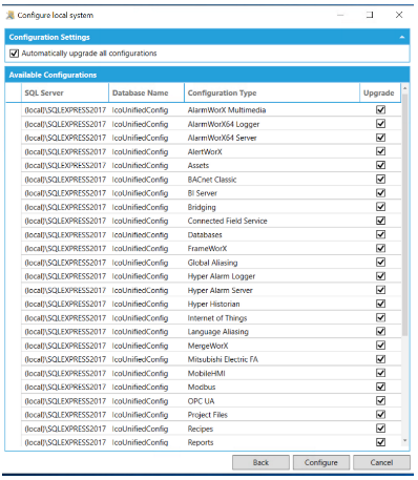
Figure 2 - System Setup step of installation
The following sets of configuration tables will be affected during the Hyper Historian database installation.
Hyper Historian
UdmConfig
GasConfig
Snmp
BACnet
Icosec
FrameWorX Server
If you decided not to overwrite or upgrade these databases during the install, you will have to upgrade them after the installation, starting with the ICONICS Security configuration.
NOTE: There are other databases that require upgrading following the GENESIS64 upgrade to 10.97.2 as well. Please read the Help topic or application note GENESIS64 - Upgrade to New Version for further details.
After the Hyper Historian installation, follow these steps to reactivate your original configuration database:
Open Workbench.
Right-click on your project at the top of the Project Explorer and select Configure Application(s) settings.
Find the Hyper Historian row.
Select the item in the Catalog column of this row to expose a dropdown menu, then select the database you would like to use for Hyper Historian.
Apply your changes.
If necessary, upgrade your database by selecting the upgrade icon in the first column.
In Project Explorer, expand the Hyper Historian provider and inspect your configuration to ensure it is correct.
NOTE: Connecting may take some time depending on the size of your configuration.
This section is for upgrading a four-node redundancy setup for Hyper Historian, pictured in Figure 3.
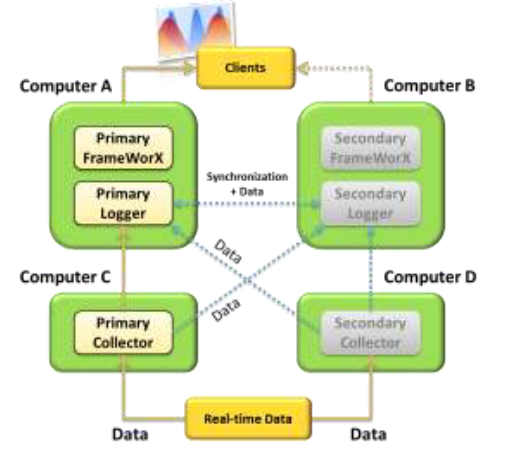
Figure 3 – Four-Node Redundancy Setup
Here is a summary of the steps to upgrade this system, with more detailed explanations to follow:
Upgrade Secondary Collector software
Upgrade Secondary Logger software and license
Upgrade Primary Collector software
Upgrade Primary Logger software and license
NOTE: This application note should be followed exactly step-by-step to ensure there is no data loss during the upgrades.
Open the Windows Services console and stop the ICONICS Hyper Historian Collector service on the secondary collector. Verify the secondary collector is offline through the redundancy viewer of MonitorWorX. Note: Open MonitorWorX by clicking on Start > ICONICS.NET Licensing > MonitorWorX Viewer.
Run the Hyper Historian setup and upgrade the secondary collector to version 10.97.2..
Once upgraded, open the Services console, and start the collector service.
In the MonitorWorX redundancy viewer for Hyper Historian, verify that the secondary collector is once more available and both loggers have the secondary collector under their tree similar to Figure 4.
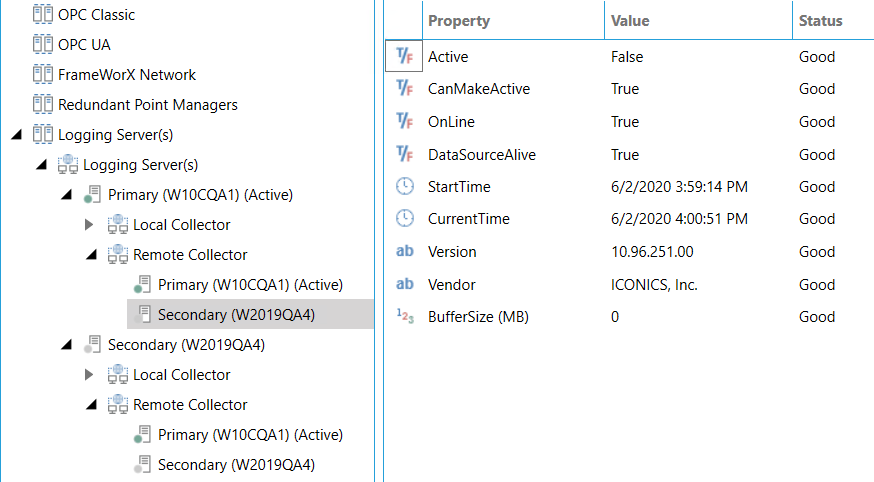
Figure 4 – Secondary collector should be available for both loggers after the upgrade
From Services, stop the ICONICS Hyper Historian Logger service on the secondary logger and verify it is offline through the redundancy viewer. Also verify that data is still being logged to the primary logger.
Kill the license and proceed with the license upgrade.
Run the setup to upgrade Hyper Historian and any other ICONICS Suite products on the machine with the secondary logger.
It is extremely important not to overwrite any databases during the Hyper Historian database installation, or else the existing default configuration will be permanently overwritten. When prompted, always make sure that “Overwrite all Databases” and “Overwrite all configurations” is unchecked.
After the installation, reboot.
Open Workbench.
If necessary, reconnect Workbench to your project's configuration databases.
If the databases were not upgraded during the installation, upgrade them now, starting with the security database.
NOTE: For more details about upgrading the databases in Workbench, please see GENESIS64 Upgrade to New Version
From Services, start the ICONICS Hyper Historian Logger service.
Verify that the secondary logger is back online through the redundancy viewer. Verify the active collector for the secondary logger is the primary collector. Also verify that the primary logger is still active.
At this point, the secondary logger (newer version) is getting data from the primary logger (older version). It is important to verify that data is being correctly logged on the secondary logger before proceeding with rest of the upgrade.
From Services, stop the ICONICS Hyper Historian Collector service on the primary collector.
Verify that both the primary logger (older version) and secondary logger (newer version) show that the secondary collector (newer version) is active, similar to Figure 5.
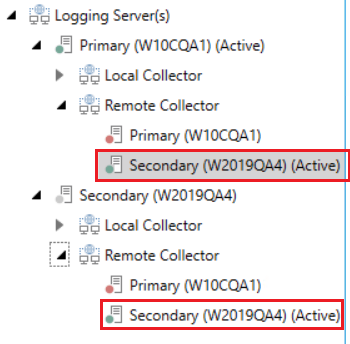
Figure 5 – Secondary collector should be active for both loggers at this point
Run the setup file to upgrade the primary collector to version 10.97.2.
From Services, start the ICONICS Hyper Historian Collector service.
Use the MonitorWorX redundancy viewer to verify that the primary collector is back online and becomes active for both loggers (assuming auto-failback is on).
Verify that data is being correctly logged on both loggers. Note that at this point, the primary logger (older version) is collecting data from the primary collector (newer version) while the secondary logger (newer version) is getting data from the primary logger (older version). It is important to verify that data is logging on both loggers before proceeding.
From Services, stop the ICONICS Hyper Historian Logger service on the primary logger and verify it is offline through the redundancy viewer. Also verify that the secondary logger has become active and is now logging data from the primary collector.
Kill the license and proceed with the license upgrade.
Upgrade ICONICS Suite products and Hyper Historian to version 10.97.2 on the machine with the primary logger.
After the installation, reboot.
Open Workbench.
If necessary, reconnect Workbench to your project's configuration databases.
If the databases were not upgraded during the installation, upgrade them now, starting with the security database.
NOTE: For more details about upgrading the databases in Workbench, please read the Help topic or application note GENESIS64 Upgrade to New Version.
From Services, start the ICONICS Hyper Historian Logger service.
Open the MonitorWorX redundancy viewer and verify that the primary logger is back online, and it is active. Verify that the primary logger has the active primary collector under its tree. Verify the data is being correctly logged on both loggers.
At this point you have successfully upgraded your complete four-node redundancy setup. If you followed the exact steps mentioned in this application note, you should have done the upgrade with zero data loss after data synchronization has finished.
The two-node redundancy setup is arranged similar to that of Figure 6. An important thing to note about this setup is that the primary logger and primary collector are on different machines. This is often referred to as the “crossover setup” and is the recommended way of setting up two-node redundancy.
Here is a summary of the steps to upgrade this system, with more detailed explanations to follow:
Upgrade software and license on Server B (primary logger)
Upgrade software and license on Server A (primary collector and FrameWorX)
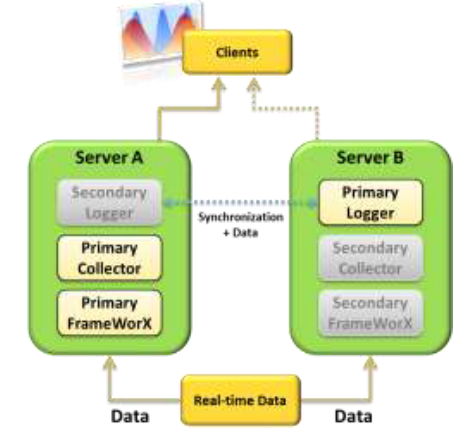
Figure 6 – Two-node redundancy setup
A two-node redundancy setup is similar to that of Figure 6. You can refer to the application note entitled Hyper Historian – Redundancy Setup Options for more details on this crossover configuration for the two-node redundancy setup.
NOTE: This application note should be followed exactly step-by-step to ensure there is no data loss during the upgrades.
Open the Windows Services console and stop the ICONICS Hyper Historian Collector and ICONICS Hyper Historian Logger services on Server B. Verify that the secondary logger has started collecting data from the Primary Collector.
Kill the license and proceed with the license upgrade.
Run the setup to upgrade Hyper Historian and any other ICONICS Suite products on Server B.
After the installation, reboot.
Open Workbench.
If necessary, reconnect Workbench to your project's configuration databases.
If the databases were not upgraded during the installation, upgrade them now, starting with the security database.
NOTE: For more details about upgrading the databases in Workbench, please see GENESIS64 Upgrade to New Version
It is extremely important not to overwrite any databases during the Hyper Historian database installation, or else the existing default configuration will be permanently overwritten. When prompted, always make sure that “Overwrite all Databases” and “Overwrite all configurations” is unchecked.
Start the ICONICS Hyper Historian Logger and Collector services on Server B and wait for the data to synchronize.
Use the MonitorWorX redundancy viewer to verify that the primary logger, secondary collector and the secondary FrameWorX server come back online.
Verify that the primary logger becomes active again and starts collecting data from the primary collector.
Verify that both primary and secondary loggers list the primary collector as active.
Kill the license and proceed with the license upgrade.
Stop ICONICS Hyper Historian Collector and ICONICS Hyper Historian Logger services on Server A. Verify the primary logger has started collecting data from the secondary collector. Only proceed to the next step after verifying this.
Run the setup to upgrade Hyper Historian and any other ICONICS Suite products on Server A.
After the installation, reboot.
Open Workbench.
If necessary, reconnect Workbench to your project's configuration databases.
If the databases were not upgraded during the installation, upgrade them now, starting with the security database.
Start the ICONICS Hyper Historian Collector and Logger services on Server A.
Verify that the primary logger is logging data and once more starts collecting data from the primary collector.
Use the MonitorWorX redundancy viewer to verify that all collectors and loggers are back online. Verify that both loggers are logging data.
Verify that the primary logger is active and both loggers list the primary collector as active.
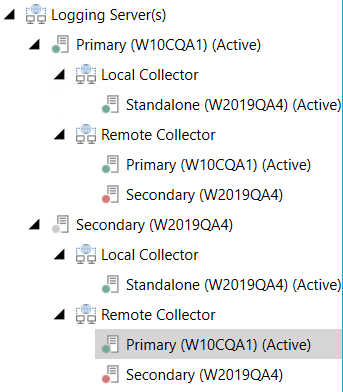
Figure 7 – Final two-node redundancy setup after the upgrade
At this point, you have successfully upgraded your complete two-node redundancy setup. If you followed the exact steps mentioned in this application note, you should have done the upgrade with zero data loss after data synchronization has finished.
See Also:
GENESIS64 - Upgrade to New Version