![]()
![]()
The ICONICS Web Licensing Utility is the tool used to activate new licenses, add products to existing licenses, and kill licenses.
While the process is made easier when the machine with ICONICS products installed is connected to the internet, an internet connection on that same machine is not required. You can use another machine with internet access and copy files and numbers from one machine to the other using a transfer method (like a USB stick).
The rest of this document assumes that you have an internet connection on the same machine as your ICONICS Licensing Software, but if you do not have an internet connection follow the instructions on the ICONICS software or internet machine as appropriate and copy the numbers or files from one machine to another, as needed.
If you have a system with both 32-bit and 64-bit products (such as GENESIS32 and Hyper Historian), you only need to use one Software License Utility. You will have two License Utilities installed, but they are both used to modify the same underlying license, like having two doors to the same room. You can authorize, add-to, and kill your 32-bit and 64-bit licenses from a single utility.
When you have multiple product generations on the same system, we recommend that you use the .NET (64-bit) License Utility for all license actions.
When issuing new licenses or adding products to an existing license you can enter both 32-bit and 64-bit P numbers into the Web Licensing Utility at the same time.
Follow these instructions to activate a license on a machine that currently has no license on it or has a license on it that you want to overwrite.
If your machine already has a license on it and you are looking to add another license to it, see the next section entitled, “Adding to an Existing Software License”.
Important: Remember that the 32-bit and 64-bit License Utilities both edit the same underlying license. If you have already activated a license with the 32-bit License Utility, do not use these “New Software License” steps with the 64-bit Utility. Doing so will remove your 32-bit license. Follow the steps in the “Adding to an Existing Software License” section below.
For 64-bit generation products (ICONICS Suite, GENESIS64, Hyper Historian, AnalytiX, or MobileHMI), on the machine where license will reside, open the ICONICS .NET License Utility.
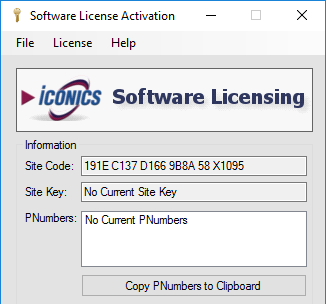
You will see a dialog similar to Figure 1. Note the Site Code. We will need to enter this information into the web site later. You may leave this dialog open for later use.
Figure 1 – Software License Activation Utility
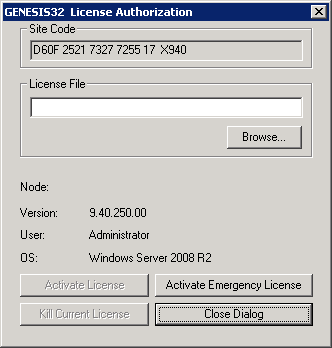
For GENESIS32, open the Licensing32 License Utility. Go to Actions > Authorize License. Note the Site Code. You will see a dialog similar to Figure 2. We will need to enter this information into the web site later. You may leave this dialog open for later use.
Figure 2 - GENESIS32 License Authorization
Go to https://licensing.iconics.com .
Select Software and log in with your email and password.
NOTE: If you do not have a login, you can register for one using the Create New Account link at the bottom. If you have forgotten your password, you can click on the Forgot Password link at the bottom.
Figure 3 – ICONICS Web Licensing Utility

Once you have logged into the website, select the New License link at the top.
Enter your Product Registration Number and Customer Key for the products. You may enter more than one set of numbers at a time.
NOTE: Your Product Registration Number(s) and Customer Key(s) are usually inside the DVD tin package that ICONICS sent when the product was purchased.
Select Next once you have entered all of your Product Registration Numbers.
Choose an existing end user or enter new end user information. Select Next when done.
NOTE: The existing end user dialog may take a few moments to appear. Please be patient.
In the next screen, you will see a list of the products that are available for you to license. Check all the products that you would like to license on this machine. Select Next.
This page shows you a summary of what will be in your license. Check to make sure everything is correct, then select Generate Key. You should see a page similar to Figure 4.
Figure 4 – Generated License
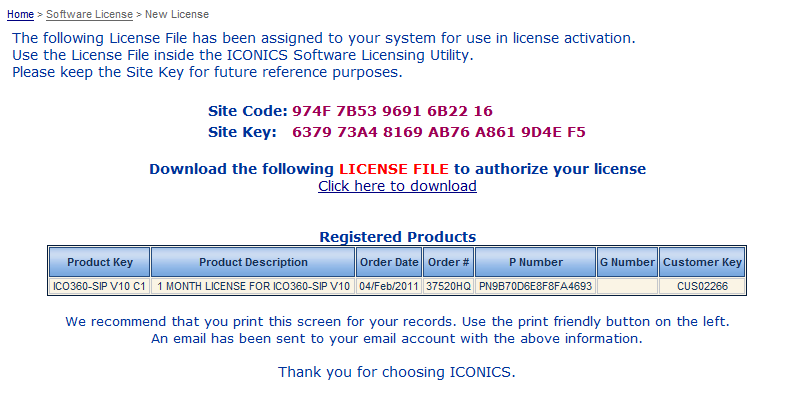
Select Click here to download to download the GLIC file and save it somewhere on your machine, such as your desktop. The exact location does not matter, as long as you will know where to find it for the next step.
NOTE: If you misplace the file after licensing it, you can use the View License link with your Product Registration Number to download it again. This link will also be emailed to you.
In the Software License Activation Utility or GENESIS32 License Authorization dialog, select Browse and look for the GLIC file that you downloaded in the previous step.
Once you have selected the file and the License File field shows the correct file path, select Activate License.
You should then receive a popup message indicating the status of the license activation. Select OK to close the dialog.
The License Utility should now show the current license information. At this point, your machine is licensed and ready to enter production.
NOTE: You may have noticed that the Site Code has changed. This is normal. The Site Code will change each time you activate, kill, or change your license.
For 64-bit generation products (ICONICS Suite, GENESIS64, Hyper Historian, AnalytiX, or MobileHMI), on the machine where license will reside, open the ICONICS .NET License Utility. Note the Site Code and the Site Key. We will need to enter this information into the web site later. You may leave this dialog open for later use.
For GENESIS32, open the Licensing32 License Utility. Go to Actions > Authorize License. Note the Site Code and Site Key. You may close this dialog, but you may want to leave the License Utility open for later use.
Select Software and log in with your email and password.
Once you have logged into the website, select the Add to License link at the top.
IMPORTANT NOTE: It is very important to pick Add to License and not New License. Picking New License will overwrite any existing license already activated on this machine. Make sure to pick Add to License if you are adding products to a machine that already has a license on it.
Enter your Product Registration Number and Customer Key for the products. You may enter more than one set of numbers at a time.
NOTE: Your Product Registration Number(s) and Customer Key(s) are usually inside the DVD tin package that ICONICS sent when the product was purchased.
Select Next once you have entered all of your Product Registration Numbers.
Choose an existing end user or enter new end user information. Select Next when done.
NOTE: The existing end user dialog may take a few moments to appear. Please be patient.
In the next screen, you will see a list of the products that are available for you to license. Check all the products that you would like to license on this machine, then copy and paste the Site Code from your Software License Activation Utility into the appropriate field on the web page. Select Next.
This page shows you a summary of what will be in your license. Check to make sure everything is correct, then select Generate Key.
Select Click here to download to download the GLIC file and save it somewhere on your machine, such as your desktop. The exact location does not matter, as long as you will know where to find it for the next step.
NOTE: If you misplace the file after licensing it, you can use the View License link with your Product Registration Number to download it again. This link will also be emailed to you.
In the Software License Activation Utility or GENESIS32 License Authorization dialog, select Browse and look for the GLIC file that you downloaded in the previous step.
Once you have selected the file and the License File field shows the correct file path, select Activate License.
You should then receive a popup message indicating the status of the license activation. Select OK to close the dialog.
The License Utility should now show the current license information. At this point, your machine is licensed and ready to enter production.
NOTE: You may have noticed that the Site Code has changed. This is normal. The Site Code will change each time you activate, kill, or change your license.
"Killing" a license removes it from the software and credits the license to the website for future use or safekeeping.
Select Software and log in with your email and password.
Once you have logged into the website, select the Kill License link at the top.
Open the ICONICS .NET License Utility (for 64-bit products or BizViz) or the Licensing32 License Utility (for GENESIS32).
In the ICONICS .NET License Utility, select the Kill Current License button. In the Licensing32 License Utility, go to Actions > Authorize License and select Kill Current License.
A message will pop up asking you if you really want to kill the license. Select Yes.
You will see a License Killed confirmation dialog as shown in Figure 6.
Figure 6 - License Killed Dialog
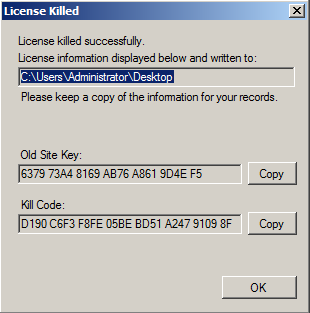
Copy the Old Site Key by selecting the Copy button next to it. Paste it into the Site Key field on the web page.
Copy the Kill Code by selecting the Copy button next to it. Paste it into the Kill Code field on the web page.
Once both fields are filled, select Remove Key on the website.
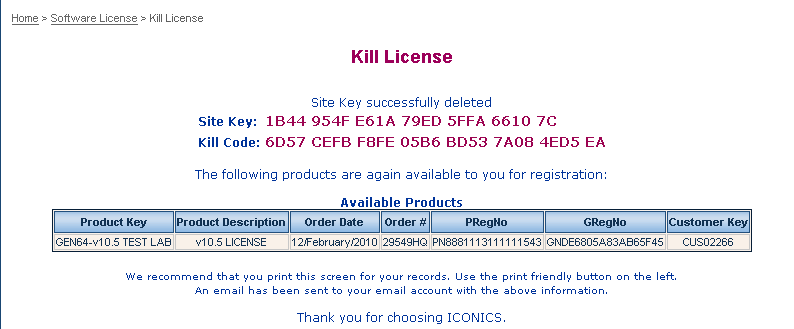
You will then get a message confirming that the license has been successfully removed. You will also receive an email with the killed license information. The products associated with this Site Key are now safely parked on the website and available to be relicensed at any time.
Figure 7 - License Removed Confirmation
ICONICS makes an emergency license available on the ICONICS Web Licensing Utility in case the original license is lost. This emergency license can be activated only once. It is identical to the original license except it lasts only for 60 days. The emergency license is designed to let your system continue running while you arrange for the proper replacement of the license. Once the permanent license has been replaced, the emergency 60-day license will be made available again for future use.
NOTE: Activating an Emergency license may destroy an existing license! Please do not activate an emergency license when another license is active. We recommend contacting ICONICS Technical Support before activating an emergency license to verify your original license is actually lost.
For a given Product Registration Number starting with “PN” or "P", the emergency license can be activated using the same Product Registration Number starting with “PE”.
Examples:
|
Original |
Emergency |
|
PN123ABC456DEF789G |
PE123ABC456DEF789G |
|
P1234567 |
PE1234567 |
The Customer Key number (starting with "CUS") is the same for both the permanent and the emergency license.
To start the replacement process of the original license, please fill in the online “Key Replacement Form” at:
https://licensing.iconics.com/Login.aspx?ReturnUrl=%2fVisualization%2fKeyReplForm.aspx
Once your license has been recovered, follow the steps in the section titled, “Issuing a New Software License” to reactivate the license.
See Also: