![]()
![]()
FrameWorX Servers provide the framework for all communications in GENESIS64. FrameWorX Servers can connect to and use other FrameWorX Servers. In order to understand how to configure Platform Services for your FrameWorX Servers, you must understand the following concepts:
Once you are familiar with these options, you can Configure Platform Services for Each Server and Enable Load Balancing.
Armed with the information described above, you must configure the platform services for each FrameWorX Server:
On the server machine, open the Workbench from Start > All Programs > ICONICS > Workbench.
On the ribbon's Tools tab, click the Platform Services button. The Platform Services Configuration dialog box opens, and looks something like the following. The following options can be set through the Basic tab.
Platform Services Configuration - Basic Tab
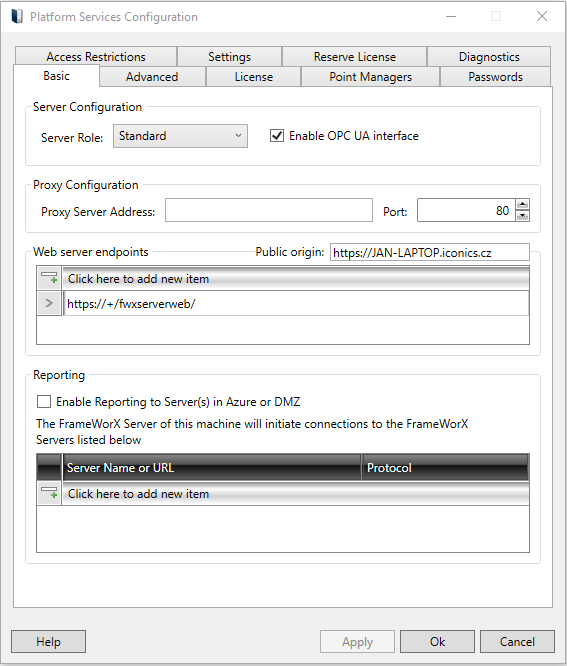
Specify the Server Configuration:
Standard. The server serves to clients or other FrameWorX Servers. The server supports security and aggregate requests from clients.
Forwarding. By selecting this option, you will be able to enter a computer name or IP address in the Advanced tab.
Data Collector. This selection supports situations where you may have a remote Data Collector behind a firewall that needs to be reached by a logger. In this instance, the Hyper Historian Collector communicates with a very small FrameWorX Server instance and that, in turn, uses reverse network comms to talk to the FrameWorX Server of the Hyper Historian Logger. In this role, some Point Managers are disabled. You can browse, but if you include any tags on scan they will return as 'bad', as this role is meant primarily for Hyper Historian rather than for GENESIS64. There is also no license required for FrameWorX Server in the Data Collector role. Click HERE for more information on Hyper Historian Data Collectors.
Select / unselect the checkbox to specify whether or not to use the OPC UA interface.
Proxy Configuration
It is a place where you set up the address and port number of the web proxy server, which should be used by FrameWorX.
Web Server Endpoints
In this section, the URL that Security listens on and the protocol (http/https) can be changed. The table here lists all the URLs that Security listens on. It is advisable to change the plus character in the URL to a specific DNS name, as a plus character here creates security vulnerabilities. Although technically possible, it is not advisable to change the path in the URL from the default ‘/fwxserverweb/’.
The Public Origin field can be used to change how the Security advertises itself. This must contain the protocol and host part of the URL only, without the trailing slash, for example ‘https://test.example.com’.
There are two use cases for this field:
1. To advertise to clients that they should use HTTPS instead of HTTP.
2. To advertise the correct host name. This is especially necessary if running behind a reverse proxy server and cannot be inferred by the Security.
Reporting
You also have the option of clicking the "Enable Reporting to Server(s) in Azure or DMZ" checkbox in the Reporting section. Once checked, you can enter the server information in the 'Server URL/Click here to add new item' text box. The 'Enable Reporting to Server(s) in Azure or DMZ' option tells the server to actively connect to another server/other servers. On a local network, when a client is connected to server A and is going through server A to server B, server A initiates connection with B. This is not possible when server A is on Azure or DMZ, due to a firewall between server A and server B, which prevents server A from connecting to server B. But server B can initiate the connection to server A. Then, server A would use the connection to talk to server B (as if server A initiated it). This behavior is switched on with this checkbox. (Server B actively reports to serve A, rather than waiting for the connection from server A). A server may report to multiple other servers, which is why users are allowed to specify the list of servers to report to.
For each connection, you may select a communication protocol: WCF (obsolete) for compatibility with all the versions, or FWX.
In the Platform Services Configuration's Advanced tab, if you had set your Server Role in the Server Configuration section as "Forwarding", you can enter the forwarding IP address in the "Forward To:" text entry field.
You can also add load balancing servers. The Load Balancing Servers section becomes available only if you have configured the server as a Primary or Secondary server.
In the Server Name field, type the name of a server that has been cloned and is part of the load balancing group.
Click the plus sign icon. The server is added to the list.
Repeat until each server in the load-balancing group has been added to the list. Add all servers in the group excluding the server you are configuring.
Platform Services Configuration - Advanced Tab
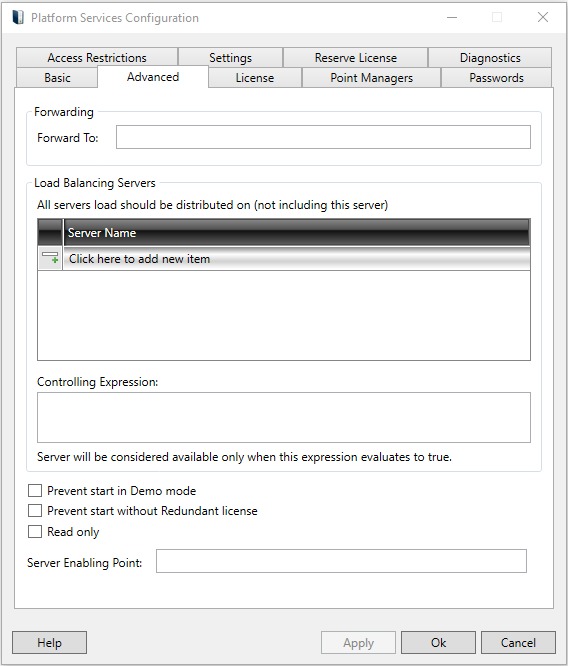
Load balancing is a way to scale your servers for large applications. It lets servers handle more clients and data. A server becomes the 'controlling' load balancing server when you specify a list of load balancing servers for it. If you don’t, that server itself will be ‘load-balancing’.
Servers in a Load Balancing Group
All servers in a load-balancing group must be clones of each other. They must have the same licensing and same security on their middle tier. Middle-tier servers share load balancing with other middle-tier servers; back-end servers share load balancing with other back-end servers.
How Load Balancing Works
In a group where load balancing occurs, one server intercepts client communications. After measuring the load on the other servers in the group, this server tells the client which load-balancing server to connect to. The primary server is the server that distributes the load; but if you have set up redundancy, both the primary and secondary servers are designed to distribute the load. The other servers -- those you have defined as load-balancing -- simply serve the clients that connect to the clients whose load they are designated to carry.
When a client session begins, load for that client is directed to a load-balancing server on the basis of the number of messages that are going through the server per second. (Messages, in this case, are requests, responses, and updates from the client.) The load-balancing server that is carrying the smallest load is assigned the client communication for the duration of the session. Load distribution occurs this way for middle-tier servers receiving communications from clients, but also for back-end servers receiving communications from middle-tier servers.
When an expression is entered in this text entry field (and any current changes to Platform Services Configuration are applied), the server will be considered available only when the entered expression evaluates to True.
Prevent start in Demo Mode - When checked, the server will not start in Demo mode.
Prevent start without Redundant License - When checked, the server will not start when the Redundancy license is not available.
Read only - True to prevent writing to any OPC servers or point managers. See here for more info.
Server Enabling Point - When a tag is defined as a “Server Enabling Point”, it will shut the server off in case of an update with a value of zero or bad quality. It is particularly useful in a redundant scenario to prevent clients from talking to a server that is technically online but has incorrect data.
Once the server is disabled, it will refuse communication with all clients. This means access cannot be restored by writing a new value from a client. Do not choose a tag that would require a client write to restore access. Access can only be restored via a new update from the data source (such as the OPC server) that has a non-zero value and good quality.
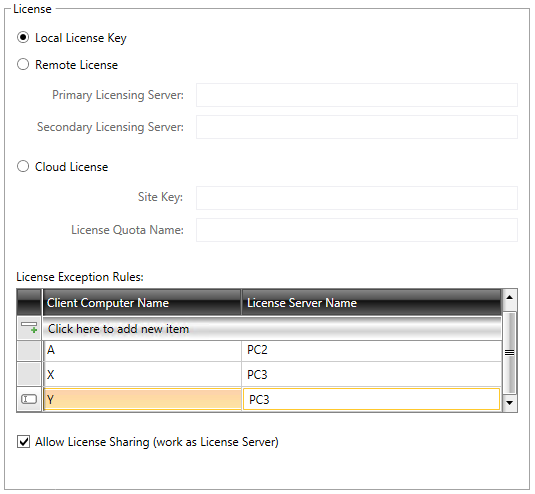
On the License tab, specify the server's licensing by choosing either Local License key (for the server to use its local license), Remote License (for the server to get a license from another FrameWorX Server) or Cloud License (for the server to use a cloud-based license).
Platform Services Configuration - License Tab
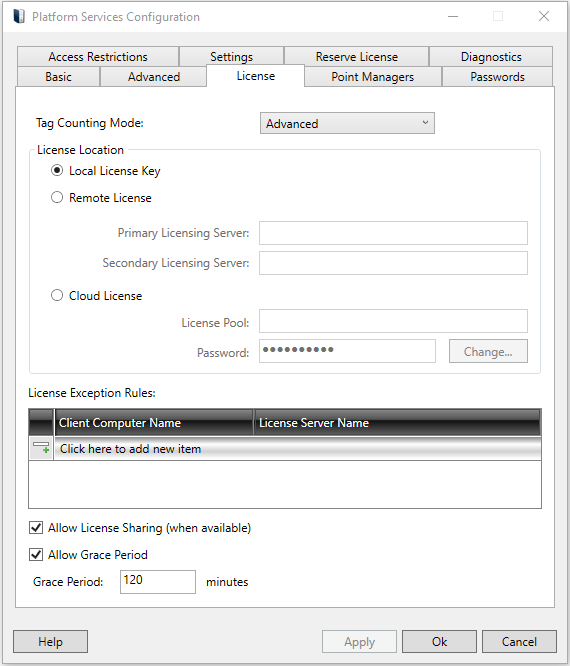
If the server uses its local license, you can also select to Allow License Sharing. If you put a check mark in this check box, the server will work as a License Server.
If the server uses remote licensing, enter the name of the server to be used as the Primary Licensing Server. If there is a secondary, back-up server for licensing, enter its name in the Secondary Licensing Server field. Also note that the Allow License Sharing option must be selected for the servers you specify in these two fields.
The License Exception Rules section allows users to redirect licensing to another server for specified client computers. In the example shown below, all clients connected to this FrameWorX Server get a local license. Client A gets license from PC2. Clients X and Y get their license from PC3.
License Exception Rules
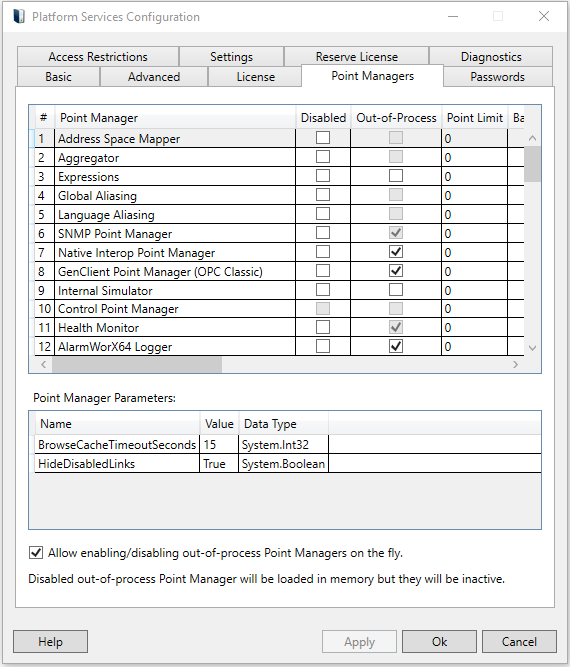
The Point Managers tab of the Platform Services Configuration window allows you to Disable/Enable and/or set "Out-of-Process" status for specific point managers for multiple integrated data components (aggregators, aliases, data connectors, databases, histories, etc). Point Managers are plug-in modules running within the process of a FrameWorX Server. They may be disabled when their functionality is not needed, in order to minimize the FrameWorX Server’s memory footprint or for troubleshooting. Also, they may be set up to run out-of-process. Then, they run in a separate process but there is a slight performance hit when running out-of-process.
For some listed Point Managers, clicking on the name brings up additional info in the Parameters section of the tab, where some values can be changed.
Point Managers Tab in the Platform Services Configuration Window
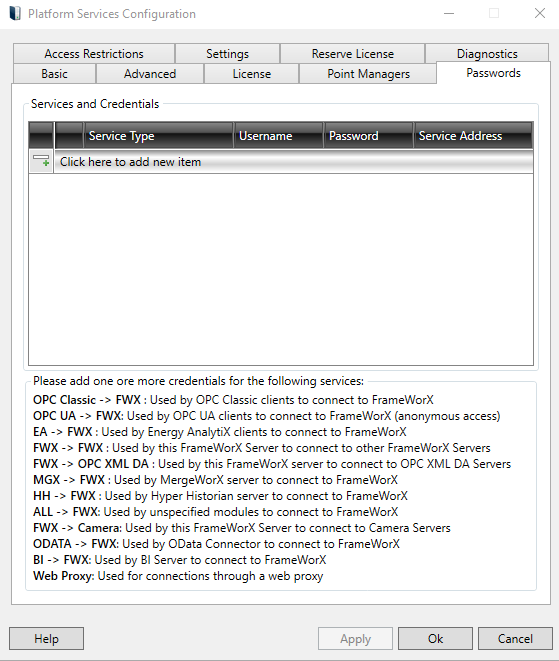
The Passwords tab allows users to specify credentials for different modules to connect to various servers. Currently, FrameWorX Servers and OPC XML DA servers are supported. Use * for the credentials to be used for all target addresses. These credentials are used for the modules running on the local computer.
Passwords Tab in the Platform Services Configuration Window
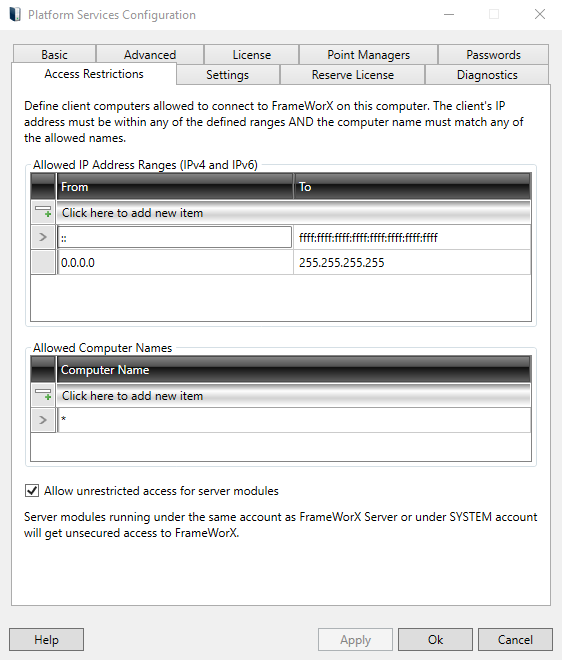
The Access Restrictions tab allows users to define which client computers are allowed to connect to the FrameWorX Server. Clients from other nodes will not be allowed. The client computer must match both lists: the Allowed IP Address Ranges (IPv4 and IPv6) and the Allowed Computer Names. Use * for any name. Use IPv4 and IPv6 addresses (Windows uses IPv6 internally). All clients are allowed by default.
Trustworthy Clients
Most server modules which are acting as clients to FrameWorX server may be granted an unrestricted access to FrameWorX server even without using a username/password (as described above).
This feature must be enabled on the ‘Access Restrictions’ tab (it is enabled by default), and the server module has to run under the same domain account as the FrameWorX server.
Notes:
It does not apply to all server modules. Some still need username/password – those, which expose FrameWorX variables to the third party, e.g. Classic OPC interface of the FrameWorX server.
This new behavior is slightly different from the previous ‘Unrestricted servers’ setting, which was vulnerable and has been removed as such.
Access Restrictions Tab in the Platform Services Configuration Window
The Settings tab allows users to set parameters for Server Limits and Diagnostics.
Settings Tab in the Platform Services Configuration Window
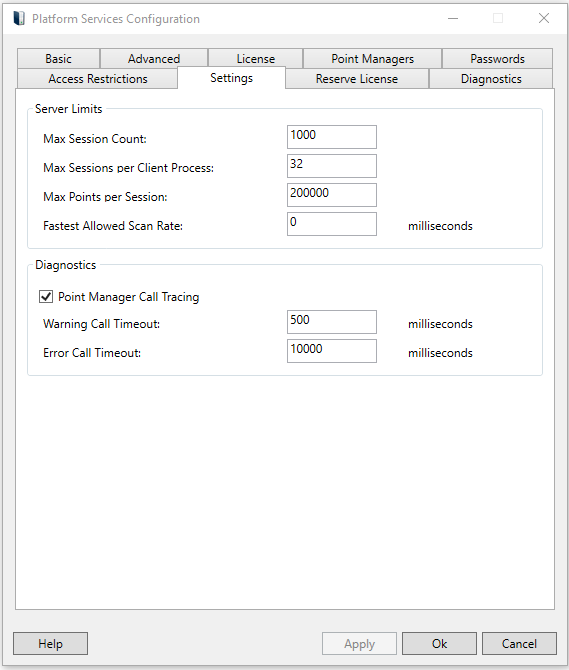
The Server Limits settings protect the server from being overloaded by excessive requests from the clients.
Max Session Count - Specifies how many concurrent sessions the FrameWorX Server is allowed to handle. When the limit is reached, other sessions will be rejected. NOTE: When a client is disconnected, is killed or crashes, its session will be cleared after one (1) minute. Until the session is cleared, it is counted in the limit.
Max Sessions per Client Process - Typically, each client application creates one session with the server. Under certain circumstances, there can be more sessions (e.g. a TrendWorX Viewer embedded in a GraphWorX display). This setting limits the number of concurrent sessions from one client process.
Max Points per Session - Limits the number of all points per session. The points include data points, security points, licensing, alarm subscriptions, etc. NOTE: Some points (security, licensing) are ‘invisible’, so the limit should be greater than the expected number of data points.
Fastest Allowed Scan Rate - Defines the fastest possible scan rate the server would use. When a client requests a faster scan rate for a data point, it will not be rejected, but the scan rate will be modified to the scan rate defined here.
The Diagnostics settings are for troubleshooting, evaluations/fixes.
Point Manager Call Tracing - Enables/disables the diagnostic feature. When enabled, FrameWorX Server monitors the duration of particular calls to Point Managers (i.e. plug-in modules - see above).
Warning Call Timeout - A warning will be logged into a TraceWorX log when a call to a Point Manager takes longer than specified. NOTE: All calls to Point Managers should be asynchronous and non-blocking. A warning can be an indication of a bad design of a Point Manager.
Error Call Timeout - An error will be logged into a TraceWorX log when a call to a Point Manager takes longer than specified. NOTE: All calls to Point Managers should be asynchronous and non-blocking. When the Error Call Timeout gets big enough, it is likely that a particular Point Manager is deadlocked when an error is detected. An error can be an indication of a bug in a Point Manager.
The Reserve License tab allows you to configure License Service behavior and set Node Reserved Licenses. Some ICONICS product users require priority access to a connected system at all times. With networked systems, users can possibly remain logged into systems that they are no longer physically near. An ICONICS Reserved User License ensures priority access without allocating specific license bits to all users.
The ICONICS Reserved User License can provide higher level users with priority access to the system and ties into existing ICONICS proper security and licensing. It sets aside needed licenses for an organization's select personnel while allowing the remaining licenses to be available for additional users.
The top License section allows you to reserve licenses for:
Client Stations
Desktop Enabled Stations
GraphWorx64 Client Stations
TrendWorX64 Client Stations
AlarmWorx64 Client Stations
Workbench Client Stations
Gadgets Client Stations
MobileHMI Client Stations
MobileHMI Write Stations
Enter a Start Delay (in milliseconds) in the text entry field for the amount of time to delay the start of the licensing service (in order to prevent any licensing server conflicts).
Enter the Number of Reserved User License Blocks in the next text entry field.
Note: A user with reserved license enabled will consume all of the reserved license types when running as a reserved user.
Note: If there are not enough reserved licenses available, the user will consume standard licenses as if they are configured to run as a standard user.
Reserve License Tab in the Platform Services Configuration Window
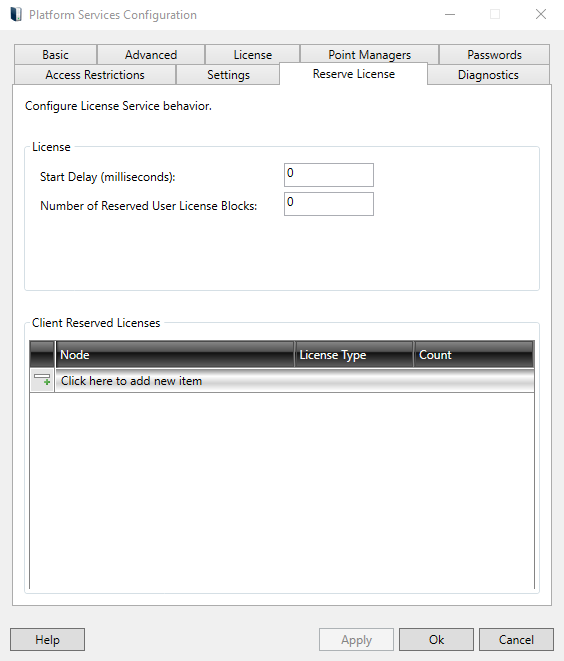
The bottom Node Reserved Licenses section allows users to pre-allocate license types to a specific node. Enter a Node and then select a specific License Type and then enter a number in the Count column for the number of pre-allocated licenses to reserve for that node (in most cases, the Count number will be 1).
Once you have entered your desired information in any of the tabs within the Platform Services Configuration window, select OK to save your settings.
To enable load balancing for a client machine or server, follow the steps below.
On the client or middle-tier machine where you are enabling load balancing, open the Workbench from Start > All Programs > ICONICS > Workbench.
On the ribbon's Tools tab, click the FrameWorX Server button.
Put a check mark in the Enable Load Balancing check box.
For information about additional fields on this dialog box, refer to the Configuring Redundant Clients for GENESIS64 Viewers topic.
Click OK when you are done.
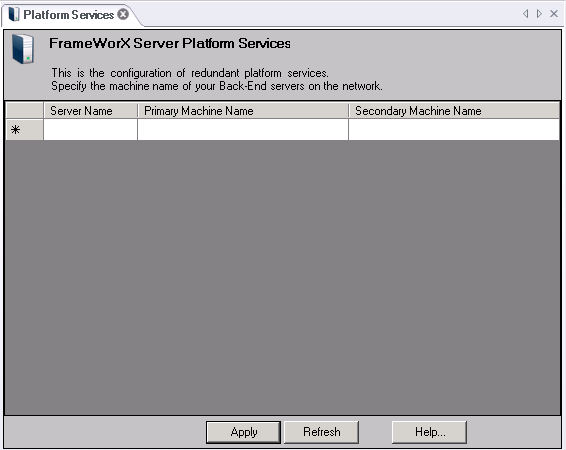
You can use the FrameWorX Server provider in the classic Workbench to configure redundant platform services by specifying the machine name of your Back-End servers on the network.
Open the Workbench and select the FrameWorX Server provider.
Expand the active database, then expand the BackEnd Servers branch.
Double-click the Platform Services sub-branch. This will open the FrameWorX Server Platform Services properties in the right-side pane of the Workbench.
Enter your Server Name, Primary Machine Name and Secondary Machine Name in the text entry fields.
Click Apply when you are done.
Support for ICONICS Security
Edge devices can now contain a security configuration. This allows the IoT Visualizer to be secured and for system administrators to limit the actions certain users can take via the Visualizer. The edge device security configuration is based on ICONICS suite security, but with a limited set of features based on the features that are available on edge devices.
Support for GenEvents
GenEvents on the edge device can now be recorded and viewed locally in the IoT Visualizer. GenEvents are logged for incidents such as a user writing to a point or logging in.
REST Interface for Third Party Containers
Other containers running on an edge device can communicate with IoTWorX containers using the REST API. This allows partners and systems integrators to create their own containers to integrate with ICONICS components on an edge device.
GenBroker and Health Monitor
GenBroker and Health Monitor support have been added to the IoT device installation. IoT edge devices do not currently support GenBroker or Health Monitor, but these configurations are still supported when deploying and managing 10.95 edge devices.
See also: