Setting up the Pager Agent with TAP
The ICONICS AlarmWorX Multimedia Pager Agent supports a wide variety of modems, pager services, and two of the most used protocols for a pager. This topic is designed to divide the configuration into three simple components:
For additional information, refer to the Multimedia Pager Agents and Configuring a Pager Agent topics.
Before you begin, make sure that UAC is turned off on your computer.
Modem Configuration
- Plug in the Modem Hardware.
- From Control Panel, select the Phone and Modem Option.
- Create or Edit the Dialing rules.
- Add the appropriate drivers for the modem hardware.
- Test the modem using a windows modem utility such as Hyperterminal.
NOTE: The actual dialogs vary between windows operating systems.
TAP Configurator
- Launch the ICONICS Multimedia configurator by going to Start -> Programs -> ICONICS AlarmWorX Multimedia -> AlarmWorX64 -> AlarmWorX Multimedia.
- Browse to Configurations Multimedia Agents Pager/SMS/GSM/TAP in the left-hand tree and open it on a new tab.
- Launch the TAP configuration, as shown in Figure 1, by clicking the General Settings button.
Figure 1 - Pager Agent General Settings
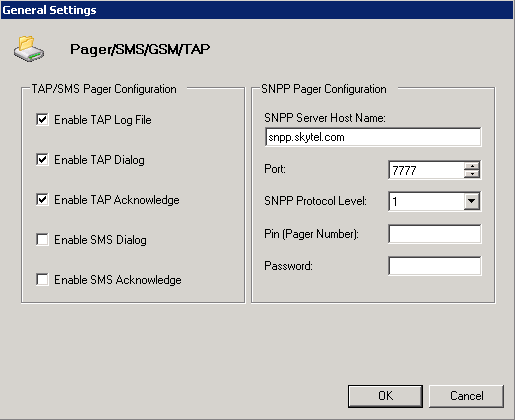
- TAP/SMS Diagnostics displays, giving you the option to view and log ISDN/GSM diagnostic messages during pager testing.
- Open Program Files -> Common Files -> ICONICS FWX64 -> BIN PagerCfg.exe and click on “Modem Configuration” to launch the TAP configurator.
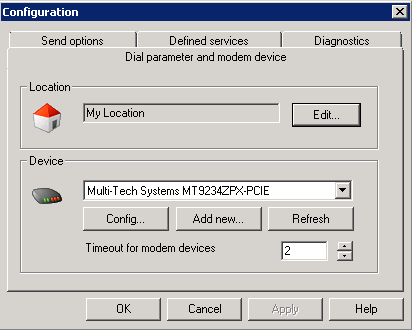
- Select the Message-Master Modem/ISDN and press the “Configuration” button.
- The Dial parameter and modem device are shown in Figure 2. Enter the following information:
-
- Location: this is the location set when configuring the Dialing rules.
- Device: select the device for the modem hardware.
- Timeout for modem devices: select the re-initialization time-out for the modem. This is in seconds.
Figure 2 - Modem/ISDN Configuration
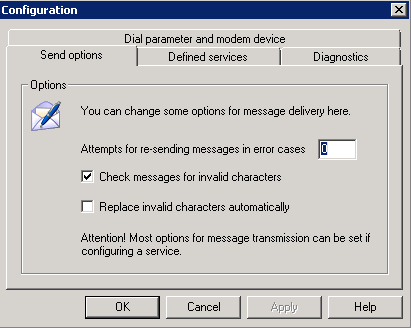
- On the Send options tab, shown in Figure 3, enter the following information:
-
- Attempts for re-sending messages in error cases: select the number of times to retry in case of error.
- Enable Check messages for invalid characters.
- If desired enable replace invalid characters automatically.
Figure 3 - Send Options
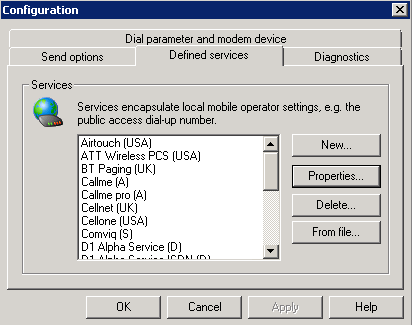
- On the Defined services tab, shown in Figure 4, check for your pager service provider. Verify the service modem’s phone number is correct by selecting the service provider and pressing the Properties button. The service provider number is on the additional tab under Number for dial-up terminal.
Figure 4 - Defined Services
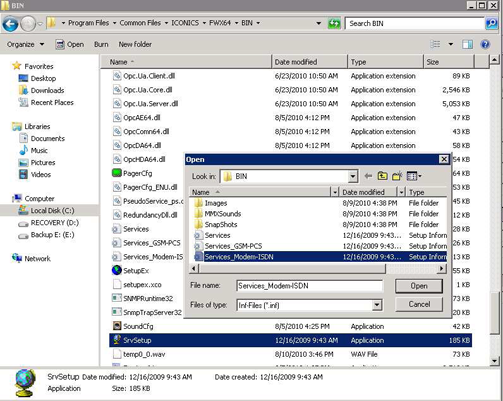
- If your pager provider is not already added, you need to open Program Files -> Common Files -> ICONICS FWX64 -> BIN and double-click on SrvSetup.exe. to run it.
- Open Services_Modem-ISDN.inf from the selector and choose to install your service provider in the list.
Figure 5 - Installing Service Providers
- This list that appears is the same list you see during installation. If your service provider is not in the list, you can click on “New” in the Configuration dialog shown in Figure 4. The details on how to configure a service provider is listed in the “Creating a New TAP Service” section later in this topic.
- On the Diagnostics tab, if you need diagnostic support enable the Write Communication Log File check box.
General Pager Configuration
- In the GENESIS64 Workbench, in the AlarmWorX64 Multimedia provider, right-click on Pager/SMS/GSM/TAP on the left-hand side, select Add Multimedia Agent Setting.
- Enter Pager Media Name.
- Enter Pager number. This is the phone number of the pager to contact. This is the same number you would use if you were paging from a touch-tone phone.
NOTE: If you are using the SkyTel pager service, you only need to enter the last seven digits of your pager number.
- Select a template.
- Select Use Modem/ISDN service and choose the service provider for your pager.
- Click Apply.
Creating a New TAP Service
The standard Multimedia pager installation includes dozens of pre-configured TAP services. If your particular service is not listed you can add it by following a few simple steps.
- Launch the Tap Configurator and select the Defined Services tab.
- If your service is not listed, click the New button.
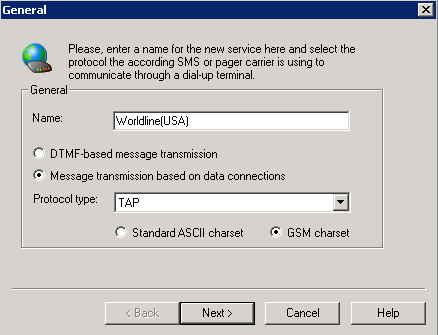
- On the General screen, shown in Figure 6, enter a name and message transmission based on data connections. For protocol type, choose “TAP”. Pick a character set and click Next.
Figure 6 - New defined service
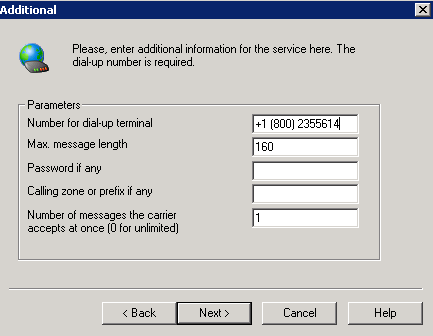
- On the “Additional” Screen, shown in Figure 7, fill in the fields using the information below and click Next.
-
- Number for dial-up: Enter service modem number. This is the phone number your modem will call to connect to the pager service provider. Your service provider will need to inform you of this number. This number needs to be in TAP format. For US the format is +1 (800) 2345678. For International numbers, the format is +44 (215) 2345678.
- Max message length: Chose the maximum number of characters to display per message.
- Password: Not necessary
- Calling zone: Not necessary
- Number of messages the carrier accepts at once: 1
Figure 7 - Define New Number
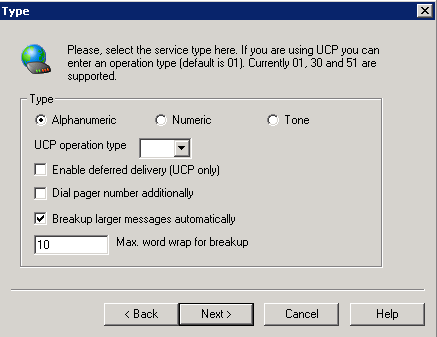
- On the Type screen, shown in Figure 8, fill out the fields using the following information, then click Next.
-
- Select the type appropriate to the pager. Generally this is Alphanumeric
- UCP operation type: NA
- Enable Breakup larger messages automatically
- Choose a maximum word-wrap for breakup. Generally, this will be a number that evenly divides into the maximum message length.
Figure 8 - Define Type
- On the Country Code tab, only enter a country code if it is required. Click Next.
- On the Terminal tab, select the modem or ISDN device and select the appropriate modem configuration for your modem. Click Next.
- Click Finished.
- Your new service is now available.
See also:
Multimedia Pager Agents