|
|
The features on this page require a GENESIS64 Advanced license and are not available with GENESIS64 Basic SCADA . |

![]()
|
|
The features on this page require a GENESIS64 Advanced license and are not available with GENESIS64 Basic SCADA . |
![]()
Workflows in CFSWorX are similar to those used within Workflow actions or within BridgeWorX in GENESIS64 and the Workbench.
To Create a Workflow Configuration for CFSWorX:
Expand your project in the Workbench, and then expand the Connected Field Service node.
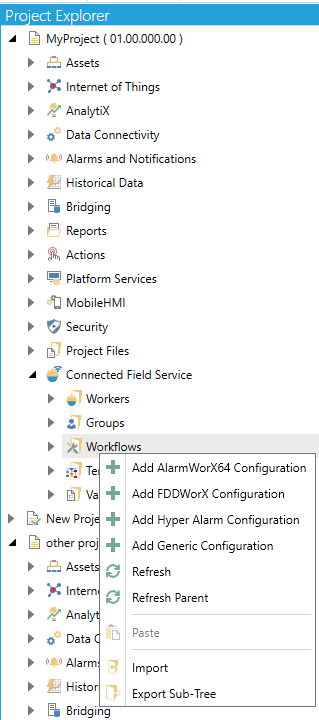
Right-click on the Workflows branch, then select Add Configuration from the pulldown menu, as shown below.
Add Workflow Configuration from the Project Explorer
-OR-
Select the Workflows branch in the Project Explorer then click on the Add Configuration button, shown below, in the Edit section of the Home ribbon in the Workbench.
Add Configuration Button

This opens the Workflow Configuration window, as shown below, within the Workbench. Enter a name for this configuration in the Name text entry field.
Workflow Configuration
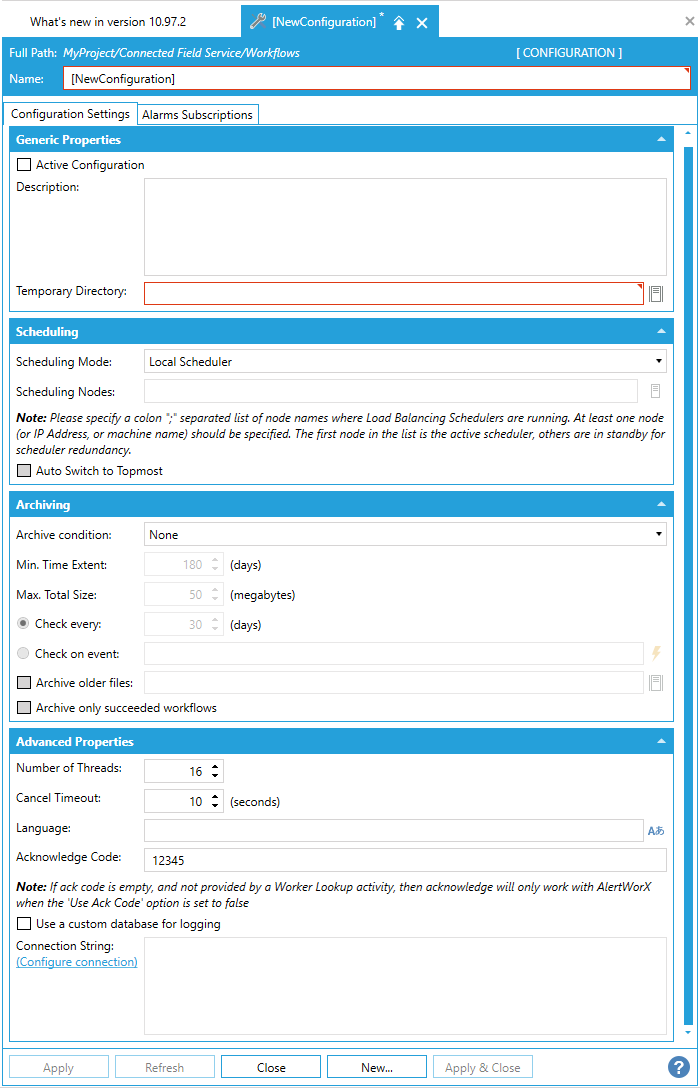
Workflow Configuration - Configuration Settings Tab
Generic Properties
Active Configuration -Check to make this configuration active.
Description -Enter a description for this workflow configuration in the text entry field.
Temporary Directory - Enter a temporary directory for the workflow configuration in the text entry field or click on the  button, which opens the 'Browse for Folder' window, where you can navigate to your selected directory.
Scheduling
Scheduling Mode - Use the pulldown menu to select from Local Scheduler or Distributed Load-Balancing Schedulers Network.
Scheduling Nodes - If you selected Distributed Load-Balancing Schedulers Network as the Scheduling Mode, you can enter scheduling nodes in the text entry field or click on the  button to open the Select one or more scheduling nodes window and choose from the listed options. Please specify a colon ":" separated list of node names where Load Balancing Schedulers are running. At least one node (or IP Address, or machine name) should be specified. The first node in the list is the active scheduler, others are in standby for scheduler redundancy.
Auto Switch to Topmost - Select this checkbox if you intend for the redundant schedulers to switch back to the topmost entry in the list when it comes back online.
Archiving
Archive condition -Use the pulldown menu to select from None, Minimum Time Extent, or Minimum Time Extend and Maximum Total Size.
Min. Time Extent -If activated, enter a minimum time extent (in days) in the text entry field, or use the up/down arrow buttons.
Max. Total Size - If activated, enter a maximum total archive size (in megabyters) in the text entry field, or use the up/down arrow buttons.
Check every -Select this option in order to check condition for a given period. Once selected, enter a number (in days) in the text entry field, or use the up/down arrow buttons
Check on event -Select this option in order to check condition on an event. Once selected, enter an event in the text entry field or click on the  button to open the Data Browser and navigate to your selected event.
Archive older files -Click this checkbox to archive older files. Once selected, enter a location for archiving older files in the text entry field or click on the button, which opens the 'Browse for Folder' window, where you can navigate to your selected location.
Archive only succeeded transactions -Click this checkbox to archive only succeeded workflow transactions.
Advanced Properties
Number of Threads -Enter a number of threads for the workflow in the text entry field, or use the up/down arrow buttons.
Cancel Timeout -Enter a time (in seconds) in the text entry field (or use the up/down arrow buttons) for timeout until cancellation.
Language -Enter a language to use within the workflow in the text entry field or click on the  button, which opens the 'Language Selector' window, allowing you to select your preferred language.
Acknowledge Code - An Alphanumeric id (must be numeric for voice alerts) that can be set up for use in acknowledging alerts sent via SMS, Voice or Email. This is used only if a workers acknowledge id/code is not set up in the worker list. Additionaly if the "Enable Acknowledge Id" is unchecked in Workbench > Alarms and Notifications > AlertWorX > General Settings, this code is ignored.
Use a custom database for logging -Check this box if you wish to use a custom database for logging with your workflow.
Connection String -If the previous checkbox was selected, you can enter a connection string in the now active text entry field or you can click on the (Configure connection) link, which opens the 'Select a logging database' window, where you can set Connection Settings properties. If you are upgrading a configuration from a previous version, you will either need to configure SQL Server with a certificate from a trusted certificate authority or you will need to update the connection strings. For each configuration, look under Advanced Properties. If "Use a custom database for logging" is checked, edit the database connection.
Workflow - Alarm Subscriptions tab
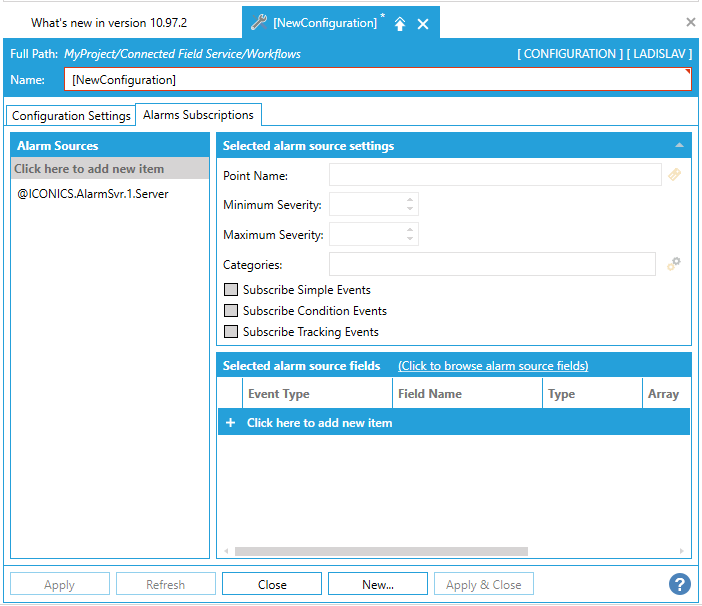
Alarm Subscription
Note: workflows can subscribe to both AlarmWorX64 Server alarms and FDDWorX (Facility AnalytiX) fault incidents.
(Click to configure fields and mapping) -Clicking this link opens the "Add/Remove fields from the subscription" window, where you can select from Server Fields based on Event/Alarm Type, Field Name, and/or Field Type. Within this window, you also have the option to Select/Unselect all. Click OK to return to the previous configuration form.
+ Click here to add new item -Click this link to add a new entry to the Alarm Subscription window.
Tag -Enter a tag in the text entry field or click on the  button to open the Data Browser and navigate to your selected tag.
Min. Severity -Add a minimum severity to the text entry field.
Max. Severity -Add a maximum severity to the text entry field.
Alarm Type -Use the pulldown menu to select an alarm type from Simple, Tracking, Condition, Simple & Tracking, Simple & Condition, Tracking & Condition, or All.
Triggering Workflows with Alarms that have Multiple States
New workflows are triggered by new alarms. A new alarm is defined by a unique alarm that has a new active time. Using the alarm server "Limit alarm" as an example, changing from LoLo to Hi does not change the alarm state. This will not trigger a new workflow. There are two options for forcing a change in behavior on state change:
Separate out the states into individual alarms.
Loop the workflow through condition blocks.
Including delays longer than 10 seconds will allow other workflows to run.
Once you have completed your configuration, click on Apply and then Close to return to the Workbench. Your new workflow configuration will now appear in the Project Explorer.
To Create a Workflow for CFSWorX:
Expand your project in the Workbench, then expand the Connected Field Service node, then expand the Workflows node. The next steps will require that you have already created a workflow Configuration via the steps above.
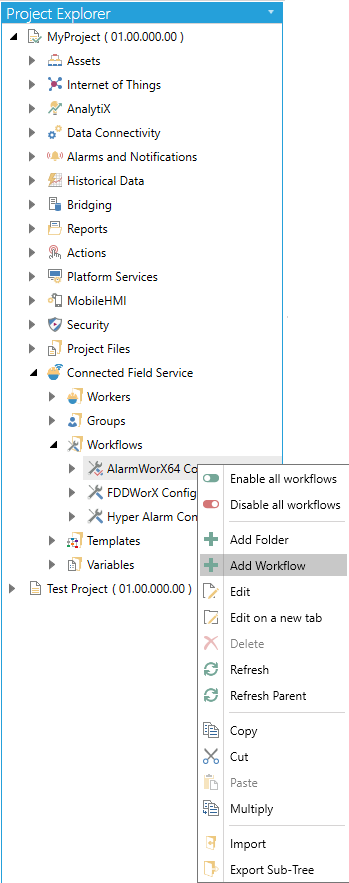
Right-click on a Configuration within the Workflows node, then select Add workflow from the pulldown menu, as shown below.
Add Workflow from the Project Explorer
-OR-
Select a Configuration within the Workflow branch in the Project Explorer then click on the Add Workflow button, shown below, in the Edit section of the Home ribbon in the Workbench.
Add Workflow Button

This opens the Workflow settings window, as shown below, within the Workbench. Enter a name for this Workflow in the Name text entry field.
Workflow Settings
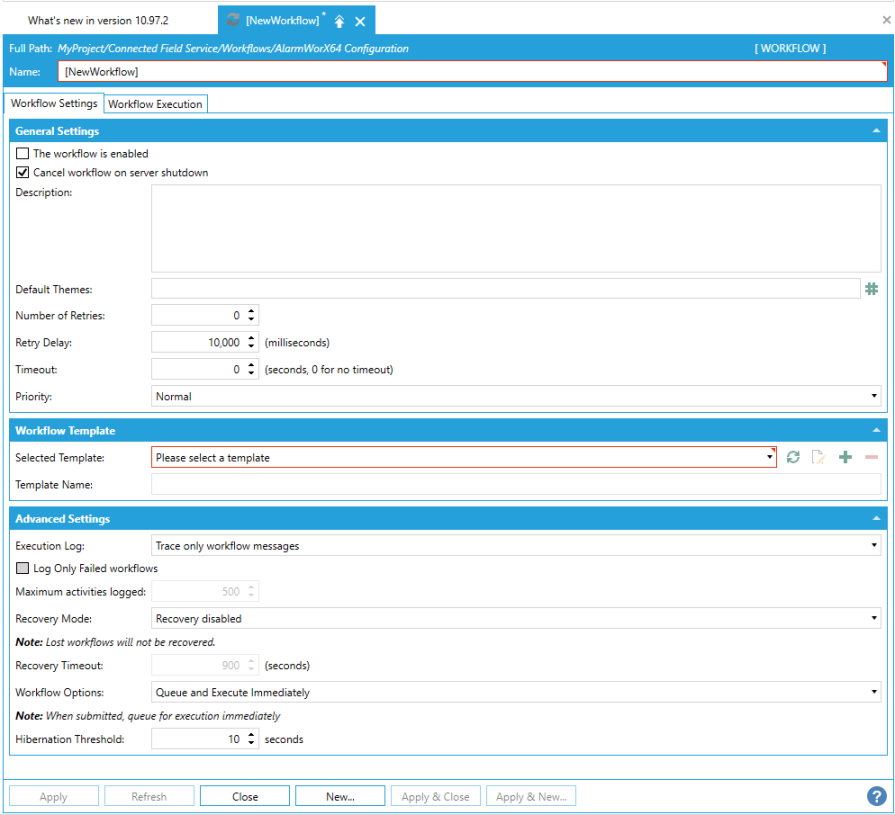
Workflow Settings Tab
General Settings
(Click to configure the alarm filter) - Click this link to configure settings for the alarm filter associated with this workflow.
The workflow is enabled - True to enable the current workflow.
Cancel workflow on server shutdown - True to cancel the current workflow when the containing server is shut down.
Description - Enter a description for the current workflow in the text entry field.
Default Themes - Enter default themes for the current workflow in the text entry field or click on the  button to open the Set Global Themes and Aliases window and configure your selected Themes and/or Aliases.
Number of Retries - Enter the number of retries (in the text entry field or use the up/down arrow buttons) to run the workflow should it be kept from immediately doing so.
Retry Delay - Enter the number, in milliseconds, (in the text entry field or use the up/down arrow buttons) as to how long to wait in between retry attempts of running the workflow.
Timeout - Enter the number, in seconds, (in the text entry field or use the up/down arrow buttons) as to when to time out in the attempt at running the workflow. Enter '0' for no timeout.
Priority - Use the pulldown menu to select a priority for the workflow. The choices include Normal, Below Normal, or Above Normal.
Workflow Template
Selected Template - Use the pulldown menu to select from listed Templates. Click on the  button to refresh the list of templates. Once selected, you can click on the
  button in order to edit the selected template. Click on the
  button to add a new template. Click on the
  button to delete the selected template.
Template Name - Enter a name for the selected template in the text entry field. This field may be pre-filled from using the Selected Template pulldown above, but can still be changed.
Advanced Settings
Execution Log - Use the pulldown menu to select from "Trace only workflow messages", "Trace workflow and activity information", or "Trace workflow information, activity information and every data step within the activity".
Log Only Failed workflows - (When activated) - True to log only failed workflows.
Maximum activities logged - (When activated) - Enter the number, in the text entry field or using the up/down arrow buttons, of maximum activities to be logged. Runtime would write to workflow log only that many last activity entries, counting both retries and repeats in loop(s). So if workflow executes many loops, the log does not grow infinitely.
Recovery Mode - Use the pulldown menu to select from "Recovery disabled" or "Local Recovery". Note: If "Recovery disabled" is selected, the last workflows will not be recovered. If "Local Recovery" is selected, the last workflows will be automatically restarted from the beginning on the same server where they are recovered. The recovery state will be monitored by the local server only.
Recovery Timeout - Enter the number, in seconds, (in the text entry field or use the up/down arrow buttons) after which the attempt at recovery will timeout.
Workflow Options - Use the pulldown menu to select from "Queue and Execute Immediately" (when submitted, queue for execution immediately), "Execute if the workflow is unique" (when submitted, queue for execution immediately and execute if no other similar workflow is executing), or "Queue if the workflow is unique" (when submitted, queue for execution immediately if no other similar workflow is queued, and execute if no other similar workflow is executing) .
Hibernation Threshold - If workflow diagram has one of more Delay Activities configured with a hard delay longer than Dehydration Threshold, such workflow will dehydrate and hibernate during configured Delay period instead of a live wait. Shorter delay settings of Delay Activities (or any soft delay values) would not cause dehydration; such Delay will be handles by runtime without workflow hibernation. Enter the number, in seconds, (in the text entry field or use the up/down arrow buttons) to set this threshold.
Alarms and Triggers tab
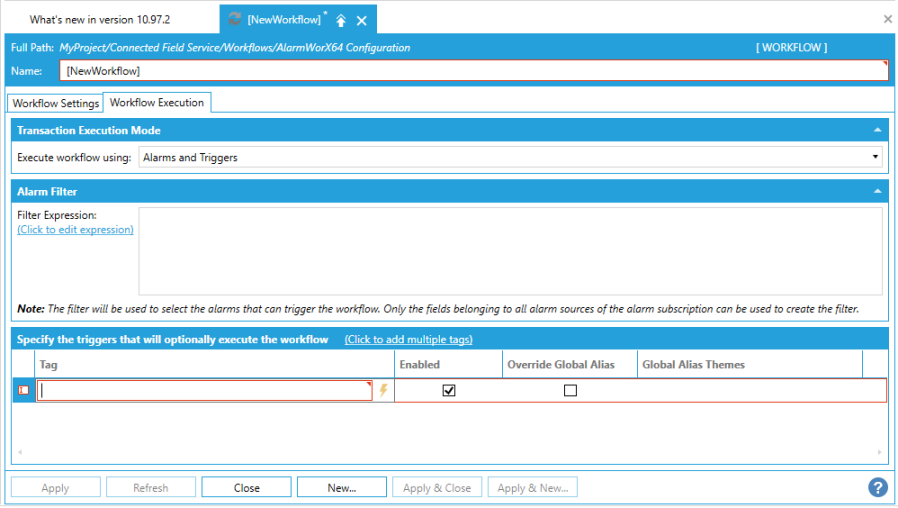
Specify the triggers that will optionally execute the workflow
(Click to add multiple tags) - Click this link to open the Data Browser and navigate to your selected tags.
+ Click here to add new item - Click here to add a new tag to the list.
Enabled - True to enable selected tag.
Override Global Alias - True to override previously set global alias for this tag.
Global Alias Themes - Click this field to activate the text entry field. Enter global alias themes in the text entry field or click on the button to open the Set Global Themes and Aliases window and configure your selected Themes and/or Aliases.
Click on Apply to save your workflow, then Close to return to the Workbench.
Alarms tab

Alarms tab Showing a Filter Expression
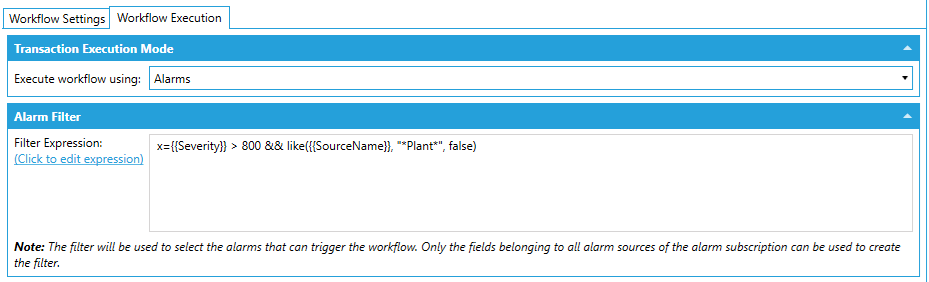
Starting version 10.97.1, only a short field name, such as {{OriginalSource}} is accepted. The full field name, such as {{BaseConditionType.OriginalSource}}, is converted on the fly to the short field name, so filters that were originally configured in earlier versions will continue to work.
See Also:
Workflow Load Balancing and Redundancy