|
|
The features on this page require a GENESIS64 Advanced license and are not available with GENESIS64 Basic SCADA . |
|
|
The features on this page require a GENESIS64 Advanced license and are not available with GENESIS64 Basic SCADA . |
Grouping simplifies work with a large set of data tags. Groups can be used to distribute a value written to one tag to a collection of tags. Groups can be used within a group.
Grouping allows you to write a single variant value to a group of data tags. Each group of tags is represented by a group data tag. Group data tags are organized in a tree structure of folders and group items. Since each group is represented as a data tag, a group data tag may also be included in other groups. Group values are written synchronously to target OPC servers.
Any write to a group data tag distributes written values to all data tags included in the group; all included data tags will have the same value as the group data tag. Once you have configured groups, they can be accessed from many applications via the appropriate tab in the Unified Data Browser. This topic describes how to define a new group, and then provides an example that shows how to use the group.
To Add a New Group:
Start the Workbench, then expand your project. Next, expand the Platform Services node to show the Unified Data Manager provider.
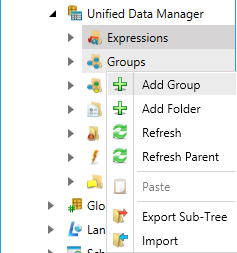
Right-click the Groups node and select the New Group command from the context menu.
Adding a New Group

NOTE: You can also create a new Folder instead of a new Group. Folders are used to logically organize the groups.
-OR-
Select the Groups node, then click on the Add Group button, shown below, in the Edit section of the Home ribbon in the Workbench.
Add Group Button

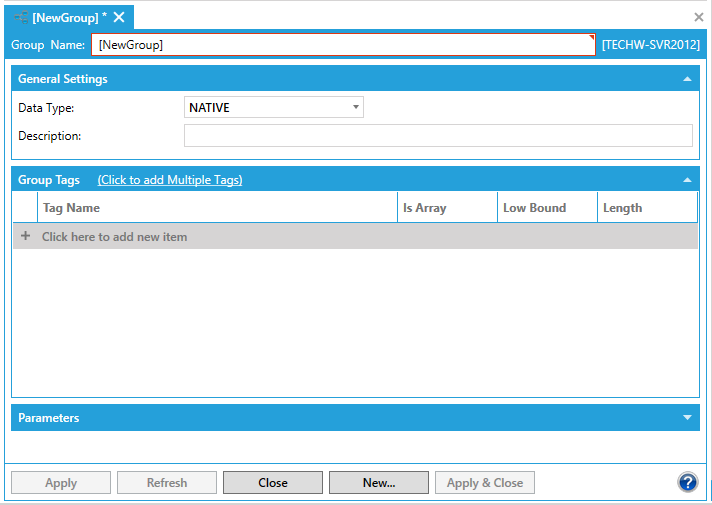
The Group properties window appears, as shown below, beneath the Project Details section in the Workbench.
Group Properties

Enter a unique name in the Group Name text entry field.
Specify the Data Type via the pulldown menu. Select from the following data types: Native, Float, Double, Boolean, Byte, Word, DWord, Character, Short, Long, String.
Each group must have a data type that will be used a base data type for grouped data tags. All the data tags in the group are requested with this base data type, so the OPC server has to allow its conversions. When a data tag cannot be requested with a specified data type, then it will be ignored. An error then will be reported to the GenEvent Server.
Enter a description in the Description field (optional).
In the Group Tags section, you can assign one or more tags to the group.
To add one tag at a time, click the  button on the line where you are adding it. (Note that to enable the
  button, you must first click in the Tag Name column.) Clicking the
  button opens the Data Browser where you can select a tag and click OK. The tag gets added to the Group Tags tab.
To add several tags at once, click the Click to Add Multiple Tags link. This opens the Data Browser, where you can:
Right-click on a tag in the Data Browser and click Enter Up. The tag gets added to the Point Name box.
Continue to add tags. The Point Name box will accumulate the tags you add to it.
Click OK to close the Data Browser and return to the Group Tags tab. All of the accumulated tags will appear on the tab.
Back in the Group Tags tab, for each tag you add, define whether the tag is an Array of values, limit the Low value, and set the Length of the value returned (optional).
In the Parameters section, enter any parameters desired, assigning them a name, type (number or string), padding alignment (none, left or right), the characters used to pad with (for example, 0s), and the number of places that the parameter will be padded up to (optional). Parameters are explained in the Parameters section below.
Click the Apply button to enforce your settings.
Parameters are client-driven, and they do not change the number of requested data tags in runtime. Parameters can replace parts of data tag names by values passed in the group data tag name. Each parameter can be an integer or a string data type with optional formatting. If you had a number of models of a certain type and wanted to add a description to the front of each model number, you could do so with a parameter. Each data tag may support parameters) that could modify names of the data tags. Each parameter can be integer or string data type with optional formatting.
The client application passes configured parameter values as a part of the full data tag name. Parameters are client driven, and they do not change the number of requested data tags in runtime. Parameters can be integer or string values. These values are then formatted using pre configured format data, and then they replace specific parts of a data tag name by values passed in the data tag name. Parameters are delimited with specific characters (e.g., << and >>) and specified by their names (e.g., ICONICS .Simulator.1\SimulatePLC\Ramp<<Parameter1>>) in the data tag name.
A group data tag can contain an unlimited number of data tags. Since each group is represented as a data tag, a group data tag may also be included in other groups. In the Group Tags tab you can specify a list of tags that will be included in the group data tag. You choose tags from connected OPC servers and databases.
Each data tag consists of the following attributes:
Fully qualified data tag name (parameters or regular expressions can also be used) represented as a string
Boolean flag that specifies whenever the tag is an array
Array length – integer, valid when array flag is set to true
Array lower bound - integer, valid when array flag is set to true
Selecting new Group from Data Browser

NOTE: If the value appears to be an * for a value, it could be that the value is not initialized. As long as the tag has good quality you can write to it, which will then provide a visible value.
Often you may want to have one group of tags that would control several collections of identical tags (e.g. different floors). In this case, it is advantageous to use parameter in tag names.
Adding a new parameter

Grouped tags with parameters

Browsing for Group that has parameters

@grp64:ParamGroup(1).Value
@grp64:ParamGroup(2).Value
See Also: