|
|
The features on this page require a GENESIS64 Advanced license and are not available with GENESIS64 Basic SCADA . |

![]()
|
|
The features on this page require a GENESIS64 Advanced license and are not available with GENESIS64 Basic SCADA . |
![]()
The Deployment section of the ProjectWorX Ribbon allows users to utilize packages of projects for future use, potentially on the same or different machine(s), for Runtime use or for further Configuration.
Deployment Section of the ProjectWorX Ribbon in the Workbench

The Deployment section is comprised of the following components:
The Pack & Go feature allows users to move whole configurations from one installation to another using a single file. It includes only the Configuration data itself, packing both files and database data. It also includes the ability to restore the active database.
To Pack a Project:
Pack & Go Button

Pack and Go Wizard
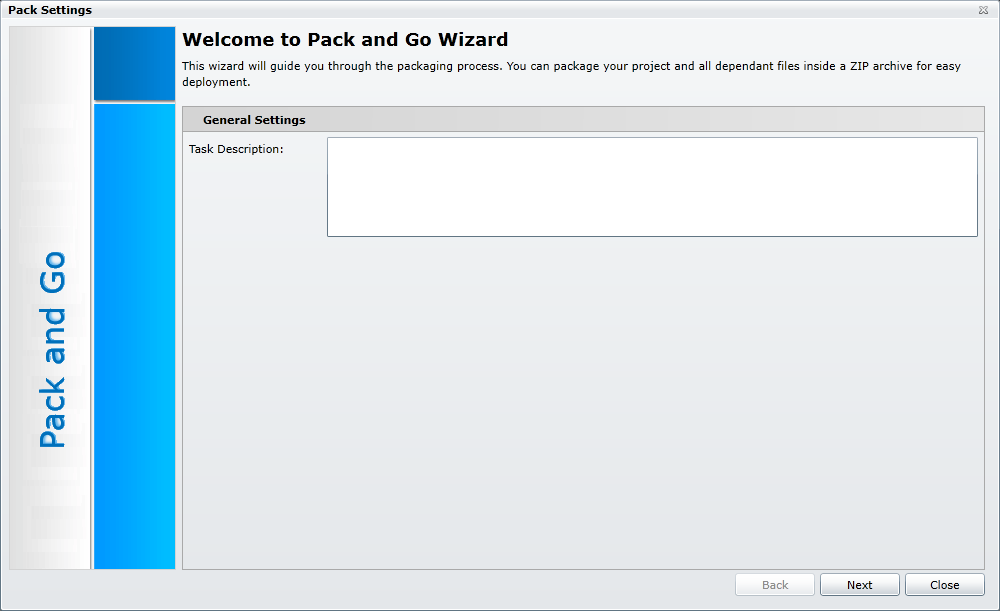
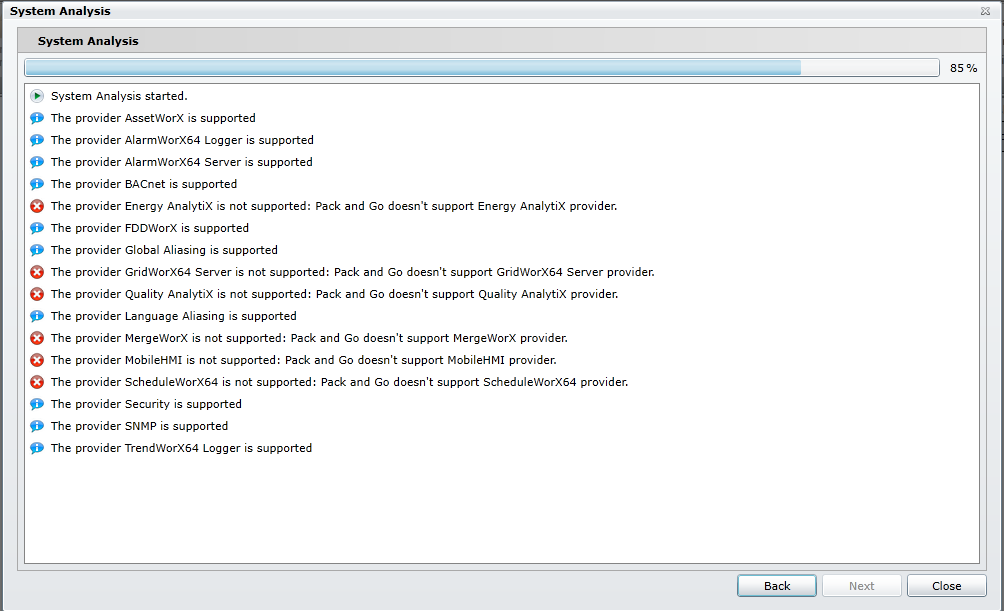
The System Analysis screen appears. You will see a listing of the providers contained in your project that are, or are not, supported, as shown below. Review the analysis results, then click Next to continue. At this point in the wizard, you may also click on the Back button to change any previously made settings.
System Analysis
The Advanced Settings screen appears, as shown below.
Advanced Settings
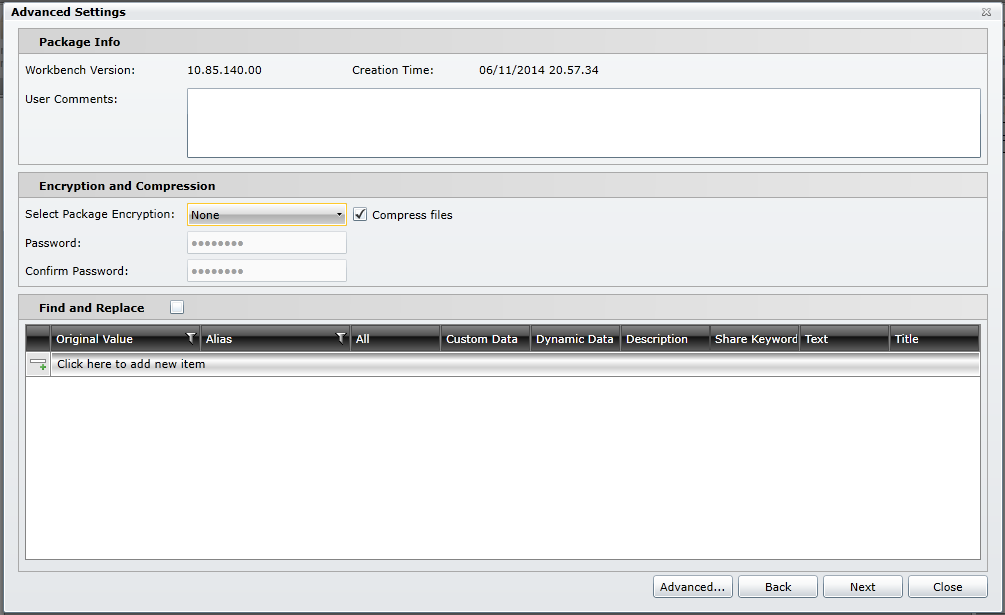
The Pack and Go Wizard will automatically show the Workbench Version and Creation Time of your current project.
User Comments - Use the text entry field to include any information you feel should accompany your packed project, including any instructions or any identifying features for this specific project that you feel may be useful for whomever will unpack it later.
Select Package Encryption - Use the pulldown menu to select the type of package encryption you would like for the packed project.
None - Select this to include no password protection or encryption for your packed project.
Protected - Select this to include password protection only for your packed project.
Encrypted - Select this to include both password protection and file encryption for your packed project.
The Password and Confirm Password fields are activated once you choose Protected or Encrypted from the pulldown menu.
Password - Choose a Password for your packaged project.
Confirm Password - Enter the same password again.
Compress files - Click this checkbox to reduce the file size of your packed project.
Find and Replace - Click on this checkbox in order to activate the lower section of the Advanced Settings window.
Click here to add new item - Click on this to add a new item for search and replacement in the packed project. For each value to be replaced, enter an Original Value and Alias, and then specify properties where replacements are to be made by selecting from All, Custom Data, Dynamic Data, Description, Share Keyword, Text, and/or Title. These properties are described in the table below. Once you start to edit one row, a new row will appear beneath it. The log file that is created after packing and unpacking will show you what strings were replaced. Once you have finished making your entries, click Next.
Properties Where Replacements Are to Be Made
|
Option: |
Replaces the Original Value in the following properties: |
|
All |
All of the properties listed below |
|
Custom Data |
CustomData property of objects |
|
Dynamic Data Source |
OPC tags used as data sources in objects' DataSource property |
|
Description |
Description property of objects |
|
Share Keyword |
ShareKeyword property of objects |
|
Text |
Text property of objects |
|
Title |
Title property of objects such as AlarmWorX and TrendWorX objects |
Clicking the Advanced... button opens the following Pack Selection window.
Pack Selection
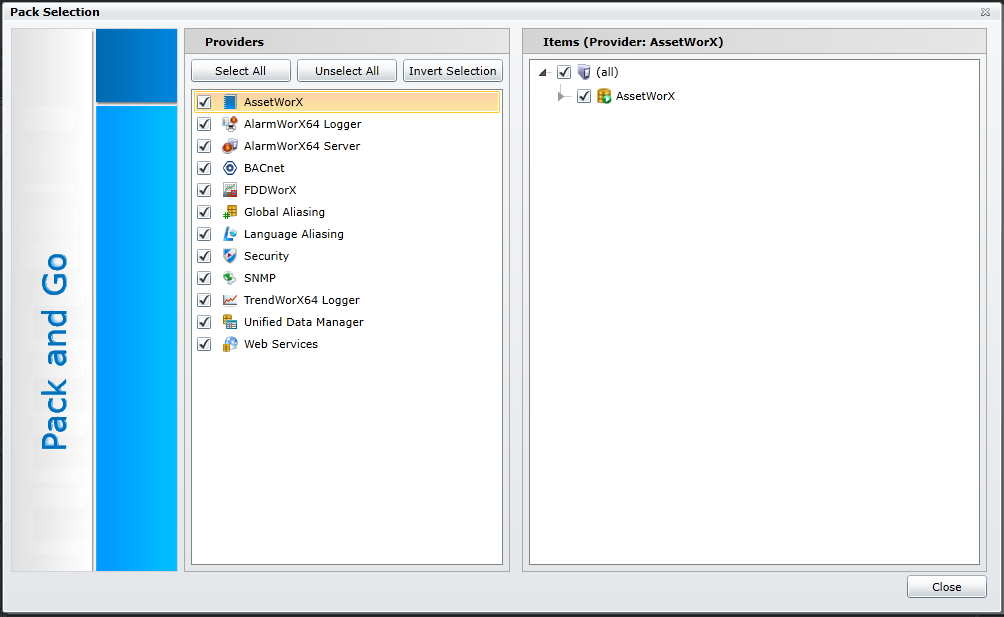
You have the option of selecting individual Providers to be included in the packed project. You can also Select All, Unselect All or Invert Selection.
You can also select individual Providers and then select specific Items in the section to the right. The Items section is set up to mimic each Provider's Tree Explorer, allowing you to expand branches/nodes in order to select certain items for inclusion in the packed project.
Once you have finished making your selection of Providers and Items, click on the Close button and you will return to the Advanced Settings window.
Once you have finished updating your Advanced Settings, click on Next.
The Display File Selection window appears, as shown below.
Display File Selection
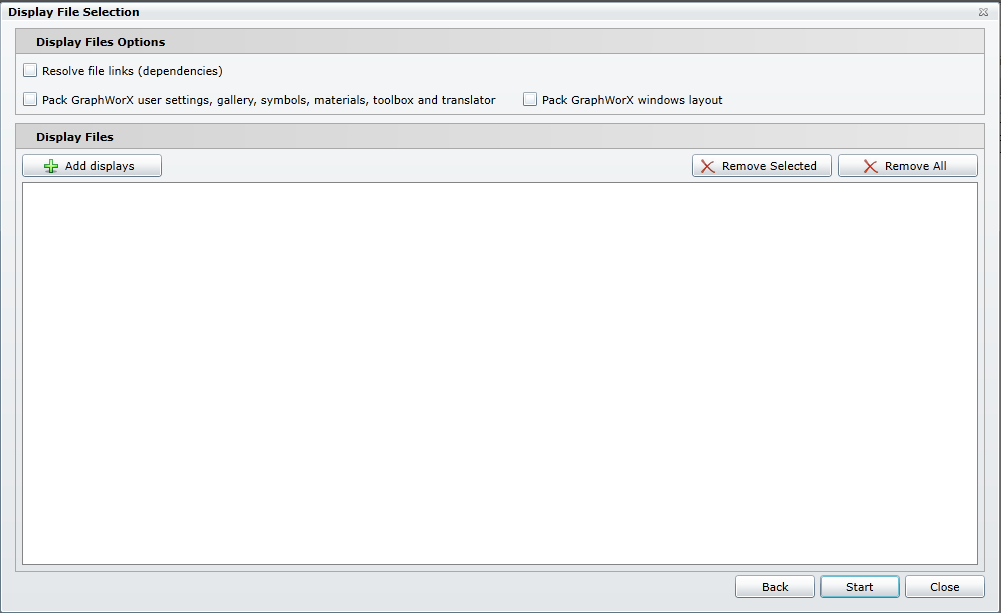
Resolve file links (dependencies) - Click this checkbox to have the Pack and Go Wizard resolve file links (dependencies) in the packed project.
Pack GraphWorX user settings, gallery, symbols, materials, toolbox and translator - Click this checkbox to include GraphWorX components (user settings/gallery/symbols/materials/toolbox/translator) in your packed project.
Pack GraphWorX windows layout - Click this checkbox to include GraphWorX windows layout in your packed project.
Add displays - Click this button to launch a file browser, allowing you to navigate to display files that you would like included with your packed project.
Remove Selected - Once you have display files listed in this window, you can click on individual items and then this button to clear them from the list of those to be included with the packed project.
Remove All - Once you have display files listed in this window, you can click on this button to clear them all so that they won't be included with the packed project.
Once you have made your desired updates to this window, click Start to begin packing your project.
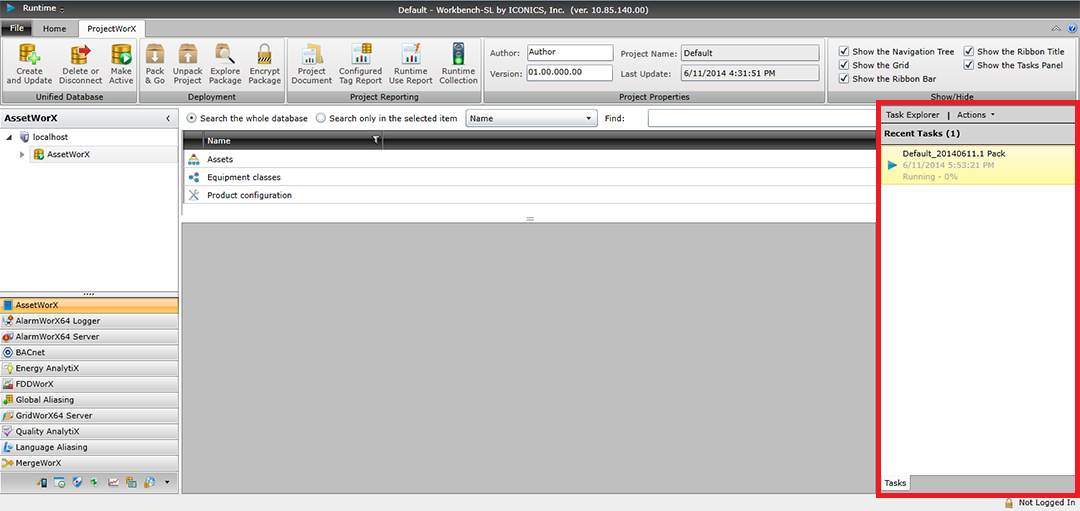
the Workbench then begins to process the packaged project. You can see the status of the project in the Task Panel in the right side of the Workbench, as shown below.
Pack & Go Project Status in the Task Panel in the Workbench
Right-click the task in the Tasks Panel to see related options, as shown below. Note: These are the same options (except for 'Show task explorer') that are available for the same task type in the Task Explorer.
Right-click Options for a Pack Task in the Tasks Panel
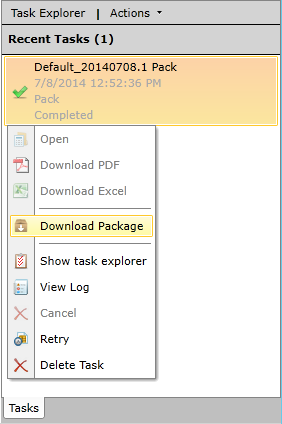
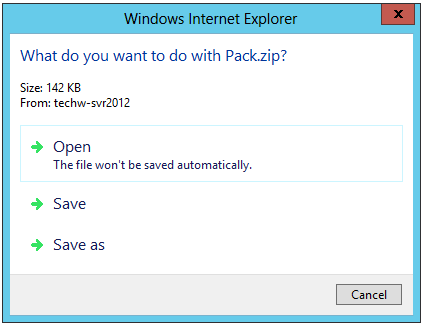
You can select to Download Package, as shown above. The following window appears, as shown below. You have the option to Open the file directly into the Workbench (Note: The file won't be saved automatically.). You can Save the file with the currently set file name in the default location or click on Save as in order to set your own file name and destination. Once saved, the packed file is now able to be unpacked for future use.
Download Package Options
The Unpack Project feature works in tandem with the Pack & Go feature to utilize saved (or "packed") configuration files. These files contain Configuration data (both files and database data) and the ability to restore an active database.
To Unpack a Project
Unpack Project Button

Unpack Wizard
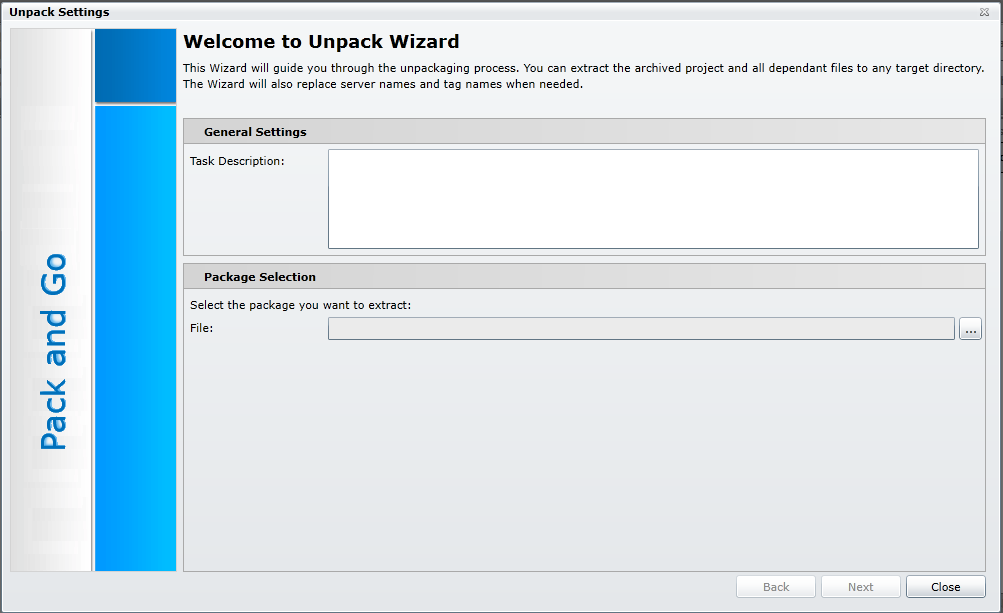
Task Description - Enter a description for this specific unpack task in the text entry field (optional).
File - Select the package you wish to extract by entering the location in the text entry field. You can also click on the ellipsis button [...], which launches a file explorer, allowing you to locate your previously packed configuration/project. This can be a Package file (.pkgz) or a compressed file (.zip)
Once you have selected your intended file, click Next to continue.
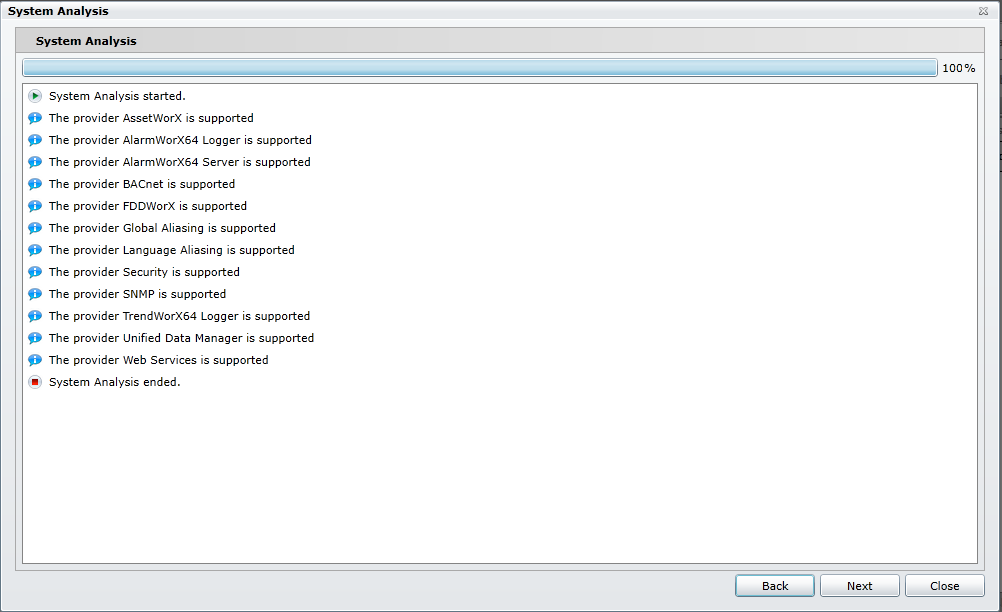
The System Analysis screen appears. You will see a listing of the providers contained in your project that are, or are not, supported, as shown below. Review the analysis results, then click Next to continue. At this point in the wizard, you may also click on the Back button to change any previously made settings.
System Analysis
The Advanced Settings screen appears, as shown below.
Advanced Settings
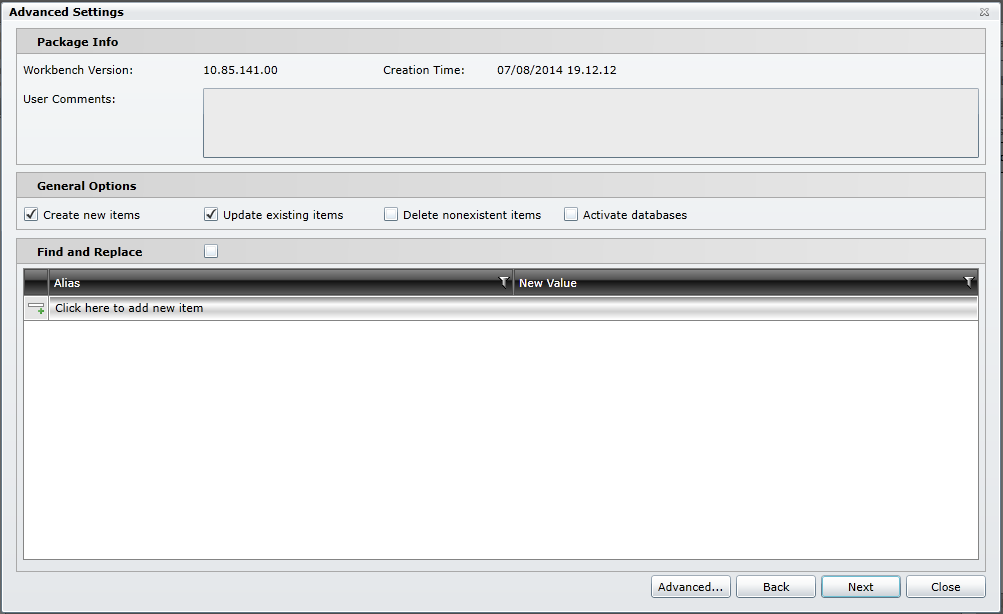
The Pack and Go Wizard will automatically show the Workbench Version and Creation Time of your current project.
User Comments - Use the text entry field to include any information you feel should accompany the project to unpack, including any instructions or any identifying features for this specific project that you feel may be useful after unpacking.
Create new items - Click this checkbox to allow items that exist in your selected packed project but do not yet exist in the current the Workbench project to be created as new items.
Update existing items - Click this checkbox to allow for items that exist in your selected packed project to update/overwrite the same items in the current the Workbench project.
Delete nonexistent - Click this checkbox to delete existing items in the current the Workbench project that do not exist within your selected packed project.
Activate databases - Click this checkbox to set the databases from your selected packed project as the active databases within their respective the Workbench providers.
Find and Replace - Click on this checkbox in order to activate the lower section of the Advanced Settings window.
Click here to add new item - Click on this to add a new item for search and replacement in the packed project. For each value to be replaced, enter an Original Value and Alias, and then specify properties where replacements are to be made by selecting from All, Custom Data, Dynamic Data, Description, Share Keyword, Text, and/or Title. These properties are described in the table below. Once you start to edit one row, a new row will appear beneath it. The log file that is created after packing and unpacking will show you what strings were replaced. Once you have finished making your entries, click Next.
Properties Where Replacements Are to Be Made
|
Option: |
Replaces the Original Value in the following properties: |
|
All |
All of the properties listed below |
|
Custom Data |
CustomData property of objects |
|
Dynamic Data Source |
OPC tags used as data sources in objects' DataSource property |
|
Description |
Description property of objects |
|
Share Keyword |
ShareKeyword property of objects |
|
Text |
Text property of objects |
|
Title |
Title property of objects such as AlarmWorX and TrendWorX objects |
Clicking the Advanced... button opens the following Unpack Selection window.
Unpack Selection
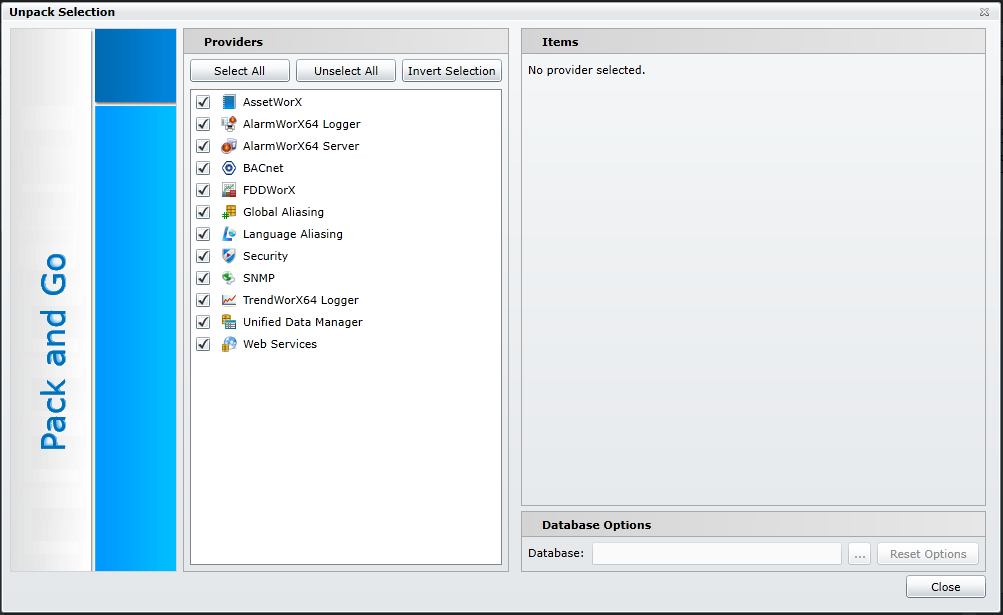
You have the option of selecting individual Providers to be included in the unpacked project. You can also Select All, Unselect All or Invert Selection.
You can also select individual Providers and then select specific Items in the section to the right. The Items section is set up to mimic each Provider's Tree Explorer, allowing you to expand branches/nodes in order to select certain items for inclusion in the packed project.
Once you have finished making your selection of Providers and Items, click on the Close button and you will return to the Advanced Settings window.
Once you have finished updating your Advanced Settings, click on Next.
The Display File Selection window displays, as shown below.
Display File Selection
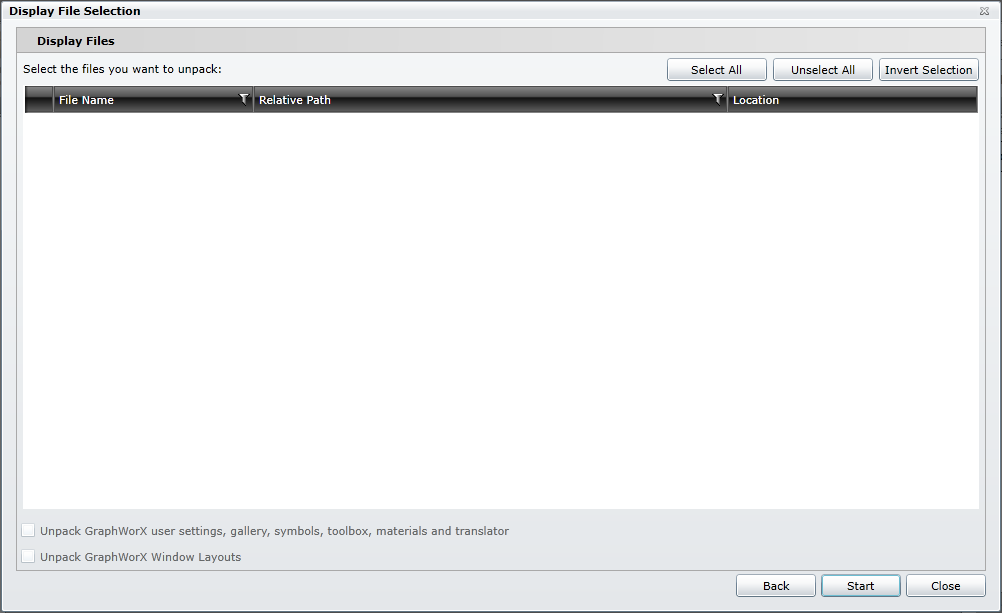
Select the files you want to unpack.
Select All - Click this checkbox to select all the files listed for their inclusion in the current the Workbench project.
Unselect All - Click this checkbox to unselect all currently selected files.
Invert Selection - Click this checkbox to invert any currently files (from selected to unselected and from unselected to selected).
Unpack GraphWorX user settings, gallery, symbols, materials, toolbox and translator - Click this checkbox to include GraphWorX components (user settings/gallery/symbols/materials/toolbox/translator) in your unpacked project.
Unpack GraphWorX Window Layouts - Click this checkbox to include GraphWorX windows layouts in your unpacked project.
Once you have made your desired updates to this window, click Start to begin unpacking your project.
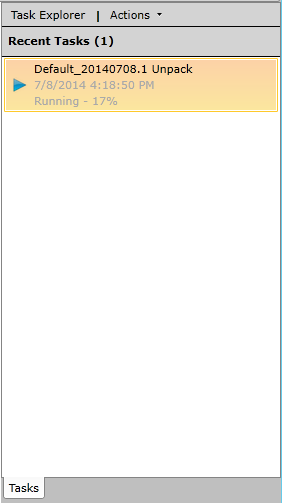
The Tasks Panel will then show the status of the unpacking, as shown below.
Unpack Task Status in Tasks Panel
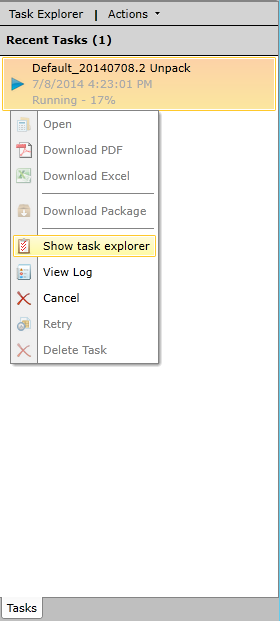
You can right-click on the running task to perform other actions, such as Show task explorer or View log, both which will show more details about the unpacking process, as shown below.
Unpack Task Right-click Options
Unpack Task Log
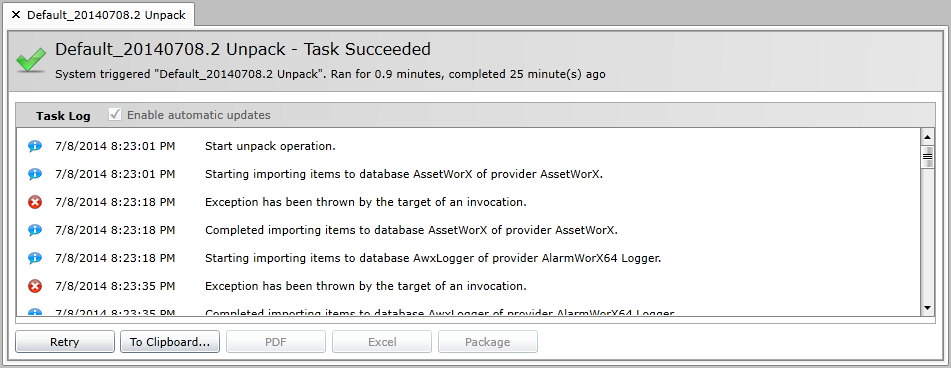
Once the Unpack Task has completed, you can check the the Workbench Project Explorer to see the results.
The Explore Package feature allows users to review the elements of a package while they are still in a packed file format.
To Explore a Package:
Explore Package Button

Explore Package Window

Select the package you want to explore by entering the file location in the text entry field or click on the ellipsis button [...] to access the file browser, which allows you to navigate to your selected package.
Once you have selected your package (created via Pack & Go), it will enable the Database tab and populate the Providers field, as shown below. If displays were included in the packed project, the Files tab will also be activated.
Explore Package Window - Database Tab Activated and Populated
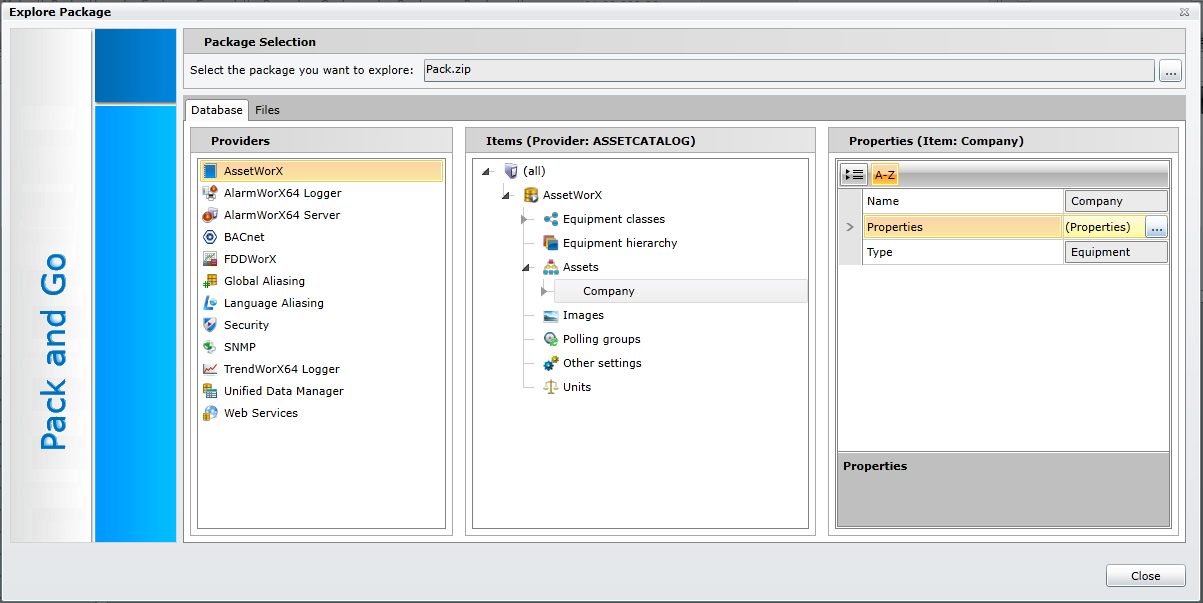
Selecting a provider in the Providers section allows you to see its contained Items in the next column, as shown above. This set-up is similar to how you would normally expand the branches of a provider within the Tree Explorer in the Workbench. You can explore further by selecting an Item, which then lists its Properties in the third column. The example above shows Properties for the 'Company' asset within the AssetWorX provider.
Within the Properties listing for most items, you can click on the ellipsis button [...], which will open an additional window allowing you to see properties for associated items. In the example below, the 'Company' item includes additional properties including Name, Description, Enabled, CustomIdentifier, Created, etc. Clicking on an Item in the right column allows you to see its Properties in the right column. In some instance, you can Add or Remove items via the buttons on the bottom left of the window.
Properties Window
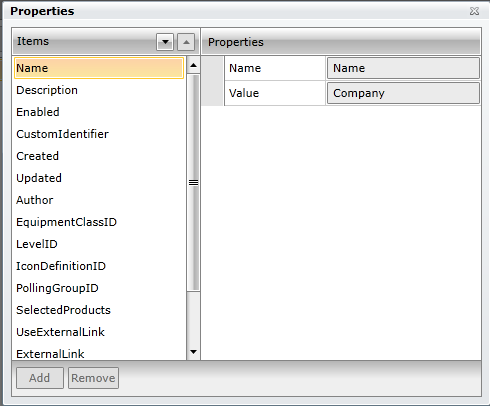
Click the [X] button in the top right to close the Properties window.
Click Close to close the Explore Package window.
The Encrypt Package feature allows users to set encryption and/or password protection for previously generated packed projects. [Note: These settings are available as part of the packing procedure itself. This button is to retroactively add encryption or password protection to existing files].
To Encrypt a Package:
Encrypt Package Button

Package Protection Window
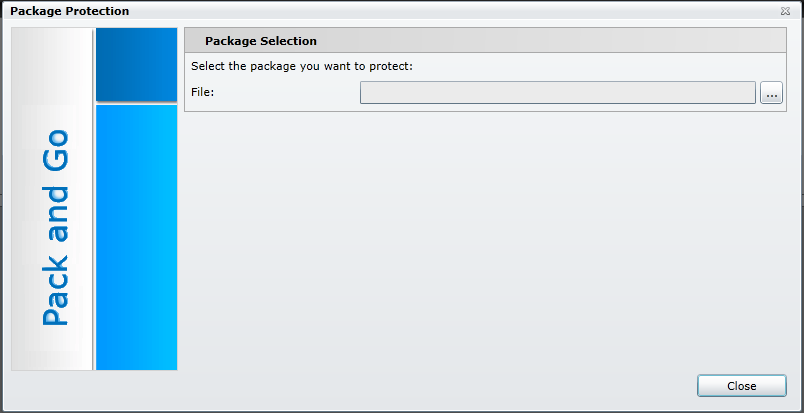
Package Selection - Select the package you want to protect by entering its location in the text entry field or click on the ellipsis button [...], which will open a file explorer, allowing you to navigate to your selected packed project.
Once you have selected a packed project to encrypt, the Package Protection section of the window is enabled, as shown below.
Package Protection Section Enabled
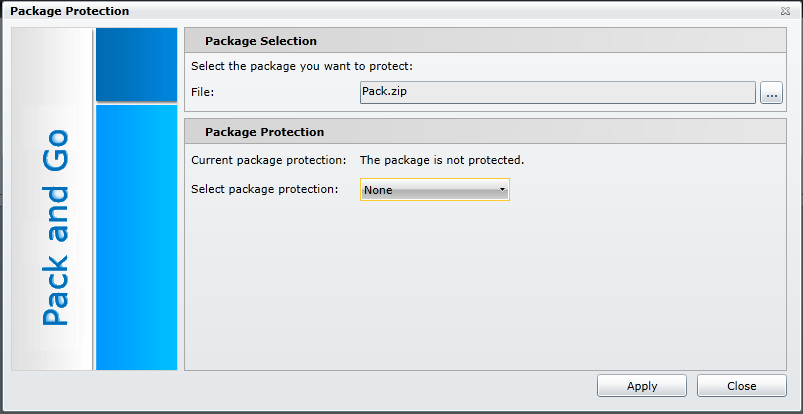
Current package protection - This will show the current state of the protection of the selected packed project.
Select package protection - Use the pulldown menu to select the type of package encryption you would like for the packed project.
None - Select this to include no password protection or encryption for the packed project.
Protected - Select this to include password protection only for your packed project. [NOTE: Password protection can be challenged with the help of ICONICS Technical Support, but provides only limited security as the package is not encrypted.]
Encrypted - Select this to include both password protection and file encryption for your packed project. [NOTE: If you lose or forget the password for encryption, it cannot be recovered. It is advisable to keep a list of passwords and their corresponding package names in a safe place. Remember that passwords are case sensitive.)
Password - Choose a Password for your packaged project.
Confirm Password - Enter the same password again.
Click Apply to save your settings.
See Also: