![]()
![]()
With GraphWorX64, you can import 3D models, clipart, and objects from other GraphWorX64 displays and templates. You can import models and clipart for use in both the 2D and 3D realms of GraphWorX64. And because GraphWorX64 displays are saved in *.xaml format, you can even import a GraphWorX64 display in order to pull in the objects that are in that display.
For example, it is likely you will import a majority of your 3D models from files created using other tools. Roughly 90% of the graphics formats that are available on the market can be imported directly into GraphWorX64, or converted to *.xaml and then imported.
|
|
Warning. A model that is created in a high-fidelity CAD program typically contains details, such as nuts and bolts, that are not necessary for use in real-time applications such as GraphWorX64. Such details typically are not monitored, their inclusion in a GraphWorX64 display does not provide feedback to the operator and, in most cases, there is no advantage to including them in a display. It is important to eliminate these unneeded details wherever possible because they add to the number of polygons in a model, which can become a burden for the graphics card and can slow the runtime performance of GraphWorX64. For this reason, before you export any model or clipart or object:
|
This topic describes the following options:
GraphWorX64 comes with a free importer for the following file formats:
3DS (3D Studio, a royalty-free and prolifically-used tool).
XAML (Extensible Application Markup Language).
DAE (Digital Asset Exchange, a COLLADA file typically used for 3D clipart) specifications 1.4.1 and 1.5.0. All revolute joints are automatically transformed into GraphWorX64 rotation dynamics and prismatic joints are transformed into location dynamics
OBJ files
BIM (Building Information Modeling)
gbXML (An industry supported schema intended for sharing building information between different building design software tools)
All GraphWorX64 display file formats
NOTE: Imported image files in the *.psd format cannot be opened. It is recommended that users update the source project (from where the images will be imported) to contain common image formats (*.jpg, *.png, *.gif, *.bmp, etc.).
To Import a File:
Click on the  button in the Home tab of the ribbon. The cursor becomes a crosshair.
Click anywhere in the GraphWorX64 display and drag to a desired size for the 3D space.
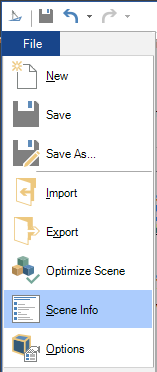
Click the File menu tab.
Select Import and in the Open dialog box navigate to and select the file you are importing (*.xaml, *.3ds, *.dae, *.obj).
The dialog, as shown below, appears. You can use the default settings or customize it if needed.
Import Options
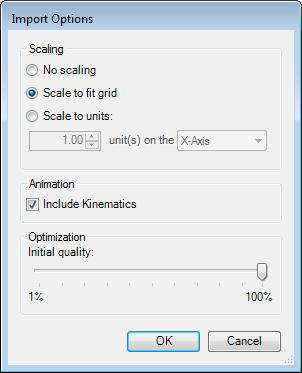
With Scaling options you can determine how or if the object will be adjusted to size.
Kinematics allows you to import the object with already added pick action, if the object or its part allows for movement.
The Initial Quality scale modifies the level of detail imported.
Save the imported model as a GraphWorX64 display (extension *.gdfx). (For a list of all valid file extensions, refer to the Displays and Templates topic.)
When the GraphWorX64 display is saved, you can start to work with the object itself. Double-click the 3D View and you will see the result.
NOTE: An imported model can be un-grouped. If you want to group the objects to one Group, select all the objects you want to have included and click the “Group objects” icon, which is available in the ribbon.
No additional external software or tools are needed in order to import *.xaml or *.3ds files. Any model that is created in *.xaml or *.3ds format can be imported into GraphWorX64 for use in a 2D or 3D displays.
The 3D viewport has selection modes that allow you to select an entire object or a facet of an object for a more refined (although advanced) means for manipulating smart symbols and other objects. For more information, refer to Selection Mode Section of the 3D Home Ribbon.
Autodesk drawing files (*.dwg) and Autodesk data exchange format files (*.dxf) can be directly imported into GraphWorX64 3D Viewer without being converted. As these formats support layers, there are additional options in the import dialog.
To import a file:
Click on the  button in the Home tab of the ribbon. The cursor becomes a crosshair.
Click anywhere in the GraphWorX64 display and drag to a desired size for the 3D space.
Click the File menu tab.
Select Import and in the Open dialog box navigate to and select the file you are importing (*.dwg, *.dxf) .
The dialog, as shown below, appears. You can use the default settings or customize it if needed.
Import Options
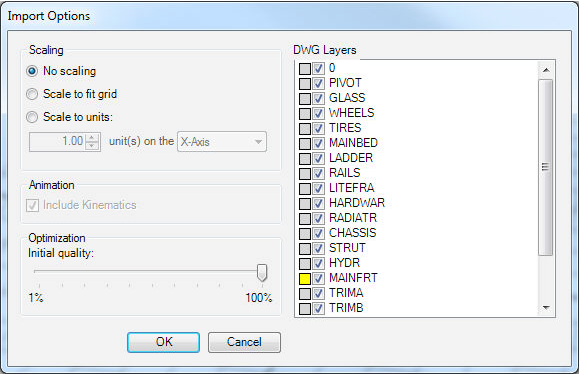
With Scaling options you can determine how or if the object will be adjusted to size.
Kinematics are automatically included during the import of Autodesk files.
The Initial Quality scale modifies the level of detail imported. For Autodesk files, it is highly recommended to set the Initial Quality to 100%.
The DWG Layers menu allows you to select which layers you wish to be included in the import. By default, all layers are included.
Save the imported model as a GraphWorX64 display (extension *.gdfx). (For a list of all valid file extensions, refer to the Displays and Templates topic.)
When the GraphWorX64 display is saved, you can start to work with the object itself. Double-click the 3D View and you will see the result.
The object can now be manipulated in the same way as any other GraphWorX object.
You can export 3D graphics as an Autodesk or a COLLADA file.
Please note that both formats have very limited capabilities regarding the dynamics, and considerable parts of the data could be lost by the export. It is therefore generally impossible to reimport a once exported file back to GraphWorX64 and get the original display. However, if you wish to export a display regardless of the possible limitations, follow these steps:
Be sure that your 3D Viewport is selected.
Click the File menu tab.
Select the Export option.
Enter the file name, make sure that it has the proper extension (*.dwg/*.dxf for Autodesk, *.dae for COLLADA).
Press OK