|
|
The features on this page require a GENESIS64 Advanced license and are not available with GENESIS64 Basic SCADA . |

![]()
|
|
The features on this page require a GENESIS64 Advanced license and are not available with GENESIS64 Basic SCADA . |
![]()
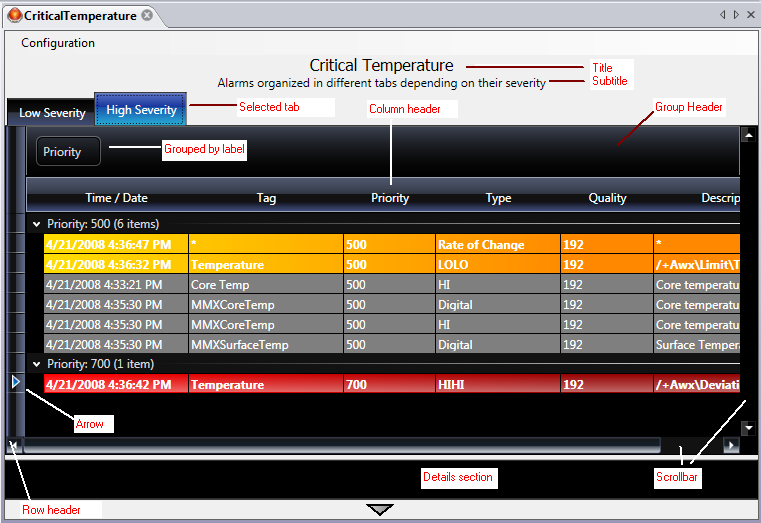
At runtime, the AlarmWorX64 Viewer displays a grid or chart. It can stand alone as its own display, or it might be embedded in a GraphWorX64 display. This topic describes general behavior of runtime alarms in terms on a grid, but alarm behavior varies depending on the alarm and its conditions and requirements. Click here to see an alarm grid at runtime, with its areas labelled for easy reference.
If runtime behavior is not as you expected, review the following configuration options for the alarm:
The alarm tag's configuration (described in Alarm Tags) and
The alarm's use in the grid or chart (described in Working with Alarms).
Generally speaking, the AlarmWorX64 Viewer has been configured to encompasses a set of OPC tags that have been defined as alarm tags in AlarmWorX64 Server. As alarm conditions occur in real-time (or as they replay from history that has been stored by the AlarmWorX64 Logger), alarms are triggered, causing them to appear in the runtime AlarmWorX64 Viewer. Not every alarm tag appears in the viewer; instead, only those that have been triggered by an alarm condition appear in the viewer.
In a grid of real-time alarms, it is likely that you will have to acknowledge at least some alarms. This process is described in Alarm Acknowledgement. You may also want to sort and filter the alarms that appear in the grid. As you sort and filter, additional alarms will be appearing in the grid, while others will disappear from the grid. How you handle these alarms depends on how the alarms are set up and how the grid is set up, but all the tools you need are provided on the runtime toolbar and the runtime ribbon. The toolbar and ribbon may appear by default at runtime, depending on how the viewer has been configured. They are described in detail below.
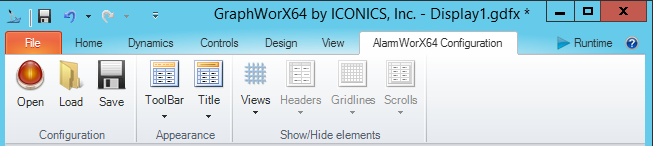
The AlarmWorX Viewer Configuration ribbon contains the options which can be set for runtime. You will see these options also change in the configuration mode, although only sample data is displayed in that mode. To see more information of the AlarmWorX Viewer Configuration tab, open the Display Options topic.
|
|
Warning. Not all AlarmWorX64 features are supported in Silverlight. If you are using Silverlight files, refer to Silverlight Files in GENESIS64 for more information. |
At runtime, an AlarmWorX Viewer has its own runtime toolbar and runtime ribbon.
The toolbar is not necessarily visible or available at runtime unless you configure it to be available. Making it available is handy in case the runtime ribbon is not available. To make the AlarmWorX toolbar available at runtime:
While in configuration mode, on the AlarmWorX Configuration ribbon, click the Toolbar button, then select any option other than None.
Select any option other than None from the drop-down list. The AlarmWorX toolbar will automatically appear in runtime.
To show and hide the AlarmWorX ribbon at runtime, click on and off the chart in runtime. For additional details, refer to Showing the Ribbons and Menus in Runtime.
The AlarmWorX toolbar and AlarmWorX ribbon have the following buttons:
|
Toolbar button |
Ribbon button |
Description |
|
|
|
Pick a View: This button lists the tabs (views) along with information about each, and lets you select one. |
|
|
|
Headers: This button lets you choose the headers to display in the alarm. |
|
|
|
Gridlines: This button lets you hide and show lines in the alarm grid. |
|
|
|
Scrolls: This button lets you control when and whether the scroll bars are shown or hidden. Settings with "Auto" will show the scroll bar only when it is needed. |
|
|
|
Details: Shows and hides the details (total number of alarms, number of visible alarms, and total number of alarm groups) at the bottom of the alarm window. |
|
|
|
Show/Hide Grouping Panel: This button lets you show or hide the grouping panel, which you can use to group alarms by one or more attributes. To group alarms, drag a column header onto the Group Header section and place it above or below any attribute that has already been placed. Grouping operations proceed from bottom to top, with the top most grouping determining the primary set of group. |
|
|
|
Minimize: This button minimizes the alarm groups in the group panel. |
|
|
|
Unselect: This button de-selects all the rows in the alarm grid. |
|
|
|
Sort: Use this button to sort alarms in ascending or descending order, based on the desired attributes. Sorting works in configuration mode and in runtime mode. For more information, refer to Sorting Items in a Grid below in this topic. |
|
|
|
Filter: This button lets you create a filter for the alarms you want to see. Click the button to open a dialog box for setting your criteria. For help doing this, refer to Configuring Filters for Alarm Grids and Charts. |
|
|
|
Confirm: Click this button to confirm an incoming alarm and stop its visual notification (such as blinking). For more information, refer to Incoming Alarms that You Cannot See below. |
|
|
|
Acknowledge: Click this button to acknowledge the selected alarm. You must have rights to acknowledge the alarm. For more information, refer to Alarm Acknowledgement. |
|
|
|
Clear: This button clears the empty rows in the table. This button is enabled only if the alarm's source was configured with its Do Not Delete Rows, Just Clear the Fields option selected on the Source tab, and there are empty rows in the grid. |
|
|
|
Refresh Data: Refreshes the historical data that displays in the chart. Keep in mind that historical information is being constantly updated. If you are looking at recent history, you may need to refresh in order to access the most recent available. |
|
|
|
Time Range: Opens the Set Right Time dialog box, where you can enter the time range of historical data that you want to view. When you click OK or Apply the cursor moves to that time. This button appears only when you are in Freeze mode. |
|
|
|
Reports: Shows the available reports for historical data. |
|
|
|
Load: Loads an AlarmWorX64 Viewer configuration from a file. |
|
|
|
Save: Saves changes to the configuration file. |
|
|
|
Close this toolbar: Hides the toolbar. To show it again, right-click in the grid and select the Show/Hide Toolbar menu item. |
The grid area of the alarm viewer is not always big enough to display all incoming alarms. For example, if there are so many alarms that there is a scroll bar on the grid, new alarms may be arriving outside the page that you are currently looking at. Other alarms may arrive when you are using a filter. There are two options that affect whether you are notified when alarms arrive outside your purview, and both are in the AlarmWorX64 Viewer configurator, on the grid's Advanced tab (for more information, refer to Advanced Display Options) in the Grid Lines section. They are:
IsNotificationEnabled: Set this option to True to turn on notification of incoming alarms to the grid. When a new alarm comes in, the tab on which the alarm arrives turns red, the text of the grid's column heading becomes red, the new alarm blinks, and the Confirm button on the runtime ribbon becomes available.
ShouldNotifyOnFilter: If this option is set to True, when you are using a filter, if new alarms occur that fall outside the filter you will be notified that new alarms are arriving outside the filter. The default is False.
To stop the blinking and other visual notification cues, click the Confirm button on the runtime ribbon. This stops the blinking for the new alarm only, confirming that you have been notified. Additional alarms will repeat the notification.
Sorting works in configuration mode and in runtime mode. To sort a grid:
Click the column header.
Click the Sort button on the runtime AlarmWorX toolbar ![]() or AlarmWorX ribbon
or AlarmWorX ribbon ![]() .
.
In the dialog box that appears, you can sort in ascending or descending order.
Click on the column header again.
To group items in a grid:
The grid must be configured for grouping items. Create a condition or grouping filter set for a grid in the configurator .
In either runtime or configuration mode click and drag a column header onto the Group Header section of the grid.