![]()
![]()
The Import/Export section of the Home Ribbon in the Workbench allows users to utilize packages of projects for future use, potentially on the same or different machine(s), for Runtime use or for further Configuration.
Import/Export Section of the Home Ribbon in the Workbench

The Import/Export section is comprised of the following components:
The Pack Project feature allows users to move whole configurations from one installation to another using a single file. It includes only the Configuration data itself, packing both files and database data. It also includes the ability to restore the active database.
To Pack a Project:
Pack Project Button

Create a package for the project Window
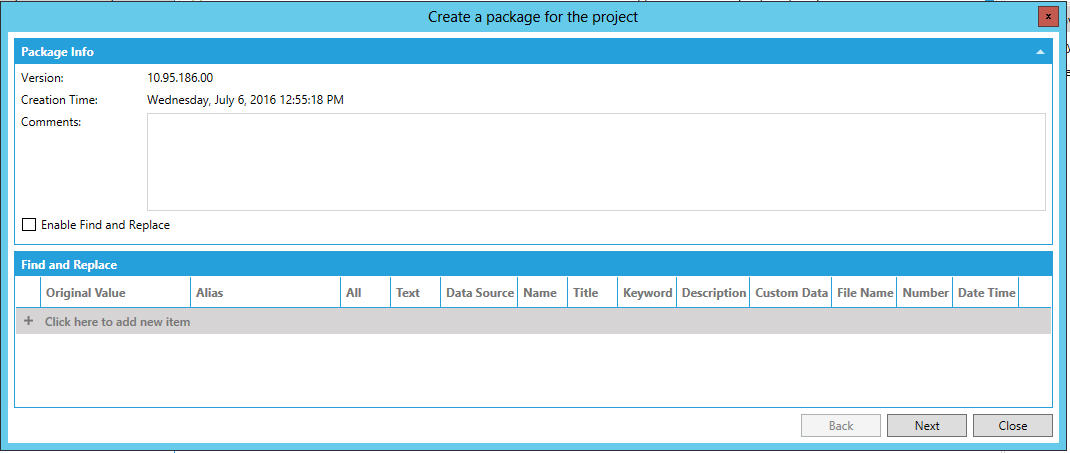
The Create a package for the project Window will automatically show the Version and Creation Time of your current project.
Comments - Use the text entry field to include any information you feel should accompany your packed project, including any instructions or any identifying features for this specific project that you feel may be useful for whomever will unpack it later.
Enable Find and Replace - Click on this checkbox in order to activate the lower section of the window.
Click here to add new item - Click on this to add a new item for search and replacement in the packed project. For each value to be replaced, enter an Original Value and Alias, and then specify properties where replacements are to be made by selecting from All, Text, Data Source, Name, Title, Keyword, Description, Custom Data, File Name, Number, or Date Time. These properties are described in the table below. Once you start to edit one row, a new row will appear beneath it. The log file that is created after packing and unpacking will show you what strings were replaced. Once you have finished making your entries, click Next.
Properties Where Replacements Are to Be Made
|
Option: |
Replaces the Original Value in the following properties: |
|
All |
All of the properties listed below |
|
Text |
Text property of objects |
|
Data Source |
OPC tags used as data sources in objects' DataSource property |
|
Name |
|
|
Title |
Title property of objects such as AlarmWorX and TrendWorX objects |
|
Keyword |
Keyword property of objects |
|
Description |
Description property of objects |
|
Custom Data |
CustomData property of objects |
|
File Name |
|
|
Number |
|
|
Date Time |
|
Click the Next button to advance to the next step in the import process.
The Create a package for the project window now displays the Encryption and Compression and application selection settings, as shown below.
Encryption and Compression and Application Selection Settings in the Create a package for the project Window
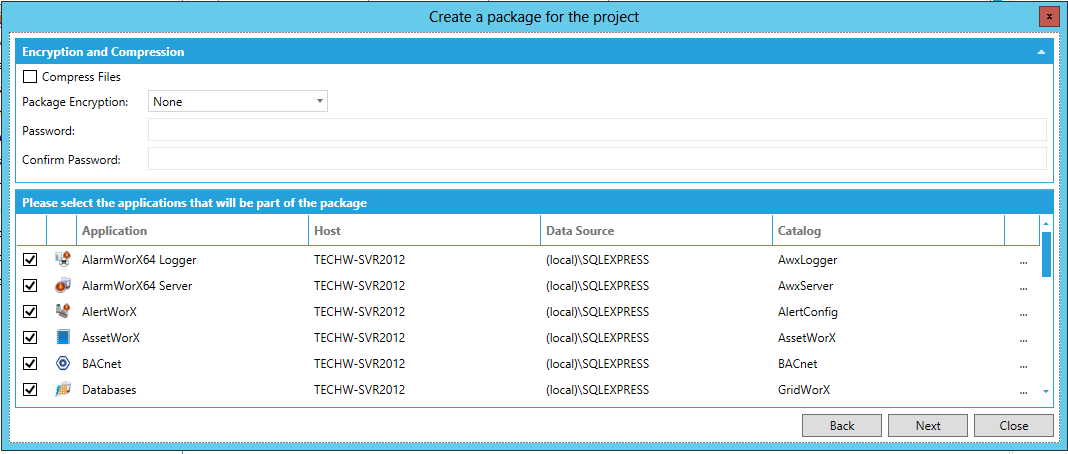
Users can opt to set encryption and/or password protection for previously generated packed projects. [Note: These settings are available as part of the packing procedure itself. This button is to retroactively add encryption or password protection to existing files].
Compress Files - Click this checkbox if you wish to reduce the total file size of the packed project via file compression.
Package Encryption - Use the pulldown menu to select the type of package encryption you would like for the packed project.
None - Select this to include no password protection or encryption for the packed project.
Protected - Select this to include password protection only for your packed project. [NOTE: Password protection can be challenged with the help of ICONICS Technical Support, but provides only limited security as the package is not encrypted.]
Encrypted - Select this to include both password protection and file encryption for your packed project. [NOTE: If you lose or forget the password for encryption, it cannot be recovered. It is advisable to keep a list of passwords and their corresponding package names in a safe place. Remember that passwords are case sensitive.)
Password - Choose a Password for your packaged project.
Confirm Password - Enter the same password again.
You have the option of selecting individual Applications (Providers) to be included in the packed project.
Once you have finished making your selection of applications, click on Next.
The Create a package for the prokect window then shows the Display Files Options and the Display Files settings, as shown below.
Display Files Options and Display Files Settings
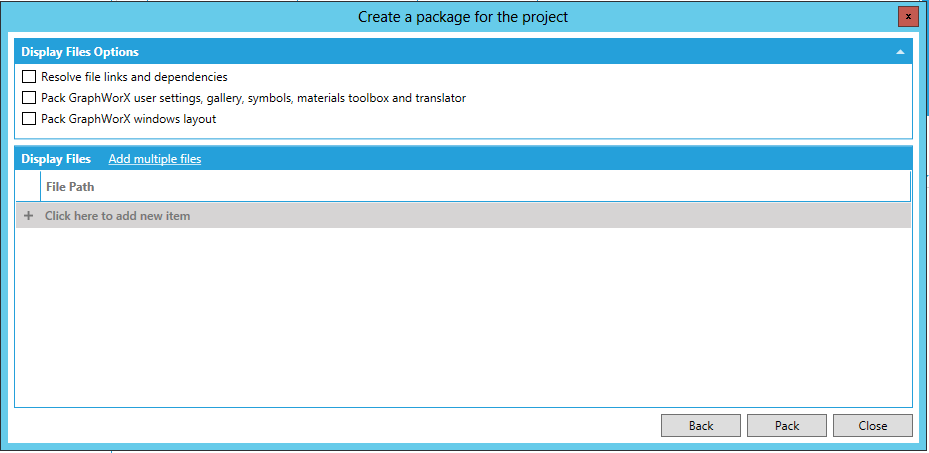
Resolve file links and dependencies - Click this checkbox to resolve file links (dependencies) in the packed project.
Pack GraphWorX user settings, gallery, symbols, materials toolbox and translator - Click this checkbox to include GraphWorX components (user settings/gallery/symbols/materials/toolbox/translator) in your packed project.
Pack GraphWorX windows layout - Click this checkbox to include GraphWorX windows layout in your packed project.
Add multiple files- Click this button to launch a file browser, allowing you to navigate to display files that you would like included with your packed project.
+ Click here to add new item - Once you have clicked on this selection, you will be able to enter the File Path to your selected display or you can click on the  button to navigate directly to your selected file.
Once you have made your desired updates to this window, click Pack to begin packing your project.
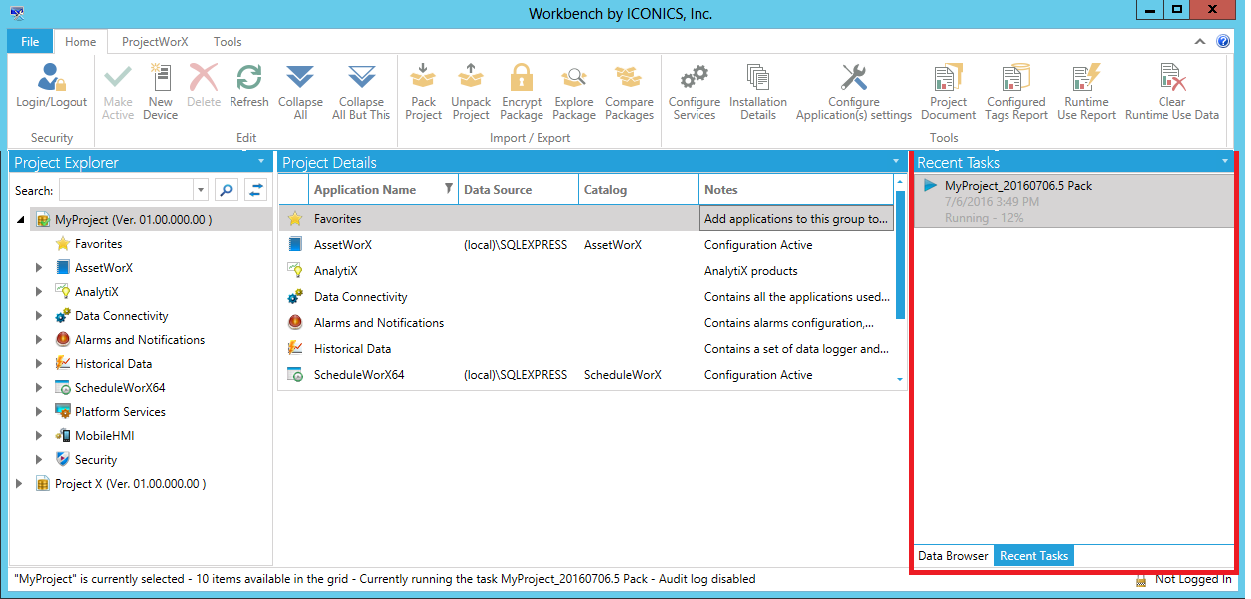
The Workbench then begins to process the packaged project. You can see the status of the project in the Task Panel in the right side of the Workbench, as shown below.
Project Packing Status in the Task Panel in the Workbench
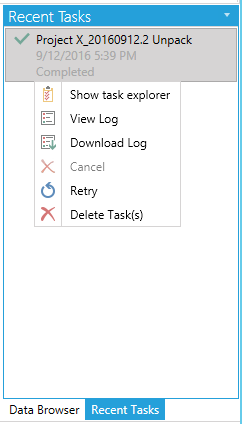
Right-click the task in the Recent Tasks panel to see related options, as shown below. Note: These are the same options (except for 'Show task explorer') that are available for the same task type in the Task Explorer.
Right-click Options for a Pack Task in the Recent Tasks Panel
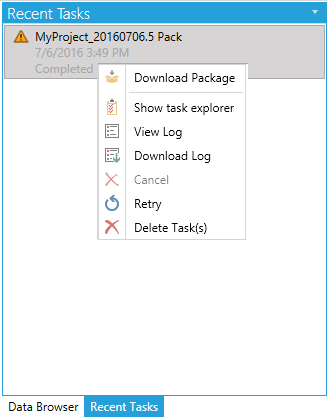
You can select to Download Package, as shown above. You can save the file in the default location or set your own file name and destination. Once saved, the packed file is now able to be unpacked for future use. You can also elect to show the task explorer, view or download the task log, cancel or retry the packing procedure or delete the selected task.
The Unpack Project feature works in tandem with the Pack Project feature to utilize saved (or "packed") configuration files. These files contain Configuration data (both files and database data) and the ability to restore an active database.
To Unpack a Project
Unpack Project Button

Unpack a package into the project Window
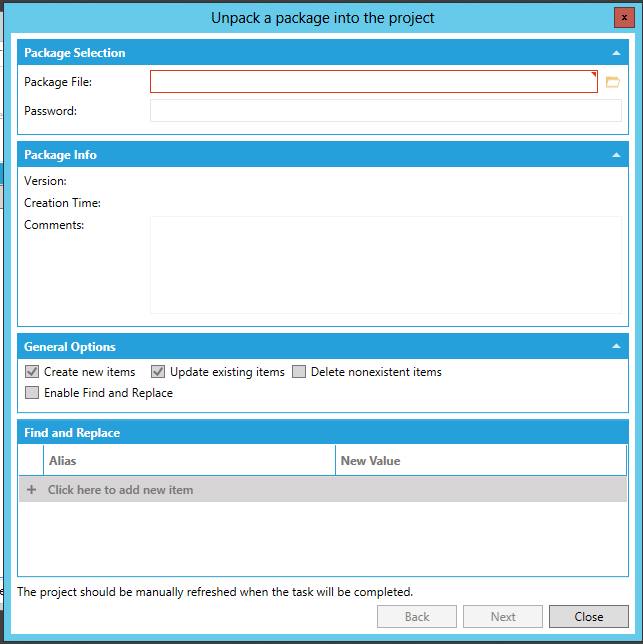
Package File - Select the package you wish to extract by entering the location in the text entry field. You can also click on the  button, which launches a file explorer, allowing you to locate your previously packed configuration/project. This can be a Package file (.pkgz) or a compressed file (.zip).
Password - If you opted to encrypt your selected packaged project, you can enter the password for it here.
The Create a package for the project Window will automatically show the Version, Creation Time, and Comments from the selected packed project.
Create new items - Click this checkbox if you would like to add new items to the selected project in the Workbench from the package that is about to be unpacked.
Update existing items - Click this checkbox if you would like to update existing items in the selected project in the Workbench from the package that is about to be unpacked.
Delete nonexistent items - Click this checkbox if you would like to remove items from the project in the Workbench that are not present in the package that is about to be unpacked.
Enable Find and Replace - Click on this checkbox in order to activate the lower section of the window.
See info on Find and Replace in the Pack Project section of this topic.
Note that the project in the Workbench into which the unpacked project will be inserted should be manually refreshed once the unpack task is completed.
Click Next to proceed.
You will then be able to select the individual applications (providers) that you would like to include in the target project from the package, as shown below.
Application Selection During Package Unpacking
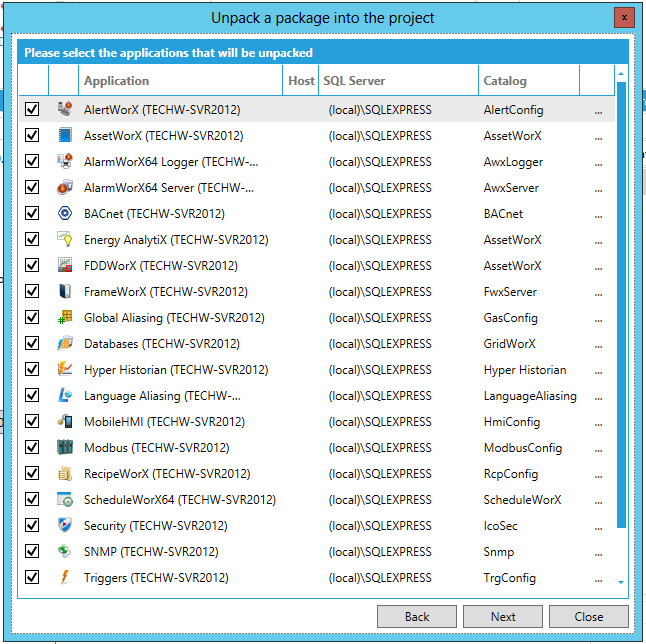
When you have completed making your application selections, click Next to continue.
The Display File Options will appear, as shown below.
Display Files Options During Unpacking
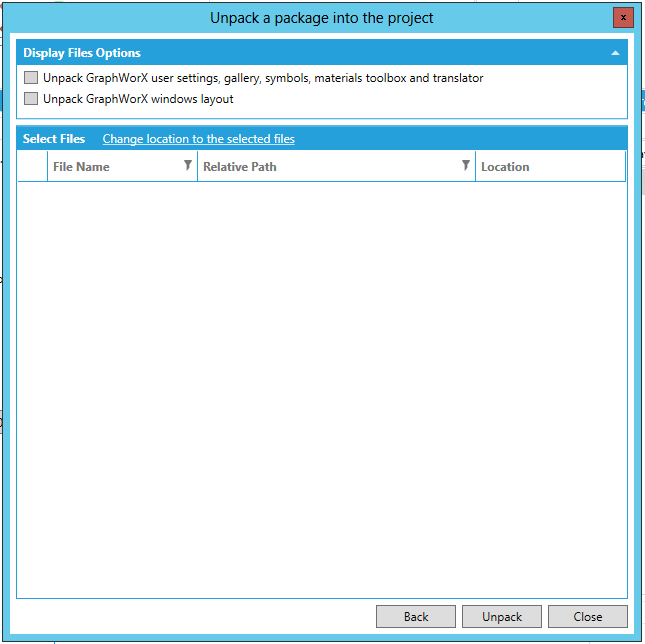
You can then opt to Unpack GraphWorX user settings, gallery, symbols, materials toolbox and translator and/or Unpack GraphWorX windows layout.
You can now select locations for the display files that you selected during the Pack process by clicking on the individual File Name and then providing the Relative Path and Location. You can also click on the Change location to the selected files link.
Once you have completed making your changes, click on the Unpack button.
The Workbench then begins the process of unpacking the project. You can see the status of the project in the Task Panel in the right side of the Workbench, as shown below.
Unpacking Project in the Recent Tasks Panel

You can right-click on the running task to perform other actions, such as Show task explorer or View log, both which will show more details about the unpacking process. You can also opt to Cancel the in-progress task. Once the unpack task has completed, you can also Download Log, Retry, or Delete Task(s).
Unpack Task Options in the Recent Tasks Panel
Once the task has completed, you can refresh the Workbench's Project Explorer and expand the project where you unpacked your package to see the results.
The Encrypt Package feature allows users to set encryption and/or password protection for previously generated packed projects. [Note: These settings are available as part of the packing procedure itself. This button is to retroactively add encryption or password protection to existing files].
To Encrypt a Package:
Encrypt Package Button

Package Protection Window
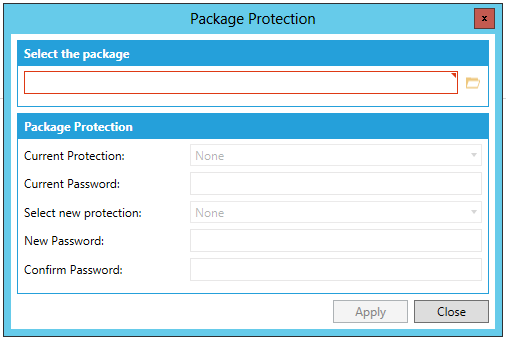
Select the package - Select the package you want to protect by entering its location in the text entry field or click on the  button, which will open a file explorer, allowing you to navigate to your selected packed project.
Once you have selected a packed project to encrypt, the Package Protection section of the window is enabled.
Current Protection - This will show the current state of the protection of the selected packed project.
Current Password - If the selected package is already Protected or Encrypted, you can enter the current password in the text entry field.
Select package protection - Use the pulldown menu to select the type of package encryption you would like for the packed project.
None - Select this to include no password protection or encryption for the packed project.
Protected - Select this to include password protection only for your packed project. [NOTE: Password protection can be challenged with the help of ICONICS Technical Support, but provides only limited security as the package is not encrypted.]
Encrypted - Select this to include both password protection and file encryption for your packed project. [NOTE: If you lose or forget the password for encryption, it cannot be recovered. It is advisable to keep a list of passwords and their corresponding package names in a safe place. Remember that passwords are case sensitive.)
New Password - Choose a Password for your packaged project.
Confirm Password - Enter the same password again.
Click Apply to save your settings, then Close to return to the Workbench.
The Explore Package feature allows users to review the elements of a package while they are still in a packed file format.
To Explore a Package:
Explore Package Button

Explore a package Window
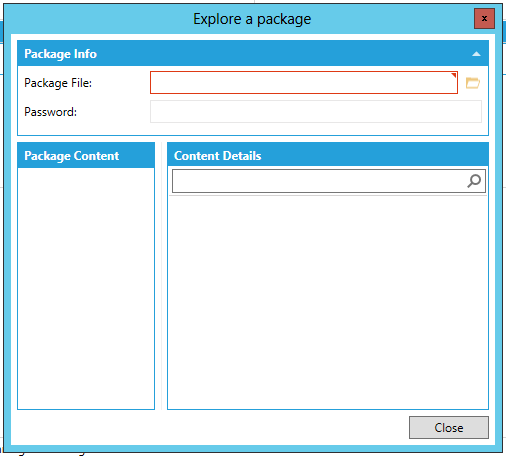
Package File - Select the package you want to explore by entering the file location in the text entry field or click on the button to access the file browser, which allows you to navigate to your selected package.
Password - If the package is Protected or Encrypted, you can enter the password in this text entry field.
Once you have selected your package (created via Pack Project), it will populate the Package Content section of the window, as shown below. Some selected Package Content items will also provide properties in the Content Details section.
'Explore a package' Window with Populated Package Content and Content Details Sections
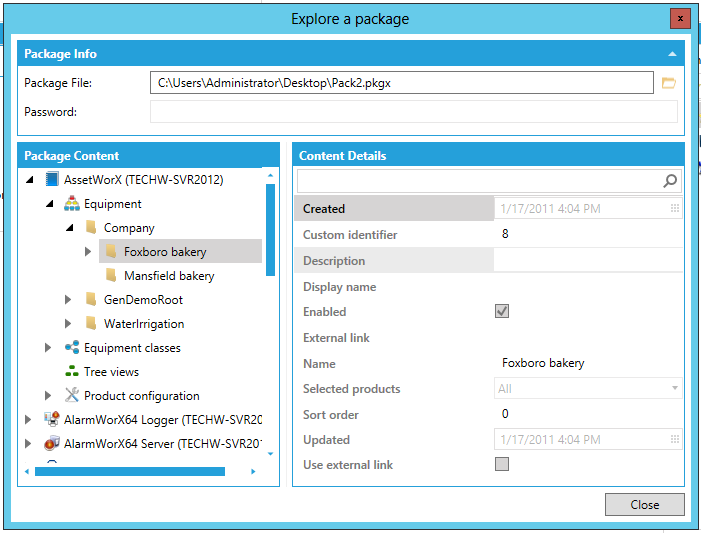
Some items in the Package Content section that provide Content Details properties can be expanded further, similar to how they would act within the Workbench's Tree Explorer. The example above shows the AssetWorX provider expanded to show the branch "Company" and the selected sub-branch "Foxboro bakery", which is populating the Content Details section.
Click Close to close the 'Explore a package' window.
The Compare Packages feature allows users to perform a comparison of the elements of two packages OR between one packed project and the currently loaded project within the Workbench.
To Compare Packages:
Click on the Compare Packages button in the Import/Export section of the Home ribbon in the Workbench, as shown below.
Compare Packages Button

This opens the Compare the content of two packages window, as shown below.
'Compare the content of two packages' Window
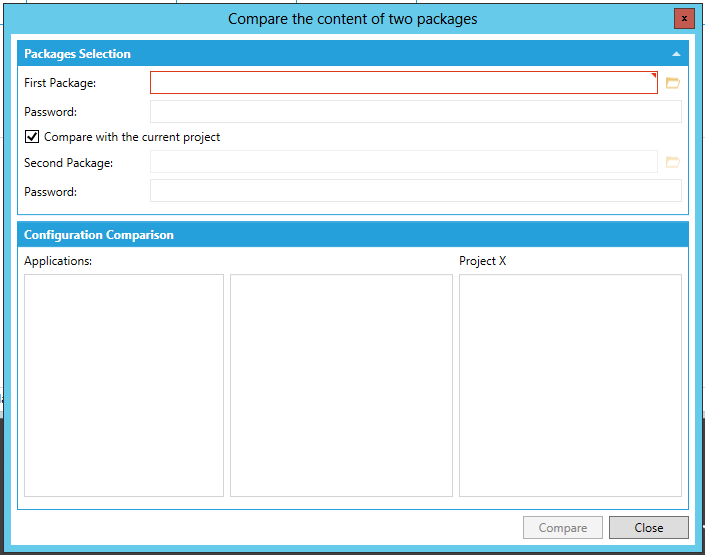
First Package - Enter the location of the first package for comparison or click on the button to navigate to your selected package file.
Password - If the package is Protected or Encrypted, you can enter the password in this text entry field.
Compare with the current project - Click this checkbox in order to perform a comparison with one (1) single packed project and the currently loaded (unpacked/not-yet-packed) project in the Workbench. Once selected, it deactivates the ability to select a second package.
Second Package - If the Compare with current project box is unchecked, you can enter the location of the second package for comparison or click on the button to navigate to your selected package file.
Password - If the second selected package is Protected or Encrypted, you can enter the password in this text entry field.
Once you have selected your projects for comparison (packed or otherwise), click on the Compare button.
The Configuration Comparison section will then display the common items within both projects. In the Applications section, each application will be listed and a green checkmark  denotes if either package contains that application, in order of selected packages (First Package then Second Package, or First and Current Project [which will be shown with its provided project name]). If a selected project does not contain that application, that is denoted by a red 'X' (
 ). The example below shoes the AssetWorX component highlighted with two green checkmarks
  . This signifies that the First Package ("Pack1") and the Second Package ("Pack2") both contain the AssetWorX application.
Populated Configuration Comparison Section in the 'Compare the content of two packages' Window
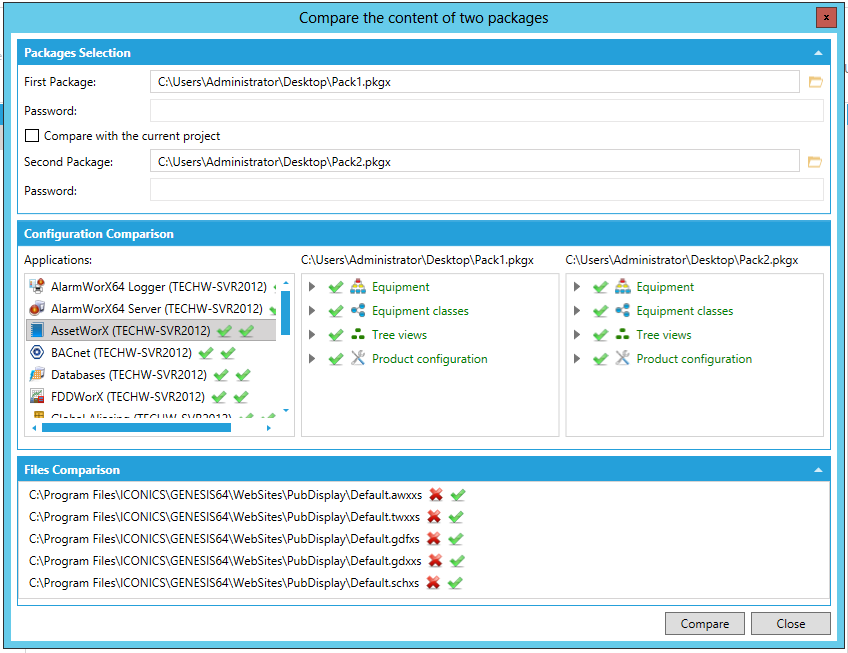
When an application is selected within the Configuration Comparison section (such as how the AssetWorX application is selected in the example above), and it is present in both packages, you will be able to see an additional level of comparison, with two additional added sections to the right; the first being the selected First Package and the second being either the current project or the Second Package. In the example above, both packages share the same elements within AssetWorX, as denoted by the green checkmark () to the left of each item. Note that these items can expanded even further, similar to how they would act within the Workbench's Tree Explorer.
If any files (display, etc.) were included in either of the selected packages, they will appear in this section. Similar to the Applications section, the presence of the listed files in either package is denoted by a green checkmark () or red X (). Using the example above, you can see that none of the listed files are included in the First Package ("Pack1"), but all are included in the Second Package ("Pack2").
Once you have completed your review of the package comparison, click Close to close the 'Compare the content of two packages' window.
See Also: